Text wrapping in Canva helps you make your designs look neat and professional. It means making your text flow nicely around images or shapes, instead of just sitting in a plain box.
While you are working with images, you might also find it useful to know how to flip an image in Canva or even how to replace an image in Canva to get your composition just right.
Even though Canva doesn’t have an automatic text wrapping tool, you can still wrap text by resizing your text boxes with the white pill handles and placing them next to your images or shapes.
You can also use the toolbar to change the font, adjust alignment, and play with spacing so your paragraph fits well.
For more advanced text edits, learning how to highlight text in Canva can also make important information stand out.
For special shapes, like circles, you can use the Effects tool to curve your text and make it wrap around the shape.
This way, your designs look better and are easier to read, whether someone is viewing them on mobile devices or a computer.
With a few simple steps, you can use text wrapping to make your Canva projects stand out and share your ideas clearly.
What is Text Wrapping and Why Use It?
Text wrapping helps text flow around pictures and design parts.
This creates a more natural look. It makes the layout look better by linking words with images. This shows how they relate to each other.
For instance, you could be designing a promotional graphic and need to know how to put a timer in Canva to build anticipation; wrapping text around it would integrate it smoothly.
Text wrapping also uses space better, especially when there is not much room. It helps give a clean and nice look.
Canva does not have an automatic text wrap like Microsoft Word.
However, it has other ways to get similar results with some changes you make. Learning these skills gives you more choice and control over your designs.
Types of Text Wrapping Possible in Canva
Canva offers several approaches to text wrapping, each suitable for different design scenarios. Understanding these options helps you select the most appropriate technique for your specific project needs.
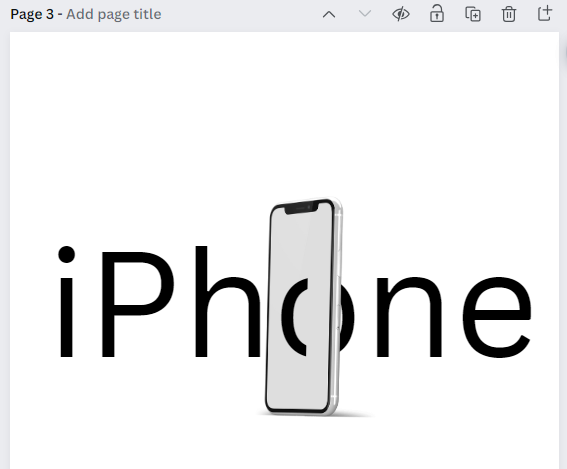
The first method involves manipulating text boxes around your images or shapes. By adjusting the size and shape of your text boxes, you can create the illusion of text wrapping around objects. This technique works well for rectangular images and simple shapes.
Sometimes, you might want to alter the image itself, and learning how to slice in Canva can offer more creative possibilities.
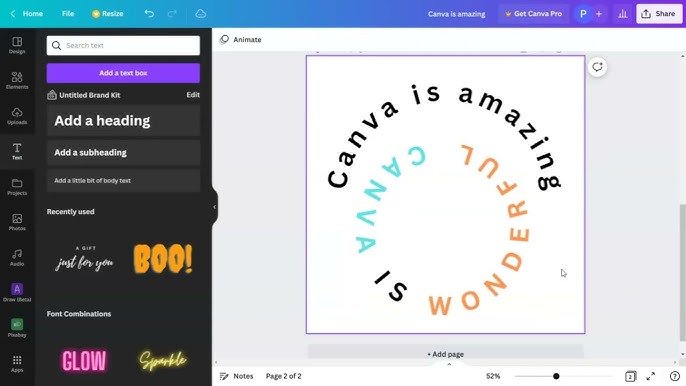
For circular or oval objects, Canva offers a specialized text curving tool found in the Effects panel.
This feature, which is detailed in guides on how to curve text in Canva, allows text to follow the contour of circular shapes, creating an organic flow. More complex wrapping effects can be achieved by using multiple text boxes positioned strategically around your images.
While more time-consuming, this approach offers the greatest control over text placement and flow.
For advanced designs, you can create custom text wrapping by duplicating shapes and positioning them carefully to create the illusion of text flowing around complex forms. This technique requires more effort but produces highly customized results for unique design challenges.
Text Wrapping Vs. Standard Text Formatting
Understanding the differences between text wrapping and standard text formatting helps clarify when each approach serves your design needs best.
Standard text formatting in Canva involves working with rectangular text boxes where text flows in straight lines from top to bottom.
For more structured paragraphs, you may find it useful to learn how to indent in Canva. The text box maintains its shape regardless of other elements on the canvas. This approach works well for simple designs or when text needs to maintain strict alignment.
Text wrapping, by contrast, creates a more dynamic relationship between text and other design elements. The text adapts to the contours of images or shapes, creating visual interest and a more integrated composition.
Wrapped text draws the viewer’s attention to both the text and the object it surrounds, establishing a stronger connection between these elements.
When deciding between these approaches, consider your design objectives. Standard formatting provides clarity and simplicity, while text wrapping offers visual interest and space efficiency.
Professional designers often combine both techniques within a single project, using standard formatting for headings and important information while employing text wrapping for body text around images.
The Significance of Text Wrapping in Design
Enhancing Readability and Comprehension
Text wrapping makes reading easier. It helps the eye move smoothly across the page. When text flows around images, it keeps the reader interested.
Good text wrapping shows how text and pictures relate to each other. This helps readers understand better.
It also makes it easier for the brain to take in what they read. By changing text boxes and aligning images well, you can create space.
This space stops things from looking messy. It keeps readers focused instead of feeling lost in big blocks of text.
Elevating Design Aesthetics
Text wrapping makes simple layouts look better.
It allows text to flow around images nicely. This creates a look that is more polished than plain boxes. To further refine your text, you might want to learn how to add shadow in Canva for a subtle, professional touch.
Using this method helps blend text and pictures. This results in a nice, balanced design that looks professional.
Furthermore, text wrapping adds space between design parts. This space gives rhythm and movement.
It helps keep viewers interested in your design.
Ensuring Consistency and Cohesion
Consistent text wrapping techniques throughout a multi-page document or across a brand’s marketing materials create a recognizable visual language that strengthens brand identity. For larger projects, such as learning how to create a lookbook in Canva, this consistency is key.
When viewers encounter similar wrapping patterns across different designs, they subconsciously register this consistency as professional and trustworthy. Text wrapping helps establish and maintain visual hierarchy by controlling how text interacts with focal elements. This consistent approach to organizing information guides viewers to process content in the intended sequence, improving communication effectiveness.
Accommodating Different Mediums
Text wrapping techniques can be adapted for various design formats, from social media posts to print materials.
When creating shareable documents, knowing how to add a clickable link in Canva PDF can make your designs more interactive.
Understanding how to modify your approach for different canvas sizes ensures your designs translate effectively across mediums.
For mobile devices, thoughtful text wrapping becomes even more critical due to limited screen space. Properly wrapped text maintains readability on smaller screens while preserving the relationship between text and images.
When designing responsive layouts, text wrapping techniques must be adjusted to account for how text and images will reflow on different devices. Canva’s positioning and alignment tools help ensure your wrapping strategies work across various viewing contexts.
Facilitating Accessibility
Strategic text wrapping improves accessibility by creating a clear visual separation between content sections. This organization helps users with cognitive disabilities navigate your design more easily.
Proper spacing achieved through careful text wrapping enhances readability for users with visual impairments who may use screen magnification. The clear delineation between text and images reduces confusion and eye strain.
How To Wrap Text In Canva?
Step 1: Open Canva and Create A New Design
Start by logging into your Canva account and selecting “Create a design” from the home page. Choose a template that suits your project needs or create a custom-sized canvas by entering your desired dimensions.
If you need to switch orientations, you can learn how to landscape in Canva easily. For optimal text wrapping results, consider the amount of content and imagery you’ll need to accommodate. Larger canvases typically offer more flexibility for text wrapping techniques, while smaller formats require more precise text box adjustments.
Before adding any elements, plan your layout mentally or sketch it on paper. Deciding where images and text will interact helps you anticipate which text wrapping approaches will work best for your specific design.
Step 2: Insert Text and Image
Upload your image by clicking the “Uploads” button in the left sidebar or select from Canva’s extensive library of stock photos and graphics.
Position your image on the canvas where you want it to serve as the focal point for your text wrapping. For a clean look, you may want to cut out an image in Canva before placing it.
Add text by clicking the “Text” option in the left toolbar.
Choose from heading, subheading, or body text options based on your content hierarchy needs.
For text wrapping, you’ll often need multiple text boxes, so don’t worry about fitting all your content into a single text element.
If you’re planning to wrap text around a circular object, consider using a circular image or shape from the “Elements” section.
Circular text wrapping requires a different technique than wrapping around rectangular images.
Step 3: Adjust The Text Box
With your text added to the canvas, it’s time to shape it around your image.
Select your text box and look for the white pill handles that appear on its edges. These handles allow you to resize and reshape the text box to flow around your image. For basic text wrapping, create a text box that extends to one side of your image.
Type or paste your content, then adjust the width of the text box using the white pill handles until the text aligns neatly alongside your image.
Canva automatically reflows text within the box as you adjust its dimensions. Experiment with different text box shapes-wide and short, tall and narrow-to see how the text flow changes and which arrangement best complements your image.
Step 4: Position Text Around The Image
Move your text box into position beside your image, leaving an appropriate margin of space between them. This space creates visual breathing room that prevents your design from feeling crowded. To soften the edge of an image, you might want to learn how to fade an image on Canva.
For more complex wrapping, you’ll need to create multiple text boxes that follow the contours of your image. Position each text box strategically to create the illusion of continuous text flowing around the image.
Use Canva’s alignment tools (accessible when you select multiple elements) to ensure your text boxes maintain consistent distances from your image.
This precision creates the professional appearance of true text wrapping.
Step 5: Use Spacing and Line Height Adjustments
Fine-tune your text wrapping by adjusting paragraph spacing and line height. Select your text box and look for these options in the text formatting panel at the top of the screen.
Increasing line height (the space between lines of text) can improve readability, especially when text wraps around irregular shapes.
Similarly, adjusting paragraph spacing helps create visual separation between content sections.
For multi-paragraph text, consider using different spacing settings depending on how close the text comes to your image.
Paragraphs directly adjacent to images may benefit from increased line height to create more visual separation.
Step 6: Duplicate Text Boxes (Optional)
For longer content that needs to wrap around multiple sides of an image, consider duplicating your text boxes. This approach gives you greater control over how text flows throughout your design.
To duplicate a text box, select it and press Ctrl+D (Windows) or Cmd+D (Mac). Alternatively, right-click and select “Duplicate” from the context menu. Position the duplicate text box where the next segment of text should appear.
When using multiple text boxes, maintain consistency in font, size, color, and spacing to create the illusion of continuous text flow.
Any variations in these properties will disrupt the wrapping effect and call attention to the separate text boxes.
Advanced Text Wrapping Techniques

Wrapping Text Around A Circle
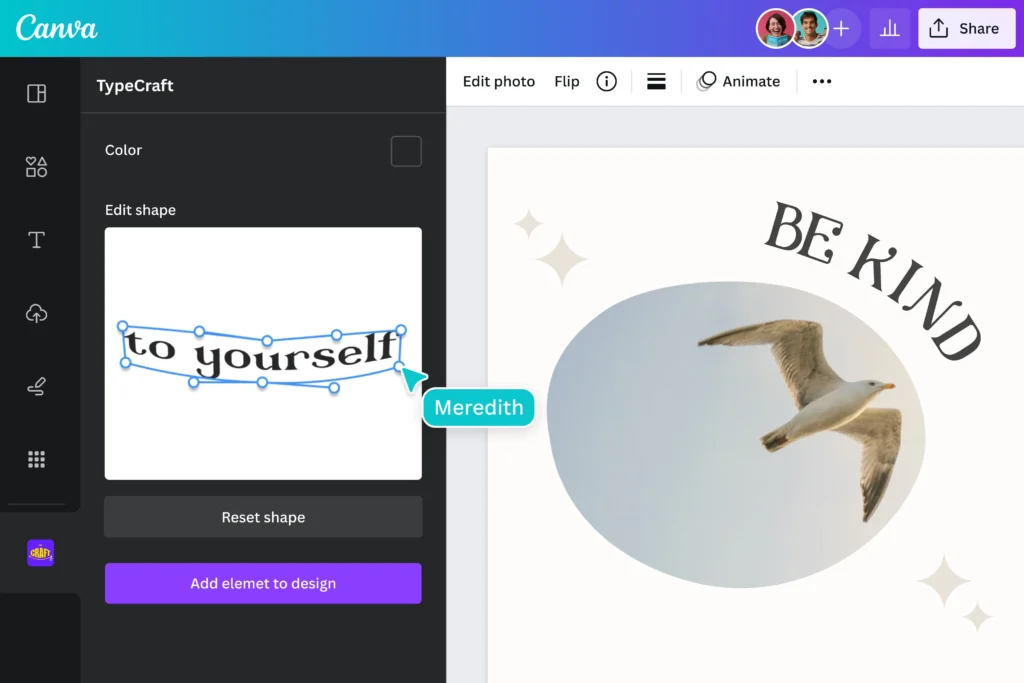
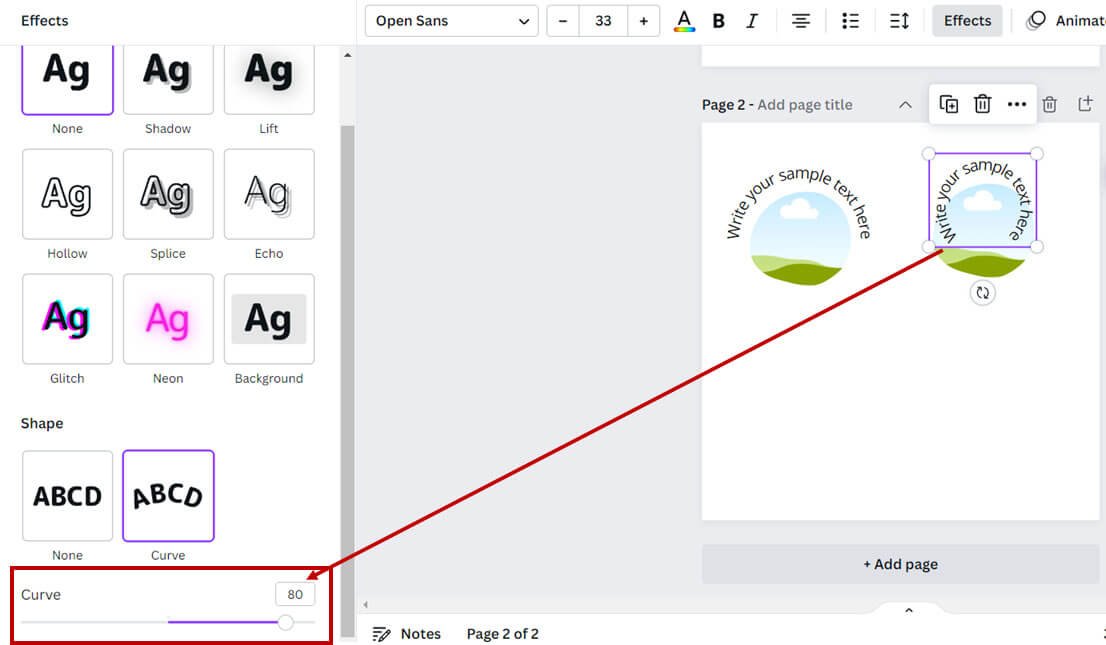
Canva offers a specialized feature for wrapping text around circular objects. Select your text, click on “Effects” in the top toolbar, then choose “Curve” under the Shape section.
Adjust the curve radius using the slider that appears. A smaller radius creates a tighter curve, while a larger radius produces a gentler arc. Experiment with this setting until your text follows the contour of your circular object naturally.
For text that needs to wrap completely around a circle, you may need to create two curved text elements-one for the top arc and another for the bottom. Adjust each separately to create a complete circular text wrapping effect.
Creating Complex Wraps With Multiple Text Boxes
For irregular shapes or complex images, create a series of text boxes that follow the contours of your object. This approach requires more manual adjustment but offers precise control over your text placement.
Start by positioning text boxes around the straightforward sections of your image. Then add additional text boxes to accommodate protrusions or indentations in the shape. Adjust each text box individually to create a cohesive wrapping effect.
Use Canva’s grouping feature to keep your carefully positioned text boxes together. Select all related text boxes, right-click, and choose “Group” from the context menu. This prevents accidental disruption of your text wrapping arrangement.
Using The “Effects” Tool For Text Shaping
Beyond the curve effect, Canva’s Effects panel offers additional text transformations that can enhance your wrapping techniques. You can even learn how to flip text in Canva for more creative options.
Explore options like wave, circle, and arch to create more dynamic text arrangements around your images.
Combine different effects for more complex wrapping scenarios. For example, use curved text for circular elements and standard text boxes for straight edges within the same design.
Remember that not all fonts support all text effects equally well.
If you want to use your own fonts, it’s good to know if you can upload fonts to Canva. Sans-serif fonts typically work better for curved text, while serif fonts may distort or become less readable when heavily manipulated.
Test different font options to find the most effective combination for your specific design.
Design Tips For Effective Text Wrapping
Utilizing Canva’s Grid and Alignment Tools
Enable Canva’s grid feature by clicking the menu icon in the top-right corner and selecting “Show grid.” This overlay helps you position text boxes with precision, creating more professional text wrapping effects.
Use alignment tools to maintain consistent spacing between your text and images. Select both elements, click “Position” in the top toolbar, and explore alignment options that help create a balanced, professional appearance.
When working with multiple text boxes, use the grid to ensure they align perfectly with each other. This precision creates the illusion of continuous text flow even though you’re using separate text elements.
Combining Text and Shapes For Visual Interest
Include shapes from Canva’s Elements section to create more dynamic text wrapping opportunities. Simple shapes like circles, triangles, or custom organic forms provide interesting contours for text to wrap around.
Layer semi-transparent shapes between your text and images to create depth and visual interest. This technique adds sophistication to your text wrapping while maintaining readability. Experiment with contrasting shape styles against your text wrapping patterns.
For example, wrap text fluidly around rigid geometric shapes, or use structured text blocks around organic, flowing images.
Ensuring Contrast and Readability
Maintain a strong contrast between your text and background to ensure readability. To help your text stand out, you can learn how to outline text in Canva. Even the most elegant text wrapping fails if viewers struggle to read the content.
Consider adding a subtle shadow or highlight to text that wraps close to complex images. This effect creates visual separation that enhances readability without disrupting your wrapping design.
Test your text wrapping designs at various zoom levels to ensure readability across different viewing contexts.
What looks perfectly spaced at 100% zoom might appear crowded or disconnected at other magnifications.
Implementing Visual Hierarchy
Use different text formatting styles to establish hierarchy within your wrapped text. Vary font size, weight, or color to indicate the relative importance of different content sections.
Position your most important content where the text wrapping creates natural focal points. Areas where text curves dramatically or creates interesting negative space naturally draw the viewer’s eye.
Consider how your text wrapping affects the overall flow of information through your design. The wrapping pattern should guide viewers through your content in a logical, intuitive sequence that supports your communication goals.
Troubleshooting Common Text Wrapping Issues
Fixing Alignment Problems
If text appears misaligned around your images, check that you’re using the white pill handles to precisely adjust each text box. Small misalignments can disrupt the professional appearance of your text wrapping.
When text wrapping looks uneven, enable Canva’s rulers and guides (available in the View menu) to ensure consistent spacing between text and images throughout your design.
For stubborn alignment issues, try grouping and ungrouping elements, then realigning them. Sometimes this reset helps resolve positioning conflicts between text boxes and images.
Dealing With Text Overflow
When text extends beyond your desired wrapping area, adjust the text box size or break your content into additional text boxes. Balancing content volume with available space is important for effective text wrapping.
If reducing the text box size causes awkward word breaks or hyphenation, try rewording your content to better fit the available space.
A common question is, “Does Canva have spell check?” Knowing this can help you proofread any changes.
Often, slight content edits can resolve visual flow problems without compromising your message.
For designs with strict space limitations, consider using font size or line height adjustments before resorting to content cuts. Sometimes, a one-point reduction in font size or a slight decrease in line height provides enough space without affecting readability.
Font Compatibility Concerns
Some fonts may display inconsistently when used with Canva’s curve and other text effects. If your wrapped text appears distorted, try alternative fonts with similar aesthetic qualities but better technical performance.
Decorative or script fonts often present challenges for text wrapping due to their complex letterforms. For critical text wrapping elements, consider using cleaner sans-serif fonts that maintain legibility when manipulated.
When wrapping text in designs for both digital and print use, test fonts that perform well across mediums.
It’s also vital to ensure you have the right to use your chosen visuals; you can learn more about whether Canva images are copyright-free in our related article.
Some fonts that display beautifully on screen may lose definition when printed, compromising your carefully crafted text wrapping.
FAQ’s:
Does Canva Have A Built-In Text Wrap Feature?
Canva does not have an automatic text wrap feature like Microsoft Word.
This often leads users to wonder how much Canva Pro costs and if it includes more advanced features.
Instead, you’ll need to manually adjust text boxes around images or use the curve effect for circular wrapping.
While this requires more effort, it also offers greater creative control over exactly how your text interacts with images and shapes.
How Can I Wrap Text Around Multiple Objects?
To wrap text around multiple objects, create separate text boxes for each area where text needs to flow. Position these text boxes strategically around your objects, adjusting their size and shape using the white pill handles.
Maintain consistent spacing and formatting across all text boxes to create the illusion of continuous text flow.
Can I Wrap Text Around Shapes As Well As Images?
Yes, you can wrap text around shapes in Canva using the same techniques as for images.
For geometric shapes, create text boxes that follow the straight edges. For circular or organic shapes, use the curve effect for text that follows rounded contours. More complex shapes may require a combination of techniques or multiple text boxes.
What’s The Easiest Way To Align Text in Canva?
The easiest way to align text in Canva is to use the alignment tools in the top toolbar. Select your text box, then click on “Position” to access options for aligning to the top, bottom, left, right, or center of your canvas.
For more precise alignment relative to other elements, select both the text and the reference object before using the alignment tools.
How Can I Adjust Text Spacing When Wrapping?
To adjust text spacing when wrapping, select your text box and look for the line height and spacing options in the text formatting panel.
Increasing line height creates more space between lines, while paragraph spacing affects the gap between paragraphs.
For fine-tuning, you can also adjust letter spacing (tracking) or the space between specific character pairs (kerning) in the advanced text options.
How Can I Ensure My Text is Readable After Wrapping?
To ensure readability in wrapped text, maintain adequate contrast between your text and background, use fonts designed for readability at your chosen size, and leave sufficient space between text and images.
Avoid extreme curving or distortion that might compromise legibility, and always test your design at various zoom levels to confirm that text remains clear from different viewing distances.
Conclusion
Text wrapping in Canva can change simple designs into smart, neat works. These works share your message well and look good too.
Although Canva does not have an automatic text wrap tool, you can still gain control manually.
Many users ask, “Is Canva Pro worth it?”, and some even seek ways to get Canva Pro for free. This guide shows how to do it effectively. By learning how to move text boxes, use curves for round shapes, and apply smart methods for tough wrapping tasks, you will boost your design skills a lot.
Good text wrapping means not only using the right tools but also thinking about how easy it is to read.
It also means keeping visual order and overall design in mind. The next time you work on a design in Canva, try these text wrapping tips.
They may make your work better. With practice, you’ll get a feel for when and how to use different wrapping styles for the best results.
For those looking to monetize their creations, a common question is, “Can I sell Canva designs on Etsy?”. If so, the next step is learning how to sell Canva templates on Etsy. Your designs will impress with a level of skill that shows you are a true design expert.
