
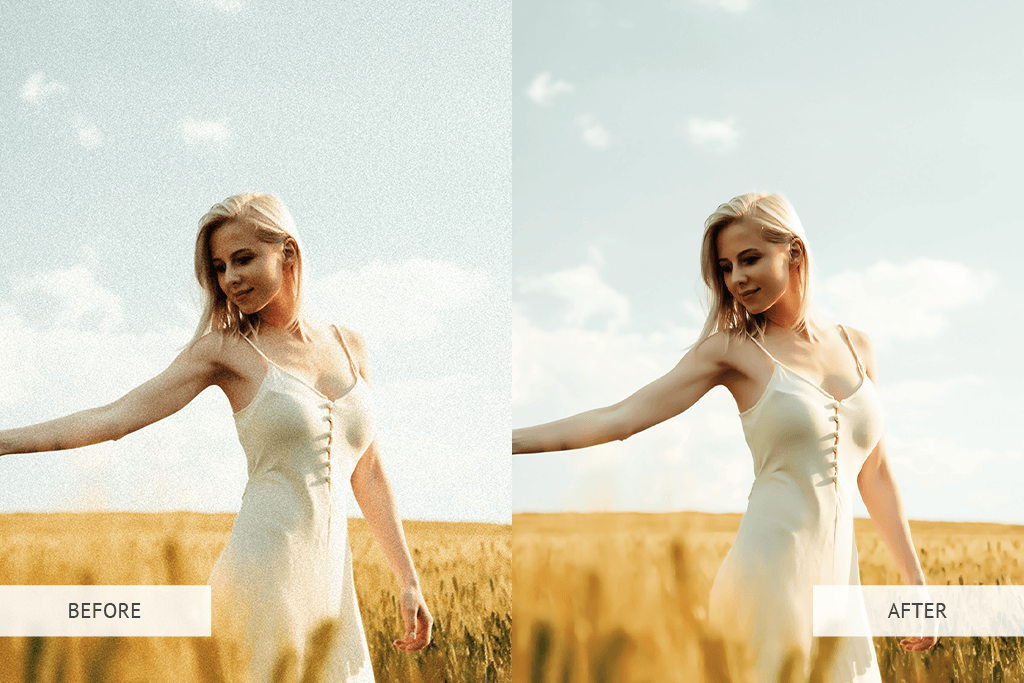
We have all been there. You snap what you think is the perfect picture. You are excited to share it on your social media posts.
But when you zoom in, your heart sinks. The clear, sharp picture you wanted is full of tiny specks. It looks rough and sandy.
This is what photographers call grainy photos. It can ruin a great moment and lower your image quality.
At Designers Choice, we know how frustrating this feels. We are a community of creators who want our work to look its best.
Whether you are a pro or just love taking pictures of your friends, dealing with digital noise is a common struggle.
But here is the good news: you do not have to delete those pictures. You can save them.
In this guide, we will teach you exactly how to fix grainy photos. We will look at why it happens in the first place and show you the best tools to fix it. We will cover big computer programs and simple phone apps.
We will explain how to fix grainy photos in Lightroom, how to fix grainy photos on iPhone, and even fix grainy photos online for free.
Our goal is to help you get a clear image every time. We believe that with a little knowledge and the right tools, you can turn a messy, grainy shot into a masterpiece. Let’s get started and clean up those images.
Understanding Image Noise: Why Do Your Photos Look Grainy?

Before we start fixing things, it is a good idea to learn why grain appears. In the world of digital images, we call this “noise.”
Think of it like listening to the radio. If the signal is weak, you hear static hiss. Digital noise is visual static. It usually happens when your camera sensor is struggling. The sensor is the part of the camera that catches light. When there is enough light, the sensor works easily. The image is smooth. But when there is a lack of light, the sensor has to work extra hard. This effort creates those ugly specks we call grain.
There are a few main reasons why your digital camera or phone makes grainy images.
High ISO Settings and Their Impact
The biggest cause of grain is usually your iso settings. ISO is a setting that controls how sensitive your camera’s sensor is to light.
When you are outside in the bright sun, you usually use a low iso, like ISO 100 or 200. At a low iso, the signal is clean. You get very little noise.
However, when it gets dark, you might raise the ISO to make the picture brighter. You might bump it up to ISO 1600 or 3200. This tells the camera to be more sensitive. It brightens the photo, but it comes with a cost.
The higher the ISO, the more digital noise you get. This is why high iso settings almost always lead to grainy photos. It is a trade-off. You get a brighter image, but you lose that smooth, photo quality look.
Underexposure and Low Light Conditions
Sometimes, you might keep your ISO low, but the photo still looks grainy. Why? This often happens because of underexposure. This means the photo is too dark. When you shoot in low light or low lighting without adjusting your settings, the camera does not get as much light as it needs.
When you put that photo into a photo editor and try to brighten it up, you will see a lot of grain appear in the shadows. The information just wasn’t there. The camera sensor tries to guess what is in the dark parts, but it makes mistakes. These mistakes show up as speckled noise.
It is very hard to fix a photo that was taken in near darkness. Low light is the enemy of a clean, sharp photo.
The Difference Between Luminance Noise and Color Noise
Not all grain looks the same. When you look closely at a grainy photo, you will see two types of noise.
- Luminance Noise: This looks like film grain. It looks like black, white, and gray sand sprinkled over the image. It affects the brightness of the pixels. A little grain like this is not always bad. Some people even like it because it looks like an old movie. It is easier to fix and less distracting.
- Color Noise: This is the ugly one. These are random splotches of red, green, and blue pixels that do not belong there. If you take a photo of a gray wall in the dark, you might see purple and green specks. This is color noise. It makes the image look unnatural and messy.
Most noise reduction tools treat these two types differently. You will usually want to reduce color noise completely, but you might keep a tiny bit of luminance noise to keep the photo looking sharp.
Step-by-Step: How to Fix Grainy Photos in Post-Processing?
Now that we know what causes the problem, let’s talk about solutions. Post-processing is just a fancy word for editing your photos on a computer or phone. This is where the magic happens.
We will look at how to save your images using different software.
Using Adobe Lightroom’s Detail Panel
Adobe Lightroom Classic is one of the best tools for photographers. It gives you a lot of control over your files.
If you want to know how to fix grainy photos in Lightroom, follow these steps.
- Import Your Photos: Open Lightroom and import your grainy images. It is best if you work with raw files (or raw images) because they hold more data than JPEGs.
- Go to the Develop Module: This is where you do all your editing. Look for the “Detail” tab on the right side.
- The Detail Panel: Click on the detail panel to open it. You will see a section called “Noise Reduction.”
- Fixing Luminance Noise: Find the Luminance slider. Slowly move it to the right. Watch your image closely. You will see the grain start to disappear. The photo will get smoother. Be careful not to slide it too far, or the photo will look blurry.
- Fixing Color Noise: Look for the color slider. Usually, Lightroom sets this to 25 automatically. If you still see weird color spots, move this slider to the right. This will blend those red and blue specks away.
- Detail and Contrast: Under the noise sliders, there is a Detail slider. This helps bring back some texture so the photo doesn’t look like plastic. There are also contrast sliders that help keep the edges sharp.
Using the detail panel in Lightroom is the standard method for adjusting photos. It offers excellent noise reduction without being too hard to use.
How to Remove Grain in Photoshop (Camera Raw Filter)
If you have Adobe Photoshop, you have a very powerful tool. You might be wondering how to fix a grainy photo in Photoshop. The best way is to use the Camera Raw Filter. It works very similarly to Lightroom.
- Open your image in Photoshop.
- Go to the top menu and click on “Filter.”
- Select “Camera Raw Filter.”
- A new window will pop up. Look for the “Detail” section (it looks like two triangles).
- You will see the same noise reduction sliders as Lightroom.
- Adjust the Luminance to smooth out the grain.
- Adjust the Color to fix the color specks.
This method is great because you can apply it to just part of the image if you want, or the entire image.
It is a quick way to clean up grainy photos before you do other edits.
Best AI De-Noising Software (Topaz DeNoise AI, DxO PureRAW)
Sometimes, the standard tools are not enough. If your photo is very grainy, you might need the power of AI. New software uses Artificial Intelligence to fix photos in ways we could not imagine a few years ago.
Tools like Topaz DeNoise AI and DxO PureRAW are amazing.
They act as an AI image denoiser. Instead of just blurring the grain, the AI looks at the image and understands what it is seeing. It knows the difference between a bird’s feather and a speck of noise. These programs can remove a huge amount of noise while keeping the image sharp.
They are often separate programs, or they can plug into Lightroom. If you have old photos that are very grainy, using an AI photo enhancer like this is a good tip. They can even help unblur image details that seemed lost.
How to Fix Grainy Photos on iPhone and Android Apps?
You do not always need a big computer. You can learn how to edit grainy photos right on your phone.
Whether you need to know how to fix grainy photos on android or how to make a photo less grainy on iPhone, the process is similar.
- Lightroom Mobile: This is a free app (with paid features). It has a “Detail” tab just like the desktop version. You can slide the noise reduction bar to smooth out your shot.
- Snapseed: This is a very popular free app. Open your photo, go to “Tools,” and select “Details.” It does not have a specific “noise” slider, but increasing the “Structure” and smoothing it out can help.
- Google Photos: The built-in editor on Android often has a “Denoise” slider.
- Apple Photos: On the iPhone, open the photo and hit “Edit.” Go to the noise reduction icon (usually a circle with dots). Slide it to fix the grain.
These apps are great for fixing social media posts on the go. They can help turn a bad shot into a clear one quickly.
Balancing Noise Reduction and Detail Preservation

Fixing grain is a balancing act. If you remove too much noise, you ruin the detail. You have to find the sweet spot.
Avoiding the “Plastic” Look
The biggest mistake beginners make is sliding the noise reduction slider all the way to 100. When you do this, the skin on people looks like plastic. Leaves on trees look like green paint blobs. The photo loses all its texture.
You want the image to look natural. It is better to have a little grain than a fake-looking plastic photo. When you use the luminance slider, stop as soon as the worst grain is gone. Do not try to make it perfectly smooth.
Check the eyes and hair of your subject.
If the eyelashes disappear or look blurry, you have gone too far. Back off the slider. You need to keep the color detail and texture real.
Using Masking to Target Specific Areas
A pro trick is to only fix the parts that need it. This is called masking.
Grain shows up most in the dark shadows and the blurry background. It is less obvious on the bright parts or the main subject.
In programs like Lightroom and Photoshop, you can create a mask. You can tell the software, “Only do noise reduction on the background.” This keeps your subject sharp and crisp, while smoothing out the messy darkness behind them.
This is how you get excellent noise reduction results that look professional.
Prevention Tips: How to Avoid Grain Before You Shoot?

The best way to fix grainy photos is to not take them in the first place. Fixing it later is okay, but getting it right in the camera is better.
Here is how to prevent grainy images.
Mastering the Exposure Triangle
Photography is all about three things: ISO, Aperture, and Shutter Speed. This is called the Exposure Triangle.
To get less grain, you want to keep your iso settings as low as possible. But if you lower the ISO, the picture gets dark.
To fix that, you need to change the other two settings.
- Aperture: Open your lens wider (a lower f-number like f/1.8 or f/2.8). This lets in more light.
- Shutter Speed: Keep the shutter open longer.
When you balance these three, you can get a bright photo with a low iso. This results in a clean, clear image.
The Importance of Proper Lighting
Since lack of light causes noise, the easiest fix is to add more light.
If you are indoors, turn on more lamps. Move your subject closer to a window. If you are taking photos of a product for your website, use a desk lamp. The more light you give the camera sensor, the less it has to struggle.
When you have enough light, the camera doesn’t have to boost the signal. This means no static, no noise, and high image quality.
Don’t be afraid to use a flash if you have one. Even a phone flash can help reduce grain in a dark room.
When to Use A Tripod to Lower ISO?
If you are shooting a landscape at night or a still object in a dark room, use a tripod. Why? Because if you hold the camera in your hands, you need a fast shutter speed to stop camera shake. Fast shutter speeds let in less light, so you have to raise the ISO. High ISO equals grain.
If you put the camera on a tripod, it is perfectly still. You can use a much slower shutter speed. You can leave the shutter open for 1 second, 5 seconds, or even longer. This lets in tons of light.
Because of this, you can keep your ISO very low (like ISO 100). The result is a night photo that is bright but has almost zero noise.
A tripod eliminates motion blur and allows for different exposures without ruining the quality. It is a simple tool that solves big problems.
FAQ’s:
Can You Fix Grainy Photos Completely Without Losing Quality?
It is hard to fix them completely without losing some tiny details. Noise reduction works by smoothing out pixels.
This naturally softens the image a little bit. However, using modern tools and the power of ai, you can get very close.
You can make the photo look great for the web and social media, even if it isn’t perfect for a huge print.
What is the Best Free App to Fix Grainy Photos on a Smartphone?
For a free app, Snapseed is a fantastic choice for both Android and iPhone. Adobe Lightroom Mobile is also excellent and very powerful, even the free version. They both allow you to control the details and smooth out the grainy images.
Does Increasing Resolution Help Fix Grainy Photos?
Not really. Just making the file size bigger or increasing pixel count doesn’t remove noise.
In fact, if you just make a grainy photo bigger, the grain gets bigger too. However, some ai photo enhancer tools can upscale images and remove noise at the same time. They add new pixels to smooth things out.
But simply resizing a standard image won’t help with the grain.
Is Grain Always Bad in Photography?
No! Sometimes grain is a mood. In black and white photography, film grain adds texture and feeling.
It can make a photo feel gritty, real, or vintage. Some photographers even add grain on purpose. But color noise (the colorful splotches) is almost always bad. It looks like a mistake. Artistic grain should be a choice, not an accident caused by low lighting.
Why Do My Photos Look Grainy Even At Low ISO?
If you are using a low iso and still see grain, you probably underexposed the photo. This means the picture was too dark when you took it.
When you brighten a dark photo in a photo editor, you reveal noise that was hiding in the shadows.
Also, older cameras or cameras with a small camera sensor (like old smartphones) produce more grain naturally, even at lower settings.
Conclusion
Dealing with grainy photos is a normal part of being a photographer. Whether you have a fancy Canon Rebel or just a smartphone, you will face low-light situations eventually. But now you know what to do.
We have learned that high iso and underexposure are the main culprits.
We have looked at how to use the detail panel in Lightroom Classic and the filters in Adobe Photoshop. We explored the power of AI with tools that act as an image sharpener and ai image denoiser.
We also discussed how simple changes, like adding light or using a tripod to allow a slower shutter speed, can stop grain before it starts.
Remember, the goal isn’t always perfection. It is about making the image look its best. Don’t be afraid to experiment with the contrast sliders and noise reduction tools. Watch your file size and keep your original image safe just in case.
At Designers Choice, we want you to feel confident in your creativity.
Don’t let a little digital noise stop you from sharing your work. With these tips, you can rescue those blurry photos and grainy images and turn them into something beautiful. So, go out there, shoot with confidence, and make your boldest visions a reality.
If you found this guide helpful, why not try editing one of your old grainy photos today? You might be surprised at how good it can look!
