At Designers Choice, we are a team of passionate designers with years of hands-on experience. We created this website to be the resource we always wished we had when we first started. It is a place where expert advice meets fresh ideas. We know the daily hurdles of turning creative thoughts into real projects, from finding the perfect pictures to staying ahead of new trends. That is why we share top-quality tips, smart solutions, and trusted advice. Our goal is to help fellow workers and beginners who want the best results. Our mission is to empower you to bring your biggest ideas to life. We want to support a community that loves creativity, good work, and excellence just as much as we do.
When you make art online, you want tools that make your design process fast and simple.
Whether you are making an email header, a neat pdf document, or beautiful pictures for Instagram, you need to know how your tools work.
Today, we are sharing a complete tutorial on a very important skill. We will show you exactly how to group things on Canva.
When you look at your screen, you might have many individual elements floating around. You might have pictures, shapes, and words.
If you want to move them all at once, you need to stick them together into a single unit. This action is called grouping.
There are lots of reasons why knowing how to do this makes you a better creator. It is a very useful feature that saves a lot of time.
Let us look at all the different ways you can use this amazing tool to make your work much easier.
Why Learning How to Group Things on Canva is Essential?
When you first start out in graphic design, it is easy to get messy. You place one picture here, add some words there, and soon your screen is full.
Knowing how to group elements is a massive help for your daily workflow. It keeps your work neat and tidy.
Let us look at the biggest reasons why you need to use this tool every time you work.
Keeping Your Design Layout Organized
When you make social media posts, you want your final picture to look perfect. A messy screen makes it hard to focus.
When you stick things together, your layout stays clean and organized.
If you are using grids to line things up, grouping helps everything snap into the right place. It also helps you keep consistency across your pages.
If you use templates to make your work faster, you will notice that the best ones always use the group feature to keep the page tidy.
Moving Multiple Elements Simultaneously
Imagine you just made a beautiful badge. It has a circle, a star, and some words. Now, you want to move this badge to the other side of your page.
If you try to move them as separate elements, you have to drag the circle, then drag the star, and then drag the words. You have to line them up all over again! This takes too much time. Instead, you can turn them into a group of elements. Once they are stuck together as a single unit, you can drag the whole badge across the screen in one quick motion. Moving a group of elements is much faster and less annoying.
Resizing Complex Graphics Without Distortion
Sometimes you need to make your art bigger or smaller.
Let us say you have a logo made of many small parts, like tiny vector elements and detailed shapes.
If you try to resize them one by one, the logo will look wrong.
The spacing will get ruined. But if you learn how to group things on Canva, you can resize the whole thing perfectly. When you resize grouped elements, everything shrinks or grows at the same time. Your graphics will always look crisp and exactly how you want them to look.
How to Group Things on Canva Using A Desktop Computer?

Working on a PC or a MAC gives you a big screen to see everything clearly. Using a desktop computer is often the favorite way for professionals to work. Let us look at how to use the desktop version of Canva to stick your items together.
Method 1: The Mouse Drag and Select Technique
This is the simplest way to select many things at once. You will use your computer mouse and the mouse grab option.
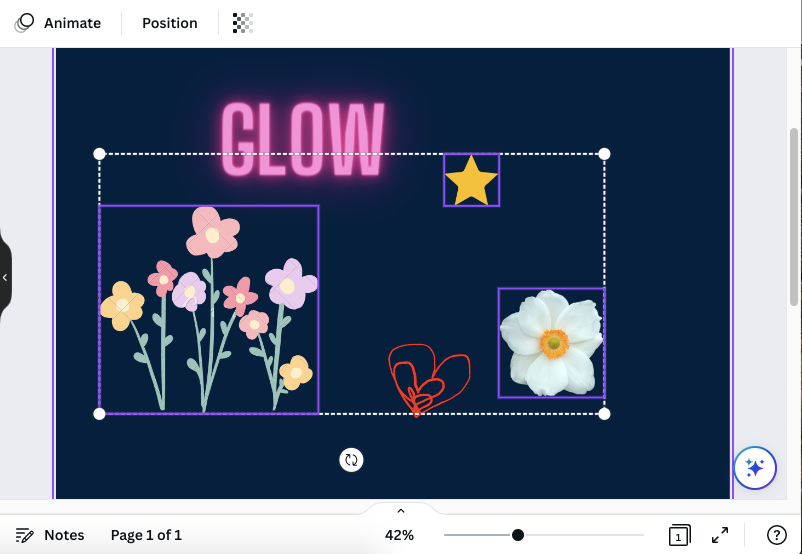
First, look at your screen. Move your cursor to an empty space near the items you want to pick. Click and hold down the button on your mouse. Now, drag the mouse over the items. This is the grab option.
As you drag, you will see a box appear. Make sure this box touches all the desired elements you want to pick.
When you let go of the mouse button, you will see a solid blue line or a dotted blue line around all the parts you selected.
Now, look at the floating toolbar that pops up, or look at the top menu near the top of the screen. You will see the word “Group“.
Click this group button. Now, your items are stuck together!
Method 2: The “Shift” Click Strategy for Precision
Sometimes, your screen is very crowded. The mouse grab option might pick up things you do not want.
When this happens, you should use the shift key on your keyboard.
First, click on the first element you want to select. Then, hold down the shift key on your computer. Keep holding it down.
Next, click on the second item, the third item, and so on. Only click the design elements you want to join.
Once you have picked all your selected elements, you can let go of the shift key. Finally, look for the group option on the screen.
It is usually in the toolbar near the top right of the screen. Click it, and your parts will join together into one block.
Method 3: The Quickest Keyboard Shortcut (Ctrl/Cmd + G)
If you want to be a Canva power user, you must learn keyboard shortcuts. Shortcuts make your work incredibly fast because you do not have to move your mouse around to find buttons.
First, select your items using the drag method or the shift method we just talked about. Once your items are selected, look at your keyboard.
If you use a Windows pc, you need to press ctrl and the letter “G” at the same time. Hold ctrl down, then tap “G“.
If you use a mac, you need to press CMD and the letter “G” at the same time. Hold CMD down, then tap “G“.
The letter “G” stands for group. By doing this quick step on the desktop version, you instantly lock the parts together. It is super fast and easy!
How to Group Things on Canva on the Mobile App?

Many people love to make art on their phones. Whether you use an iPhone or an android phone, the Canva app is very powerful.
Because the phone screen is small, doing things on the mobile version is a little different than on the desktop.
But do not worry, mobile users can do this just as easily. Let us see how it works on the mobile app.
Selecting Elements With A Long Press
When you use the app on your phone, you do not have a mouse. You use your fingers. To select your first item, just tap it once.
Now, tap and hold your finger on that item for a second. This is called a long press. When you do this, you tell the program that you want to do something special. After the long press, you can just tap on the other things on your screen that you want to add.
As you tap them, they will be added to your selection.
Using the “Select Multiple” Feature in the Menu
There is another easy way to pick many things on your phone.
First, tap on one item to select it. When you do this, a menu will show up at the bottom of your screen.
Look at this menu and slide it to the side until you see an option called “Select Multiple.” Tap this option. Now, the app knows you want to pick more things. You can go ahead and tap all the other items you want to join together. A box will appear around all the selected elements.
Finding the Group Button on a Small Screen
Once you have picked all the things you want to join, it is time to lock them together. Look at the menu at the bottom of your screen again.
Swipe through the options until you find the group button. Tap this button. Just like that, your items are now joined!
You can drag them around your phone screen with one finger, and they will all move together. To break them apart later, you just find the ungroup option in the same menu.
Troubleshooting: When You Can’t Figure Out How to Group Things on Canva?
Sometimes, things do not work the way we want them to. Even when you know how to group things on Canva, you might run into a tiny problem. Do not worry! Here are some simple fixes for common issues.
Dealing with Locked Elements
If you select your items, but the group button is missing or grey, one of your items might be locked. Locking is a tool that keeps an item from moving. If a piece is locked, you cannot join it with other pieces.
To fix this, look at the items you picked. Does one of them have a tiny picture of a padlock next to it? If it does, click or tap on that item.
Then, click the padlock picture to unlock it. Once all your items are unlocked, you can join them together with no problems.
Grouping Text Boxes with Frames
Sometimes, people try to join text boxes with picture frames, but it feels clunky. If you put words over a frame and try to join them, the program might think you want to put the words inside the frame.
To fix this, make sure your words are placed exactly where you want them on top of the picture.
Use the shift key on your desktop to carefully select the picture first, and then the words. Then, press your grouping shortcut.
This helps the program understand that you want to keep them as separate layers stuck together, instead of stuffing the words inside the frame.
How to Temporarily Ungroup For Edits?
What if you joined a bunch of things, but now you need to change one little word? You have to break the group apart for a minute.
This is called ungrouping. It is very simple. Click on your joined block. Look at your toolbar or the top menu. You will see an ungroup button or an ungroup option. Click it. Your block will split back into separate elements. Now you can change the word or swap the picture.
When you are done fixing it, you can just select them all again and make them a group. Some people use the Canva Pro version to do fancy edits, but basic ungrouping works for everyone on the free version, too.
FAQ’s:
What is the Keyboard Shortcut to Group Items in Canva?
If you are using a Windows computer, the fast shortcut is to hold down the Ctrl button and press the letter “G“. If you are on an Apple computer, hold down the CMD button and press the letter “G“. This is the fastest way to stick your design elements together.
Why is the “Group” Button Greyed Out Or Missing?
If you cannot click the button, there are two main reasons. First, you might only have one item selected. You need to select at least two things to stick them together! Second, one of your items might be locked with the padlock tool. You must unlock it first before the button will work.
Can I Group Text and Images in Canva?
Yes, absolutely! You can mix anything you want. You can join text boxes, shapes, photos, and drawings all into one big block. This is very helpful when making posters or banners where the words and the pictures need to stay next to each other.
Can I Group A Group Within Another Group?
Yes, you can do this! Let us say you have a small joined block of words. Then, you have another joined block of pictures. You can select both of these big blocks and join them together into an even bigger block. This helps keep very complex pages super neat.
How Do I Ungroup Items Once They Are Grouped?
To break things apart, just click on the joined block. Then, look for the ungroup option.
On a computer, it is usually at the top right of the screen or in the small menu that pops up. On a phone, it is in the menu at the bottom of your screen. Click or tap it, and your items will break apart into separate elements again.
Is There A Shortcut to Quickly Group and Ungroup Elements?
Yes! We talked about the shortcut to stick things together (CTRL + G or CMD + G). To quickly ungroup elements, you just add the shift key.
On a Windows computer, select the joined block, then press CTRL + Shift + G.
On a Mac computer, select the joined block, then press CMD + Shift + G.
This breaks them apart instantly!
What Should I Do If My Grouped Elements Are Not Moving Or Editing As Expected?
If your joined items are acting funny, the best thing to do is to break them apart and start over. Click ungroup, and click away so nothing is selected. Then, carefully select the items you want again, making sure you do not pick up anything hidden in the background.
Then, stick them together again. This usually fixes any weird bugs.
Does Grouping Elements Affect Animations?
If you want your items to wiggle or bounce on the screen, sticking them together changes how they move.
If you animate separate elements, they can move in at different times. But if you animate grouped elements, the whole block will bounce or slide onto the screen at the same time as a single block. Keep this in mind when making fun videos!
Conclusion
Learning how to group things on Canva is a wonderful step in making your art journey easier.
We hope this simple guide helps you feel more confident when making your beautiful designs. Whether you are using the mouse grab option on a big computer monitor or tapping away on your mobile app, sticking items together keeps your screen clean and your mind clear.
Remember, practice makes perfect. Try opening a blank page right now. Add a square, a circle, and a few words. Practice picking them all up at the same time and sticking them into one piece. Then, practice breaking them apart.
Once you learn these fast keyboard shortcuts, you will save so much time on your next big project.
At Designers Choice, we love sharing these simple tips to help you grow. Good design is for everyone, and learning your tools is the best way to let your ideas shine. Keep creating, keep learning, and most importantly, have fun with your art!
