
Have you ever stared at a bright, plain screen while working on your computer? Sometimes, that bright white screen makes it very hard to see what you are doing. At Designers Choice, we know that making art should be fun and easy. It should not be hard on your eyes.
When you do graphic design, you might need a different workspace to see things clearly. Knowing exactly how to change the artboard color in Illustrator is a very handy trick to learn. It is an essential skill that helps you see your design elements much better.
In this easy guide, we will show you the simple steps to change the color of the artboard. We will look at two simple methods that anyone can do. Whether you are making fun art for social media or getting ready to print a big image file, these neat tricks will make your illustrator workflow much better. Let us look at how you can pick a new background color today!
We will make sure you learn this quickly so you can get back to drawing.
Why Learn How to Change Artboard Color in Illustrator?
You might wonder why you even need to learn how to change the artboard color in Illustrator in the first place. Most new projects start with a giant, plain white canvas. It looks just like a fresh piece of copy paper. But leaving it plain white is not always the best choice for your art.
Here are a few great reasons why you might want to change the background color of an artboard.
Enhancing Visibility For White Or Light-Colored Artwork
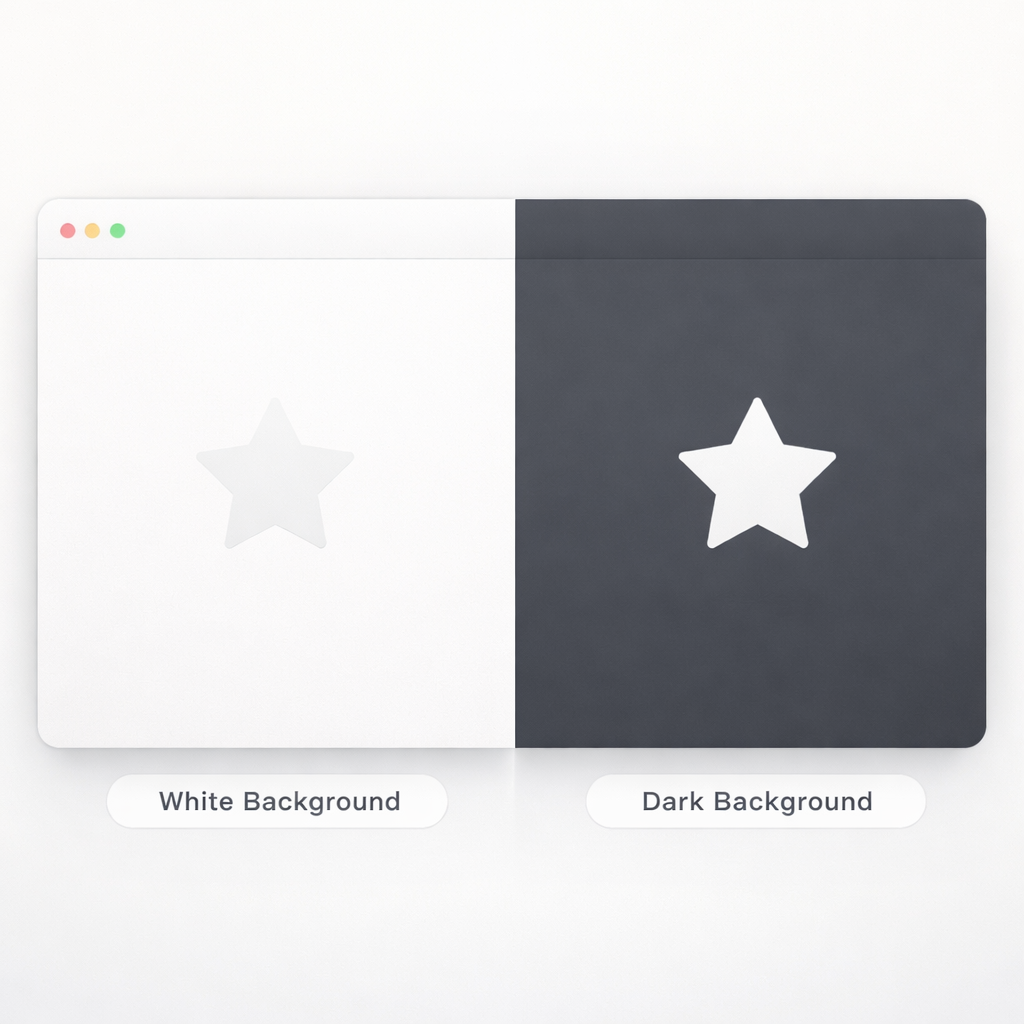
If you are drawing a fluffy white cloud or a light yellow star, it will blend right into a white background.
You will not be able to see the edges of your art at all. It can make you feel lost. If you change background color to something dark, like blue or black, your light-colored art will pop right out. This makes it so much easier to work on your graphic design.
You can pick different backgrounds to see your work clearly and easily. You will not have to guess where your lines are anymore.
Simulating Final Print Materials (Like Colored Paper)
Sometimes you want to print your art on real blue paper or pink paper at your house or at a print shop. If you only look at a white screen while you draw, it is hard to guess what the final print will actually look like.
You can use the simulate colored paper option inside the program to see exactly how your ink will look on that colored paper. This helps you plan your art much better before you spend money on printing.
Reducing Eye Strain During Long Design Sessions
Staring at a super bright screen for hours and hours can make your eyes feel very tired and sore. It can even give you a headache.
If you change the artboard background color to a soft gray or a warm, gentle tone, it is much kinder to your eyes. This is a very helpful trick for anyone who spends a lot of time sitting at a desk and working on design elements.
You can even adjust your user interface brightness to help your eyes even more while you work.
Document Setup Method: How to Change Artboard Color in Illustrator
The first way to do this is called the document setup method. This way only changes how the workspace looks on your computer screen. It is great when you just want a better view while you are drawing. Let us break it down into very simple steps.
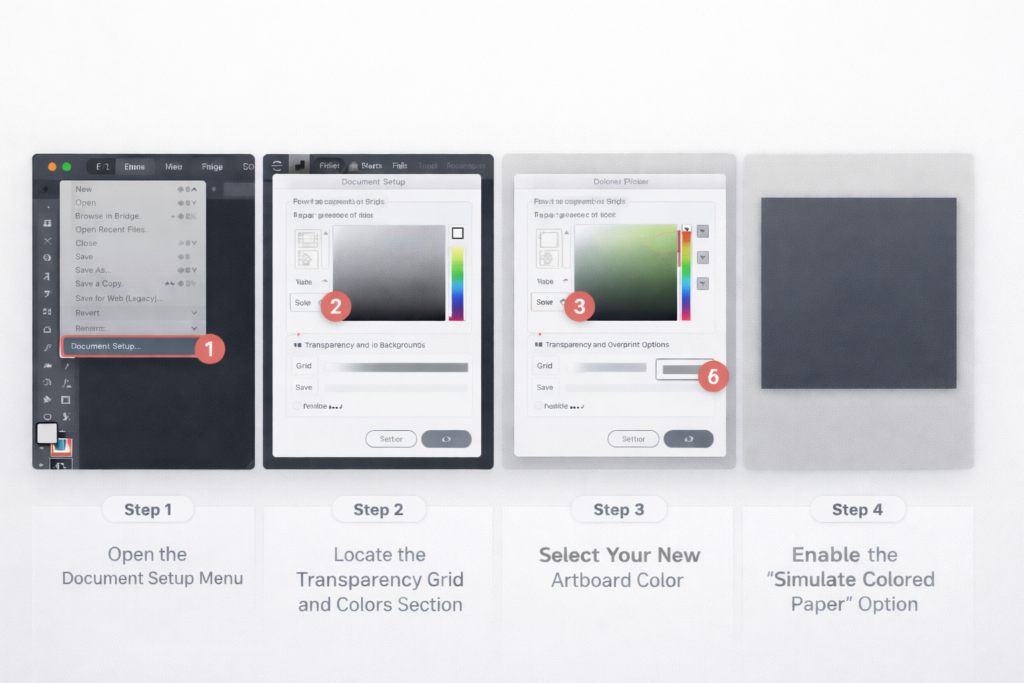
Step 1: Open the Document Setup Menu
First, you need to turn on your computer and open adobe illustrator.
Start your new document or open a file you already made earlier. Now, look at the very top of your screen. You will see a list of words. Click on the word “File” in the menu bar. A drop-down list will appear on your screen. Scroll down that list and click on the words “Document Setup.”
This will open the document setup window right in the middle of your screen. You can also access document setup by clicking a special button inside the properties panel. You can usually find this panel on the right side of your screen.
Step 2: Locate the Transparency Grid and Colors Section
Inside the document setup window, you need to look for a specific section. It is called the “Transparency and Overprint Options” section.
Here, you will see a little box that looks like a checkerboard. This little box is related to the transparency grid. You will also see two small color boxes right next to it. These two boxes are very important. They control the color of the grid and the color of your artboard.
Step 3: Select Your New Artboard Color
Now, click on the top color box. This action opens up the color selector tool. Now, you have the power to pick any color you want for your canvas color. You can click on a nice dark gray, a soft gentle blue, or any other color that helps you see your drawing better.
Once you pick the exact color you want, click the button that says “OK.”
Step 4: Enable the “Simulate Colored Paper” Option
There is one more very important thing to do. You must check the little box right next to the simulate colored paper option. If you forget to check this box, nothing will happen at all. Once you check it, click “OK” to close the menu completely.
If you still see a white screen after doing this, do not worry. You just need to turn on the grid. Go back to the menu bar at the top, click on the word “View,” and select show transparency grid. Now, you will finally see your brand new background color!
The Background Shape Method: An Alternative Way to Change Artboard Color
The first method is cool, but it only changes what you see on your monitor. It does not actually print that color on your printer. If you want the color to print out, or if you want to save it as a raster image with the color showing, you need to use a different method.
This way is called the rectangle method. Here is exactly how to make a background rectangle for your art.
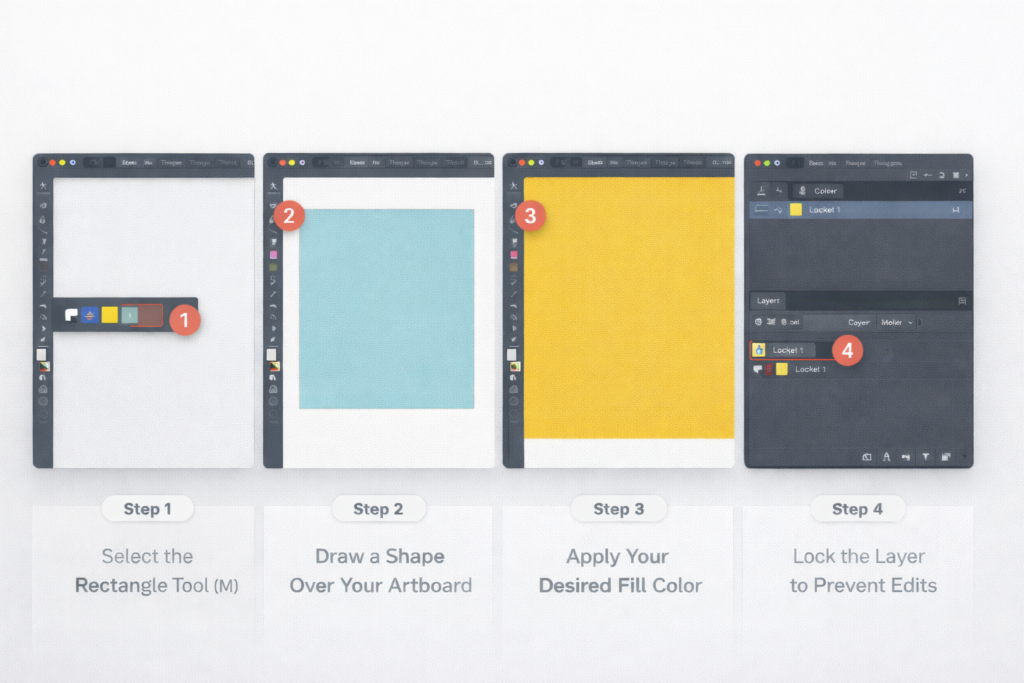
Step 1: Select the Rectangle Tool (M)
Go to your tool panel on the left side of your screen. Look for the rectangle tool and click on it with your mouse. It looks like a simple square. You can also just press the letter “M” on your computer keyboard to pick it super quickly.
Step 2: Draw A Shape Over Your Artboard
Now, click and drag your mouse across the entire artboard. You want to make a big shape that is the exact size of your artboard. If your artboard is a perfect square, draw a perfect square. Make sure it covers every single edge perfectly so no white parts are left showing.
Step 3: Apply Your Desired Fill Color
With your big shape still selected, look at your color tools. Pick a new fill color for your shape. This color will be your new image background. You can change it to bright blue, deep red, or anything you like. Now, your shape acts as the solid color of the background.
Step 4: Lock the Layer to Prevent Accidental Edits
You do not want to accidentally move this background shape while you are busy drawing other fun things.
So, you need to open your layers panel. It is usually sitting on the right side of your screen. Look for your new shape in the list. Click the empty little box next to the eye icon to lock it. A small picture of a padlock will appear. Now, the shape is safely locked in place.
For better organizing, make a new layer right above it to draw your other design elements. Always make sure to keep your background shape sitting at the bottom of the layer list.
Document Setup Vs. Background Shape: Which Should You Use?
Now you know two great ways to change the color of your artboard. But which one should you pick for your project? It really depends on what you want to do with your file later on.
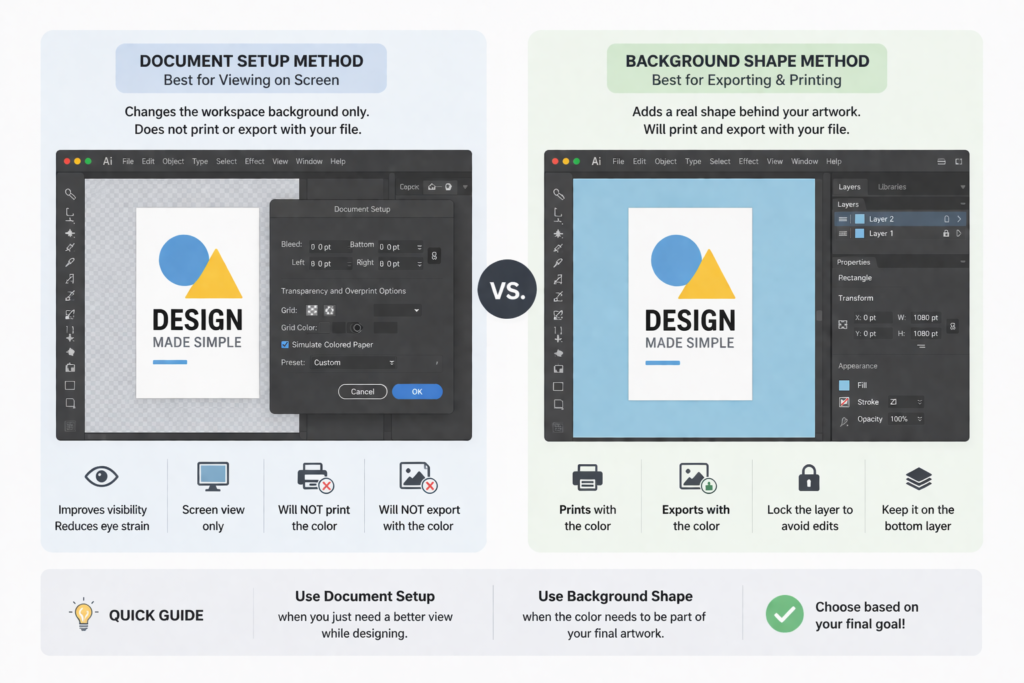
When to Use Document Setup (Viewing Purposes Only)
The document setup method is strictly for your eyes while you work on your computer. It only changes the user interface view.
If you use this method, the color will not show up when you print your artwork on a printer. It will also not show up if you save your file as a picture with a transparent background.
You should only use this method if you just want to reduce eye strain or if you just need to see white shapes better while you work.
When to Use A Background Shape (Exporting and Printing)
The rectangle method is exactly what you need if you want the color to be part of your final art.
If you are making a fun post for social media and want a pink background, you must draw a solid pink shape. This method makes sure the background colors are saved when you export your final image file. It makes the color real and permanent, unlike the other way.
FAQ’s:
Will the Color I Set in Document Setup Show Up When I Export Or Print My File?
No, it will not. The color you pick in the document setup menu is only there to help you see better on your computer screen. When you print the file or save it to show your friends, it will act like it has a transparent background or a plain white background.
If you want the color to actually print out on paper, you must use the rectangle tool to make a solid shape behind your art.
How Do I Change the Artboard Color Back to White?
If you used the document setup method, just go right back to the document setup window. Click the color selector and pick the white color again. Make sure the simulate colored paper option is still checked, and click “OK.” If you drew a big shape instead, just unlock the shape in the layers panel. Then, you can change its fill color to white. Or, you can just press delete on your keyboard to remove the shape completely.
Can I Have Multiple Artboards With Different Colors in the Same Illustrator Document?
If you use the document setup method, the color you pick will change the look of the entire artboard workspace all at once. It will make all your boards look the same color. If you want different colors on different boards, you must use the rectangle tool.
Draw a shape on the first board and give it one color. Then, draw a shape on the next board and give it a different color. You can use the artboard tool and the artboard options to easily fix the size of your artboard for each different one you make.
Why Isn’t the Color Changing Even After I Picked A New One in Document Setup?
This is a very common problem for beginners. Usually, it happens because you forgot to check the tiny box for the simulated colored paper option. Go back into the menu and make sure that box has a check mark in it. Also, you must make sure your transparency grid is turned on.
Go to “View” in the menu bar and click the words Show Transparency Grid. Then you will see your new background color.
Does Changing the Illustrator UI Interface Color Affect My Artboard?
No, it does not do that. You can change your user interface brightness to make the menus dark gray or light gray.
This only changes the toolbars and menus sitting around your workspace. It just changes the user interface. It does not change the actual canvas color where you draw your art. The color of your artboard stays the same, no matter how dark or light your menus are.
Conclusion
Knowing how to change artboard color in Illustrator is a great trick that makes your work so much easier.
We hope these simple steps help you enjoy your graphic design work even more today. Whether you use the document setup method for a better view or the background rectangle for printing, you now have the tools you need to succeed.
At Designers Choice, we love sharing tips that help you create better art without getting a headache. You can easily save your eyes from staring at a super bright white screen all day long. You can easily test how your art looks on different colored paper before you print it.
There is no need for a fancy automated background remover tool when you know how to control your layers and backgrounds right from the very start. Try out these simple methods today on your brand new projects, and see how much better your workspace feels!
