
Taking great photos should be fun, not hard. But when you look at all the buttons and dials on a digital camera, it can feel like you are trying to fly a spaceship. Many people buy a nice camera and leave it on auto mode forever. While auto mode is okay, it does not give you full control over how your picture looks. If you want to take your photography to the next level, you need to know how the camera thinks.
At Designers Choice, we believe that anyone can learn to take amazing pictures. You do not need to be a professional photographer to get professional results. You just need a little help. That is why we wrote this guide. Think of this as your personal camera settings cheat sheet.
We will show you exactly which buttons to push to get the right exposure every time. Whether you are using a big DSLR camera, a mirrorless camera, or even a mobile device, light works the same way.
We will help you understand the exposure triangle so you can fix blurry photos, brighten up dark scenes, and capture sharp action.
By the end of this article, you will feel ready to pick up your camera bag and go out to shoot with confidence.
Let’s get started and learn the secrets to better photos.
Understanding the Exposure Triangle: The Core of Your Camera Settings Cheat Sheet
To take a photo, your camera needs light.
The exposure triangle is just a fancy name for the three main settings that control that light. These three settings are Aperture, Shutter Speed, and ISO. They work together. If you change one, you usually have to change another to keep the light balanced.
Imagine a bucket that you need to fill with water. The water is the light. You can open the tap wider (Aperture), leave the tap on longer (Shutter Speed), or use a smaller bucket (ISO). All three ways help you get the correct exposure.
Aperture (f-stop) and Depth of Field
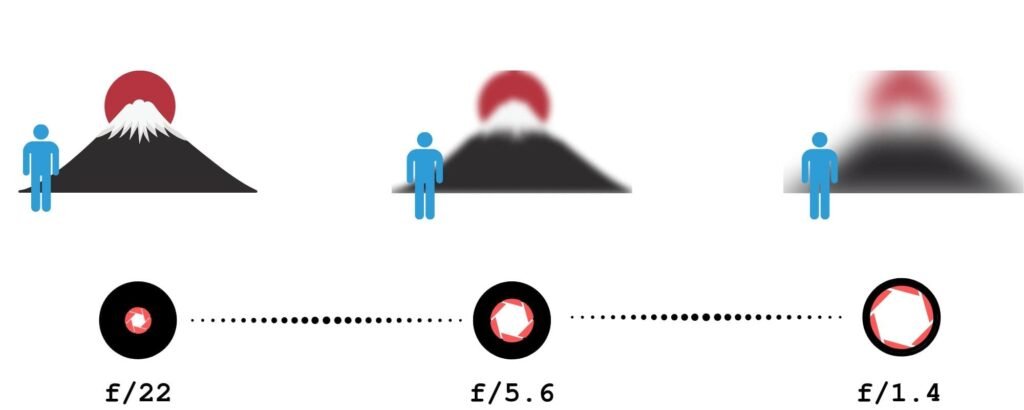
The aperture setting controls how big the hole is in your camera lens. When you take a picture, light goes through this hole to hit the camera sensor. We measure aperture with a number called an “f-stop.” This can be confusing because the numbers seem backward.
- A smaller numerical value (like f/1.8 or f/2.8) means a wider aperture. This is a big hole. It lets in a lot of light.
- A larger number (like f/16 or f/22) means a narrower aperture. This is a tiny hole. It lets in less light.
Aperture does more than just control light. It also controls something called depth of field. This determines how much of your photo is in focus.
- Shallow depth of field: This happens when you use a wide aperture (small f-number). The subject is sharp, but you get a blurred background. This is great for portraits because it separates the person from the busy background.
- Deep depth of field: This happens when you use a narrow aperture (large f-number). Everything from the front to the back is sharp. This is the best way for landscape photography.
So, remember this rule for your cheat sheet: Low number = blurry background and much light. High number = everything sharp and less light.
Shutter Speed and Motion Blur
Shutter speed is the amount of time the shutter opens to let light in. When you press the shutter button, a curtain moves out of the way.
We measure this in seconds or fractions of a second.
- Fast shutter speed: This is very quick, like 1/1000th of a second. It freezes action. If a dog is running, a fast speed makes it look frozen in clear detail.
- Slow shutter speed: This is longer, like 1/30th of a second or even 1 full second. It lets in light for a long time. If something moves, you get motion blur.
You use faster shutter speeds for sports photography or any moving subject. You need to be careful with slower shutter speeds.
If you hold the camera in your hands and the shutter stays open too long, your hands might shake. This causes camera shake, making the whole photo blurry. If you go below 1/60th of a second, you might need a tripod or very steady hands to keep sharp images.
ISO and Image Noise
The third part of the triangle is ISO. This measures the camera’s sensitivity to light.
- Low ISO (like 100 or 200): The sensor is not very sensitive. You need a lot of light or sunshine. This gives you the highest image quality with no grain.
- High ISO (like 1600, 3200, or higher): The sensor becomes very sensitive. You use this in low-light or dark rooms. The camera tries to boost the light signal.
The downside of a high ISO is image noise. Noise looks like little sandy grains or colored specks all over your photo. It makes the picture look less clear. To get better photos, you should always try to keep the ISO as low as possible.
Only raise the iso settings if it is too dark, and you cannot open your aperture or slow down your shutter anymore.
Quick-Reference Camera Settings Cheat Sheet By Scenario
It is easy to forget these rules when you are outside taking photos. To help you, we have created scenarios with the settings you should start with. You can write these down or save this as a free camera settings cheat sheet.
Best Settings For Portrait Photography
When taking pictures of people, you usually want them to be the main focus. You want that soft, professional-looking blurred background.
- Mode: Aperture Priority Mode (Av or A).
- Aperture: Use a wide aperture (f/1.8 to f/2.8). This creates a shallow depth of field.
- ISO: Keep it low ISO (100–400) if you are outside.
- Shutter Speed: The camera will choose this for you in Aperture Priority. Just make sure it is not too slow, so the person doesn’t get blurry if they move.
If you are using a phone camera settings cheat sheet idea, look for “Portrait Mode” on your phone. It mimics this wide aperture look digitally.
Best Settings For Landscapes and Nature
For nature, you want the mountains in the back and the flowers in the front to all look sharp.
- Mode: Aperture Priority or Manual Mode.
- Aperture: Use a narrower aperture (f/8 to f/11). Do not go to f/22 unless you have to, as it can sometimes reduce sharpness.
- ISO: Low ISO (100) for the best image quality.
- Shutter Speed: The camera will decide. If the light is low, the shutter might stay open longer. You might need a tripod to avoid camera shake.
Best Settings For Action and Sports
In sports photography, everything moves fast. Your goal is to freeze the moment so the player does not look like a blur.
- Mode: Shutter Priority (Tv or S) or Manual.
- Shutter Speed: Use a fast shutter speed. Start at 1/500 or 1/1000. For race cars, you might need 1/2000.
- Aperture: The camera will likely open the lens to a wider aperture to get enough light in that short time.
- ISO: You might need to raise this to High ISO (800 or 1600) if you are in a stadium or if it is cloudy. It is better to have a little grain than a blurry photo.
- Focus Mode: Switch to Continuous Focus (AI Servo) to track the moving subject.
Best Settings For Night and Low Light Photography
Low light is tricky. There is not much light available, so you have to help the camera see.
- Mode: Manual Mode is best here.
- Aperture: Use the widest aperture your lens has (like f/1.8). You need every bit of light.
- Shutter Speed: Use a slow shutter speed. It could be 1/30, 1/10, or even longer.
- ISO: Raise your iso settings. Start at 800 and go up to 3200 if needed. Watch out for image noise.
- Tip: If you are shooting a city at night and want the lights to streak (long trails), use a tripod and a very slow shutter speed (like 5 seconds).
Advanced Additions to Your Camera Settings Cheat Sheet
Once you know the exposure triangle, there are a few more settings that help you get great photos.
White Balance: Getting Colors Right
Have you ever taken a photo inside and it looked very orange? Or a photo in the shade that looked very blue? This is because of white balance. Light has different colors. A lightbulb is orange/yellow. The sun is white/blue.
Your eyes adjust automatically, but your camera sensor needs help.
- Auto White Balance (AWB): Works well most of the time.
- Daylight: Use this outside on a sunny day.
- Cloudy: Adds warmth (orange) to the photo.
- Tungsten/Incandescent: Adds blue to cool down orange indoor lights.
Getting the white balance correct ensures white objects look white, not yellow or blue.
Focus Modes: Single Vs. Continuous
Your camera has different ways to focus.
- Single Shot (AF-S or One-Shot): When you half-press the shutter button, the camera locks focus. If the subject moves, the focus stays where it was. This is best for still things like landscapes or posing people.
- Continuous (AF-C or AI Servo): The camera keeps refocusing as long as you hold the button half down. This is the best way to move subjects like kids, pets, or cars.
File Formats: When to Shoot RAW Vs. JPEG
In your menu, you can choose the file type.
- JPEG: The camera processes the photo for you. It adds contrast and colors and saves a smaller file. It is ready to share immediately.
- RAW: This saves all the data from the camera sensor. The photo might look flat at first. However, it gives you much more control when editing later. You can fix the white balance or brighten dark shadows easily on a computer.
For a casual snap, JPEG is fine. For a professional photographer or serious hobbyist, RAW is better.
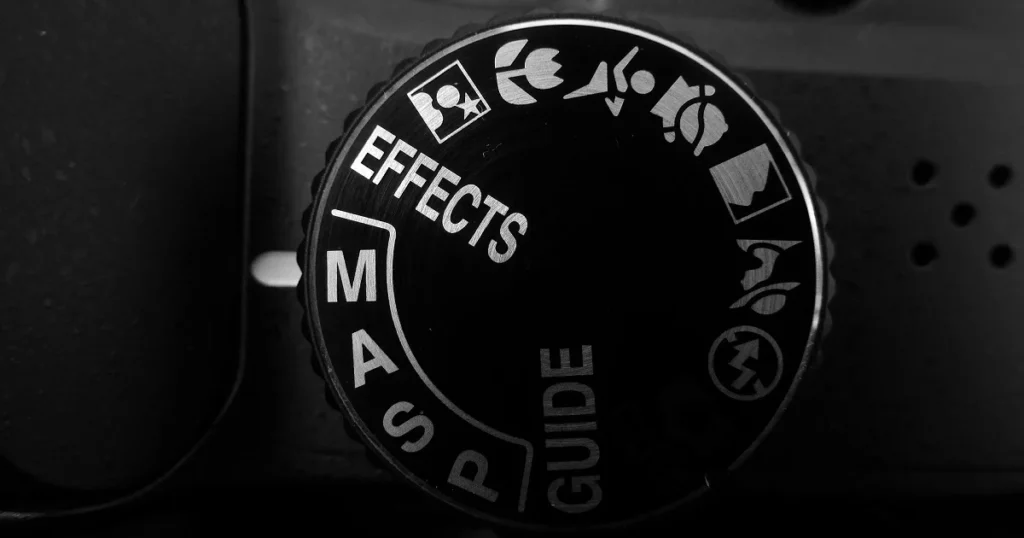
Shooting Modes Explained
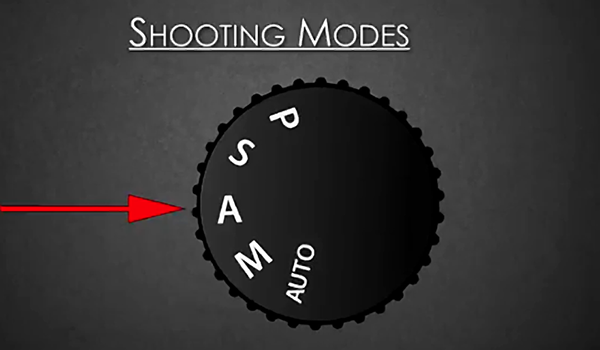
Your camera has a mode dial on top. This dial tells the camera who is in charge: you or the computer.
Aperture Priority (Av or A)
This is a favorite mode for many photographers. You choose the aperture setting (f-stop), and the camera chooses the shutter speed to get the right exposure.
- Use it when: You want to control the depth of field. If you want a blurred background, pick a small f-number. The camera does the math for the speed. It is semi-automatic and very fast to use.
Shutter Priority (Tv or S)
In this mode, you choose the shutter speed, and the camera picks the f-stop.
- Use it when: You are freezing motion (sports) or want to create blur (waterfalls). You tell the camera, “I need 1/1000 speed,” and the camera opens the aperture to make that work.
Manual Mode (M)
This is the big goal. In Manual Mode, you set the Aperture, Shutter Speed, and ISO. Nothing is automatic.
- Use it when: The lighting is tricky, or you want a specific creative effect. It gives you full control. It takes time to learn, but it is worth it. It stops the camera from making bad guesses.
FAQ’s:
What Are the Best Camera Settings For Indoor Photography?
Indoors, you usually have less light than you think.
- Increase your ISO (try 800 or 1600).
- Use a wider aperture (small f-number) to let light in.
- Watch your shutter speed. If it goes below 1/60, your photos might be blurry from hand movement. For an iPhone camera settings cheat sheet, tap the screen to focus and slide the sun icon up to brighten the image.
Do I Always Need to Shoot in Manual Mode?
No. Even a professional photographer often uses Aperture Priority mode. Manual mode is great when the lighting does not change (like in a studio) or when the camera is confused. But for walking around, semi-automatic modes are very useful and faster.
How Do I Get A Blurry Background in my Photos?
To get that creamy, blurred background, you need a shallow depth of field.
- Select Aperture Priority.
- Dial in the lowest f-number your lens allows (like f/1.8 or f/2.8).
- Get close to your subject.
- Make sure the background is far away from the subject. If you are using a mobile device, use “Portrait Mode.”
What is the “Sunny 16” Rule?
This is an old rule from the days of film, before digital screens. It says: On a sunny day, set your aperture to f/16. Then, set your shutter speed to match your ISO. For example, if ISO is 100, shutter speed is 1/100. This usually gives the correct exposure without needing a light meter.
Which ISO Setting Should I Use to Avoid Grainy Photos?
To avoid image noise (grain), use the lowest ISO possible.
ISO 100 or 200 is best. As you increase the number (400, 800, 1600), the camera adds electricity to the sensor, which creates noise. Only raise the ISO if you have poor lighting conditions and cannot fix it with aperture or shutter speed.
Conclusion
Learning your camera’s settings is the best thing you can do for your photography. It might feel like a lot to remember at first.
That is normal. The exposure triangle is a balancing act. If you change one thing, you check the others.
Start by trying one mode at a time. Spend a day in Aperture Priority. See what happens when you change from f/2.8 to f/16.
Then spend a day thinking about shutter speed. Try to freeze a car or make water look like silk.
Remember, even the most expensive digital camera is just a tool. The real magic comes from your vision. This camera settings cheat sheet is here to help you unlock that vision. Don’t be afraid of the manual mode or the mode dial. Mistakes are just part of learning.
So, grab your camera, check your battery, and head out.
Whether you are using a phone with an iPhone camera settings cheat sheet app or a heavy DSLR, the light is waiting for you. Next time you see a beautiful moment, you will know exactly how to capture it.
We hope this resource helps you on your creative journey. Keep practicing, keep shooting, and enjoy the process of making great photos.
