Categories
Photoshop

How to Create Photoshop Type On Path: Quick Tips & Easy Method

Here at Designers Choice, we know that design is more than just placing pictures on a page. It is about telling a story.

As a team of passionate designers, we have spent years learning the tricks of the trade. We created Designers Choice to be the resource we always wished we had—where expertise meets inspiration. We know the challenges of turning creative ideas into reality.

You might struggle to find the perfect layout or get your text to look just right. That is why we have curated a collection of top-quality products, innovative solutions, and trusted insights, all tailored for fellow professionals who demand the best.

At Designers Choice, our mission is to empower you to bring your boldest visions to life, backed by a community that values creativity, craftsmanship, and excellence as much as you do.

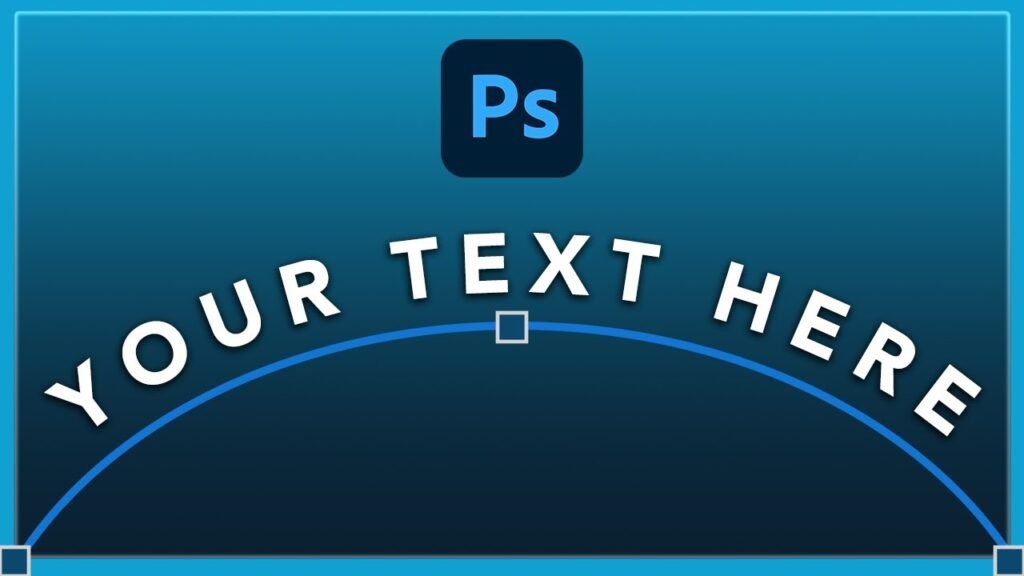
Today, we are going to tackle a super fun and useful skill: Photoshop type on path. Have you ever seen a logo with text curving around a circle? Or maybe a poster where the words flow like a wave? That is not magic; it is a simple tool in Adobe Photoshop. Whether you are new to graphic design or just need a refresher, this guide will help you master it. We will write this in very simple steps so anyone can follow along.

What is the Photoshop Type on Path Tool?

What is the Photoshop Type on Path Tool?

Before we start clicking buttons, let us talk about what this tool actually is. In most simple writing apps, you type in a straight line from left to right. But design is not always straight. Sometimes, you want your words to have a shape.

The Photoshop type on path feature allows your text to stick to a line or a shape. This “line” is called a path. A path is like an invisible wire. When you attach text to it, the letters sit on that wire like birds on a telephone line. If the wire curves, the text curves.

If the wire goes in a circle, the text goes in a circle.

Understanding the Basics of Text and Paths

To make this work, you need two things: a text layer and a path. You can make a path out of anything.

It can be a perfect circle made with the ellipse tool. It can be a square made with the rectangle tool.

Or, it can be a squiggly line you draw yourself.

When you combine the type tool with a path, Photoshop creates a special kind of relationship between them. The text is still editable.

You can fix spelling mistakes or change the font size. But now, it follows the rules of the path.

Why Use Type On A Path For Design?

Why would you want to do this? There are many reasons!

  • Logo Design: Many logos use text inside a circle. Think of badges or stickers.
  • Text Effects: You can make text look like it is sliding down a hill or wrapping around a person’s head.
  • Artistic Layouts: Straight text can be boring. Curved text feels more dynamic and fun.

Even with the rise of generative AI, knowing these manual skills is key. AI can make a picture, but it often messes up text. A human designer knows exactly where every letter should go.

How to Create A Photoshop Type on Path Using Shapes?

How to Create A Photoshop Type on Path Using Shapes?

Let us start with the easiest method: putting text on a shape. We will use a circle for this example, as it is the most common request we get.

Step 1: Selecting the Shape Tool (Circle, Rectangle, Polygon)

First, open Adobe Photoshop. You want to look at the tools panel on the left side of your screen.

Look for the shape tools. Usually, the rectangle tool is on top. If you click and hold your mouse button on it, you will see a list of other shapes.

Select the ellipse tool. This is the tool we use to make circles and ovals.

Tip: If you do not see it, check if you are in the Photoshop basics section of your workspace, or search for “Ellipse” in the help bar.

Step 2: Drawing Your Shape on the Canvas

Now, look at the options bar at the top of the screen. This bar changes depending on what tool you have picked. Near the far left of the options bar, you will see a drop-down menu that usually says “Shape“.

You have various options here, but for this technique, you can leave it as “Shape” or switch it to “Path“. If you leave it as “Shape“, it creates a colored shape on a new layer. This is fine.

Go to your canvas. Click and drag to draw your circle.

  • Designers Choice Tip: To make a perfect circle, hold down the shift key on your keyboard while you drag. If you do not hold the shift key, you might get an egg shape.
  • Try to make a circle about the size of a golf ball or an orange on your screen so you have plenty of room to work.

You will see a thin outline appear. This is your path.

Step 3: Activating the Type Tool and Clicking the Path

Now, go back to the tools panel and click the type tool. It looks like a big letter “T“. Specifically, you want the horizontal type tool.

Move your mouse over the edge of the circle you just drew. Watch your cursor closely.

  • Normally, the cursor looks like a box around the letter I.
  • When you touch the edge of the shape, you will see a cursor change. The box around the “I” disappears and turns into a dotted wavy line.

This dotted wavy line is the secret signal! It tells you that if you click now, the text will stick to the shape of the path.

Step 4: Typing and Formatting Your Text

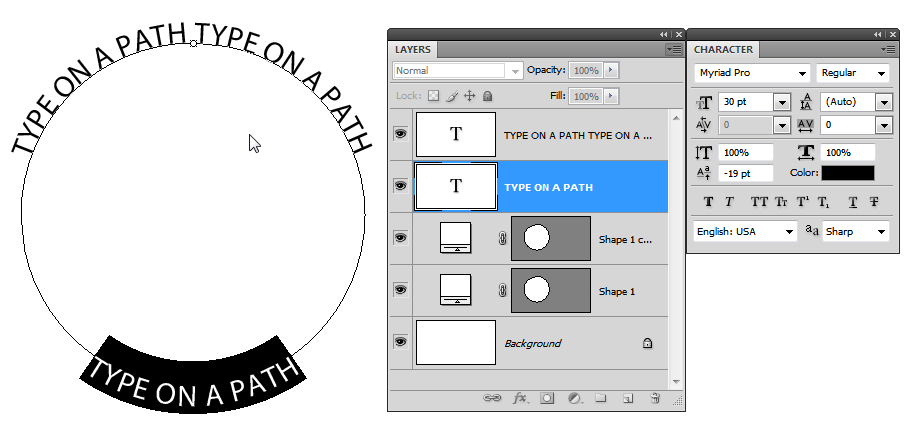
Click once on the edge of the circle. You will see a blinking line. Now, just type! You can type “Designers Choice” or “Best Coffee in Town“.

Notice how the letters wrap around the curve.

  • If the text is too big, select it and change the font size in the options bar.
  • We recommend a clean font like Futura Condensed Medium for circular text because it is easy to read.

When you are done typing, click the checkmark at the top or press Enter (on the number pad) to finish. You now have a type layer that is shaped like a circle!

Mastering Photoshop Type on Path With the Pen Tool

Mastering Photoshop Type on Path With the Pen Tool

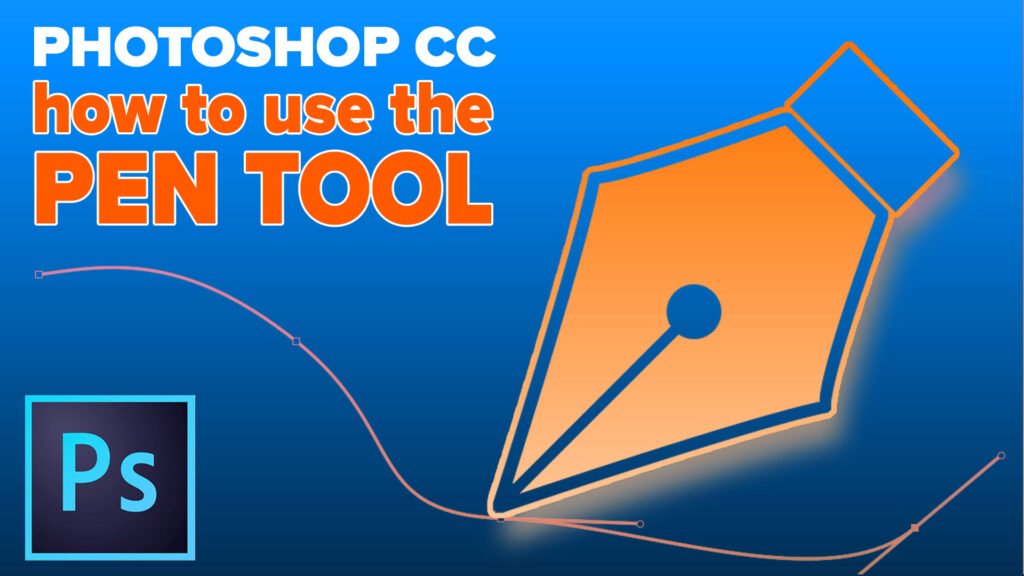
Shapes are great, but sometimes you want a path that flows like a river. For this, we use the pen tool.

Drawing Custom Curves With the Pen Tool

Select the pen tool from the tools panel. It looks like the tip of an ink pen.

  • Click on the left side of your canvas to make a dot (an anchor point).
  • Move to the middle, click, and drag. This creates a curve.
  • Move to the right side and click again.

You have now created a freeform path. It is not a shape; it is just a line. This works exactly the same way as the circle.

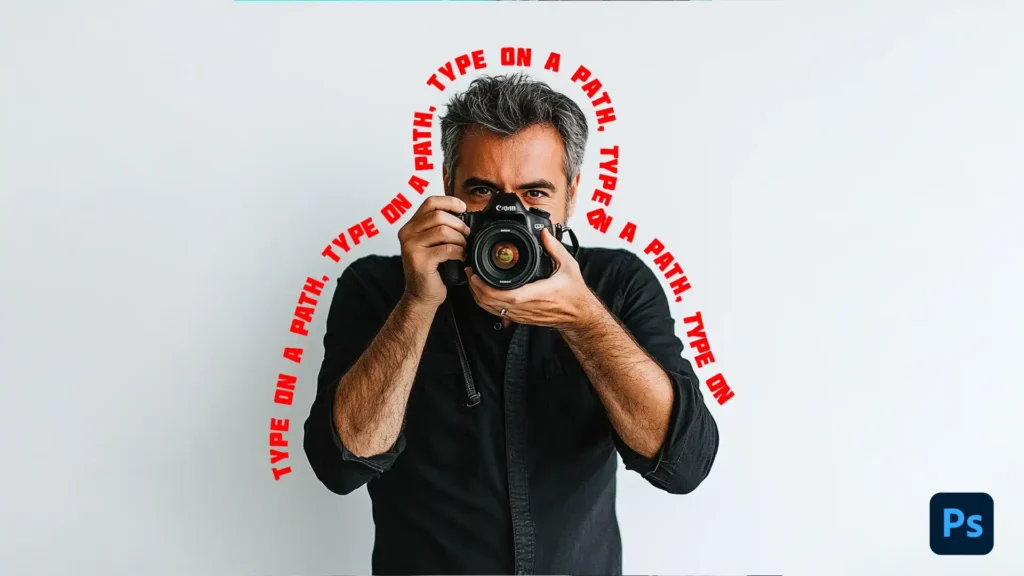
How to Snap Text to A Custom Path?

Select the text tool again. Hover over your new wavy line.

Wait for that dotted wavy line icon to show up near your cursor. Click on the line. Now, type your text. The words will surf along the wave you drew. This is perfect for text effects where words need to flow around an object, like a person’s head or a mountain.

Adjusting the Start and End Points of Your Text

Here is where it gets a little tricky, but do not worry. When you type on a path, Photoshop puts invisible marks at the start and end of your text. Sometimes, your text starts in the wrong spot.

To fix this, we need a special tool called the path selection tool.

  • Go to the tools panel.
  • Look for the arrow tools. There is a black arrow and a white arrow.
  • Select the black arrow. This is the path selection tool.

Hover your mouse over your text. Your cursor will change to an I-beam with a small arrow pointing left or right.

  • Click and drag the text along the line. You can slide it to the left or right.
  • You will see two points: an ‘X‘ (the start) and a circle (the end).
  • Use the path selection tool to drag these points so your text sits exactly where you want it.

Advanced Techniques For Photoshop Type on Path

Advanced Techniques For Photoshop Type on Path

Now you know the basics. But what if you want the text to be inside the circle? Or flipped upside down? This is a very common question, and our photoshop type on path flip technique is essential.

Flipping Text to the Inside Of A Circle

Imagine you are making a stamp style logo. You have text on top that curves up, and text on the bottom that curves down.

If you just type on the bottom of a circle, the text will be upside down. We do not want that! We want it to be readable.

Here is the secret:

  1. Draw your circular path.
  2. Type your text. It will sit on the outside.
  3. Select the path selection tool (the black arrow).
  4. Move your cursor over the text.
  5. Click and drag the text toward the center of the circle.

Snap! The text will flip to the inside of a circle. Now it is on the original side but facing inward.

You might notice the text looks a bit cramped. Since it is inside the circle, the letters get squished.

  • Go to the character panel (Window > Character).
  • Find the “Tracking” option (it looks like VA with arrows).
  • Increase the number to add space between letters.

Distorting and Warping Text Along A Curve

For a fun effect, you can use the warp text feature.

  • Select your type layer.
  • Look at the options bar for an icon that looks like a T on a curved hill. This is warp text.
  • Click it to see various options. You can make text bulge, twist, or look like a fish.

This is different from a path because it distorts the letters themselves, making them fat or thin.

Creating Spiral Text Effects

Want to make a spiral? You can do this with the pen tool or adobe illustrator if you have it.

In Photoshop CC, you can draw a spiral path by hand.

  • Draw a loose spiral with the pen.
  • Click with the text tool.
  • Type a very long sentence.
  • The text will curl all the way into the middle!

Troubleshooting Common Photoshop Type on Path Issues

Troubleshooting Common Photoshop Type on Path Issues

Sometimes, Photoshop type on path not working is a search term we see a lot. Things can go wrong. Here is how to fix them.

Why is My Text Disappearing?

You are typing, and suddenly… poof! The end of the sentence is gone. This usually happens because the text is too long for the path.

  • Switch to the path selection tool.
  • Look for a small circle or square at the end of the text on the path line.
  • If this point is too close to the start, the text gets cut off.
  • Drag the endpoint further down the path to reveal the hidden words.

Also, check your text alignment.

If your text is “Center Aligned” but you clicked at the very end of the path, half your text might be hanging off the edge into space.

How to Hide the Path Line After Typing

Once you are done, you might still see that thin black line or circle. It can be annoying when you are trying to view your final result.

  • This line does not print, but it distracts you.
  • To hide it, simply click on a different layer in the layers panel, like the background layer.
  • Or, press Ctrl + H (Command + H on Mac) to hide extras.

Fixing Spacing and Kerning Issues on Tight Curves

If you put big text on a small circle, the letters might crash into each other.

  • Use the character panel again.
  • Adjust the tracking (space between all letters).
  • You can also use baseline shift. This moves the text up or down from the line.
  • A negative number in the baseline shift box will move the text closer to the center. A positive number moves it away. This helps the text float nicely.

FAQ’s:

How Do I Flip Text On A Path in Photoshop?

Use the path selection tool (the black arrow). Click on your text and drag your mouse cursor across the line of the path.

If you are on the outside, drag inside. The text will flip instantly.

How Do I Remove the Path Line After Typing Text in Photoshop?

You cannot “remove” it because the text needs the path to sit on. However, you can hide it. Just click on another layer, like the background layer, in the layers panel. The line will vanish from view, but the text stays.

Can I Edit the Shape of the Path After I Have Typed On It?

Yes! Use the direct selection tool (the white arrow). Click on the path line. You will see little squares called anchor points.

Drag these squares to change the shape. The text will automatically move to fit the new shape. It is like a smart object that updates itself.

Why Is My Text Upside Down When Using Photoshop Type on Path?

This happens based on the direction of the path you drew or where you clicked. To fix it, grab the path selection tool and drag the text to the other side of the path line. It will flip right-side up.

Which Version of Photoshop Supports Type on Path?

This feature has been around for a long time. It works in Photoshop CC, CS6, and even older versions. Whether you use the latest version with generative ai tools or an old disc version, you can do this.

Conclusion

We hope this guide makes you feel more confident using the Photoshop type on path tools.

At Designers Choice, we believe that mastering the basics is the best way to grow. Whether you are using a custom shapes tool, the pen tool, or just a simple, perfectly circular path, adding curved text can make your designs look professional and unique.

Remember, the next step is practice.

Open a new document, draw a dotted wavy line, and start typing. Play with the direct selection tools and see what happens when you drag the double arrows. Do not be afraid to make mistakes; that is how we all learn.

If you ever feel stuck or need high-quality assets to finish your project, check out Adobe Stock or browse our own curated resources here at Designers Choice. We are here to support your creative journey every step of the way. Happy designing!

Categories
Photoshop

How to Add Image in Photoshop? A Step-by-Step Guide

Welcome to Designers Choice. We are a community that loves graphic design and creativity.

We know that starting a new project can feel big. You have a great idea, but you need to know how to put it on the screen. Adobe Photoshop is a strong tool for this. It helps you change photos and make art.

But sometimes, even simple things can look hard at first.

One of the most important things to learn is how to add an image in Photoshop. This is the first step for almost every design.

You might want to put a logo on a picture. Or maybe you want to combine various images to make something new.

If you do not know how to do this, you might feel stuck. But do not worry. We are here to help you.

At Designers Choice, we want to make things easy for you.

We believe that anyone can create amazing things with the right help. In this guide, we will show you different ways to put a picture into your work. Whether you are using a Mac or a PC, these steps will help you.

Let us start this journey together and make your creative ideas real.

Why Learning How to Add an Image in Photoshop is Essential?

Why Learning How to Add an Image in Photoshop is Essential?

Why do we need to learn how to add image in photoshop? Can we just use Microsoft Word? Well, Photoshop is special. It works with layers.

Imagine a sheet of paper. Now, imagine a clear plastic sheet on top of it. You can draw on the clear sheet without ruining the paper below.

This is how a new layer works in Photoshop.

When you bring a second image into your project, it usually goes onto its own separate layer. This is very good for photo editing. You can move the new image around without moving the background image. You can make the top image see-through. You can even cut parts of it out.

If you want to make a poster, a funny meme, or a nice card, you need to mix pictures. You need to know how to insert image in photoshop on top of the background. This skill lets you build a final image that looks professional. It is the key to all graphic design. Once you know this, you can do almost anything in the program. It opens the door to using blending modes, layer masks, and more. It is the most useful skill to have.

How to Add an Image in Photoshop Using Basic Methods?

How to Add an Image in Photoshop Using Basic Methods?

There are a few simple ways to get your picture onto the screen. We will look at the easiest ways first. You can choose the one that feels best for you.

Drag and Drop From File Explorer

This is the method many people use because it is very fast. It works just like moving files on your computer.

  1. First, open Adobe Photoshop and open your new photoshop document. You should see your white canvas or background layer.
  2. Next, open your computer’s file folder. On Windows, this is the File Explorer. On a Mac, it is the Finder.
  3. Find the image file you want to use.
  4. Click on the file with your mouse button and keep holding the button down.
  5. Drag the file over to the Photoshop window.
  6. Let go of the mouse button when the cursor is over the canvas.

The computer will think for a moment. Then, you will see your image appear. It will have a box around it with corner handles. This box creates a Smart Object by default in newer versions. Press Enter on your keyboard to finish. Now you have a new layer with your picture on it.

File > Place Embedded Command

This is another easy way to add a photo. It is good if you like using menus.

  1. Look at the top of the screen where the words are. Click on the word “File.”
  2. A long menu will drop down. Look for “Place Embedded.” Click on it.
  3. A window will open showing your files. Browse to find your original photo.
  4. Click on the image and then click the “Place” button.

This puts the image into your Photoshop document. It is called “Embedded” because the image is now stuck inside your project file. If you delete the original image from your computer later, your design will still have the picture. This is a very safe way to work.

Copy and Paste From Clipboard

Sometimes, you might find a picture on the internet or in another open document. You can copy it just like text.

  1. Open the image you want to use. If it is in a web browser, right-click and choose “Copy Image.”
  2. If the image is already open in another tab in Photoshop, press Ctrl + A (to select the entire image) and then Ctrl + C (to copy).
  3. Go to your main project tab where you want the image to go.
  4. Press Ctrl + V on your keyboard.

This will paste the pixels directly. It creates a new layer above your background layer. Note that this method usually pastes pixels, not a Smart Object, so be careful if you resize it many times.

How to Add an Image in Photoshop as a Smart Object?

How to Add an Image in Photoshop as a Smart Object?

You might hear the term Smart Objects a lot. What are they? A Smart Object is like a protective box for your picture. When you learn how to add an image to another image in photoshop, using Smart Objects is a pro tip.

Benefits of Using Smart Objects

When you change the size of a normal picture (made of pixels), it can get blurry.

If you make it small and then big again, it loses image quality. It looks bad.

A Smart Object is different. It keeps the original image data safe inside. You can make it tiny, then huge, then tiny again. It will always look as sharp as the start. This is called “non-destructive” editing.

It means you do not destroy the original quality. Also, if you use a Smart Object, you can change the original file later, and it will update in your design. This is great if you are working on a logo that might change.

Converting Existing Layers to Smart Objects

If you pasted an image and it is just normal pixels (a raster layer), you can turn it into a Smart Object easily.

  1. Look at the layers panel on the right side of your screen.
  2. Find the layer that has your new image.
  3. Right-click on the gray part of that layer (not the thumbnail picture, but the name).
  4. A menu pops up. Look for “Convert to Smart Object.” Click it.

Now you will see a small icon in the corner of the layer thumbnail. This means it is safe. You can resize it without worry. This is one of the best simple tasks you can do to keep your work looking good.

How to Insert an Image Into A Specific Shape Or Selection?

How to Insert an Image Into A Specific Shape Or Selection?

Sometimes you do not want a square picture. Maybe you want your photo to be a circle, or a star, or fit inside a text letter. This is fun to do.

Using Clipping Masks to Fit Images

A clipping mask is like looking through a window. The bottom layer is the shape of the window. The top layer is the view outside.

  1. First, make a shape. You can use the Shape Tool to make a circle on a new layer.
  2. Next, bring in your second image. Make sure this image layer is above the circle layer in the layer panel.
  3. Move your mouse between the two layers in the panel. hold down the Alt key (or Option key on Mac).
  4. You will see a little square arrow icon appear. Click the mouse button.

Snap! Your image will jump inside the circle. The parts of the image outside the circle are hidden, not deleted. You can use the move tool to slide the picture around inside the circle until it looks perfect. This is a very cool trick for graphic design.

Using the “Paste Into” Feature

This is an older way, but it still works for specific selections.

  1. Use a selection tool (like the Marquee tool) to draw a box or circle on your canvas. You will see “marching ants” (dotted lines).
  2. Copy your image from somewhere else (Ctrl + C).
  3. Go to “Edit” in the top menu.
  4. Go down to “Paste Special” and choose “Paste Into.”

This creates a layer mask automatically. The image only shows where you drew the selection. You can see a black and white box next to your image in the layers panel. The white part is where the image shows. The black part hides the image.

Editing Your Image After Adding It

Editing Your Image After Adding It

Once you know how to add a photo to the background in Photoshop, you need to make it fit. Usually, the new photo is too big or too small.

Resizing and Transforming Your Image

To change the size, we use “Free Transform.”

  1. Click on your image layer in the layer panel.
  2. Press Ctrl + T on your keyboard.
  3. You will see a box with corner handles around your picture.
  4. Click on a corner handle and drag it. If you want to keep the shape correct (so it does not look squished), most new versions of Photoshop do this automatically. If you have an old version, you might need to hold the Shift key.
  5. You can also move your mouse outside the corner to spin or rotate the image.
  6. When you like the size, press Enter.

This helps you fit the new image onto your canvas size perfectly.

Rasterizing Smart Objects For Editing

Sometimes, you want to use the eraser or a brush on your image.

If you try to do this on a Smart Object, Photoshop will give you an error. It says you cannot edit the smart object directly.

To fix this, you must “rasterize” it. This turns the smart layer back into simple pixels.

  1. Right-click on the layer name in the layer panel.
  2. Choose “Rasterize Layer.”

Now it is just paint on a digital sheet of paper. You can erase parts of it or draw on it. But remember, you lose the “smart” protection.

If you make it small and then big again, it will lose image quality. Only do this if you really need to use the eraser or brush.

Troubleshooting When You Add an Image In Photoshop

Troubleshooting When You Add an Image In Photoshop

Sometimes things go wrong. It is okay. Here are some common problems and how to fix them.

Fixing “File Format Not Supported” Errors

You try to open a file, but Photoshop says “No.” This happens if the file format is strange. Photoshop likes JPG, PNG, and PSD files.

If you have a file type like “WEBP” (from the internet) or a specific camera raw file, an old Photoshop might not know it.

To fix this, you can open the image in a simple program like Paint or Preview first. Then save it as a JPG.

Now, try to add it to your Photoshop document. It should work.

Resolving Layer Visibility Issues

I added the image, but I cannot see it!

Don’t panic. Check your layers panel.

  1. Is the new layer below the background layer or another big image? In Photoshop, the layer at the top covers the layers at the bottom. Click and drag your image layer to the very top of the list.
  2. Look for the little eye icon next to the layer. If the eye is gone, the layer is invisible. Click the box to bring the eye back.
  3. Did you move it off the canvas? Press Ctrl + T. If you see the handles far away, use the move tool to drag them back to the center.

Handling Oversized Or Undersized Images

If you add a photo and it is huge, you might only see a tiny patch of color. This means the image resolution is much bigger than your canvas size.

  1. Press Ctrl + 0 (zero). This zooms out so you can see everything.
  2. Press Ctrl + T to see the edges. Shrink it down using the corner handles.

If the image is tiny, be careful. Making a tiny image huge makes it look blocky or blurry. It is better to find a larger original photo if you can.

Advanced Techniques After You Add an Image in Photoshop

Advanced Techniques After You Add an Image in Photoshop

Now you have your images. Let’s make them look amazing.

Using Layer Masks For Seamless Blending

A layer mask is the best way to mix images. It is better than erasing. Why? because if you erase, the pixels are gone forever. With a mask, you just hide them.

  1. Click your top image layer.
  2. Click the layer mask icon at the bottom of the layer panel (it looks like a rectangle with a circle inside).
  3. A white box appears next to your layer.
  4. Choose the Brush tool. Pick the color black.
  5. Paint on the image. The black paint makes the image disappear!
  6. If you make a mistake, switch your paint color to white. Paint over it, and the image comes back.

This is great for making a white background transparent or blending two faces.

Adjusting Blend Modes and Opacity Settings

At the top of the layer panel, there is a box that says “Normal.”

This is the blend mode. Click it and try others like “Multiply,” “Screen,” or “Overlay.”

  1. Multiply makes the white parts clear. It creates a dark mix.
  2. The screen makes the black parts clear. It creates a light mix.
  3. Overlay mixes the colors nicely.

Next to that is “Opacity.” This controls how solid the layer is. If you lower the opacity of the top layer to 50%, you can see the background image through it. This is how you create a ghost effect or a gentle texture overlay image.

FAQ’s:

What File Formats Can I Use When I Add an Image in Photoshop?

You can use many types. The most common are JPEG and PNG. PNG is great because it can have a clear background. You can also use TIFF, GIF, and PSD. If you use a new file from a camera, it might be RAW, which Photoshop can also handle.

How Do I Resize an Image After Adding it to Photoshop?

Select the layer in the layer panel. Press Ctrl + T on your keyboard. Grab the corner handles and drag them. Hold Shift if you want to keep the shape the same (on older versions). Press Enter when you are done.

Why Can’t I Use the Brush Tool Or Eraser on the Image I Just Added?

It is likely a Smart Object. Look for a small icon on the layer thumbnail. To draw on it, right-click the layer name and choose “Rasterize Layer.” Now it is a regular pixel layer.

Why Can’t I Add an Image in Photoshop – Getting an Error Message?

Your scratch disks might be full (your computer’s hard drive is full). Or the file format is broken. Try saving the image again or restarting Photoshop.

How Do I Add Multiple Images in Photoshop At Once?

You can go to your file explorer, select various images by holding the Ctrl key, and drag them all onto your canvas. You will have to press Enter for each one to place them as separate layers.

How Do I Open an Image as a New Layer in an Existing Project?

Do not use “Open.” Use “Place Embedded” from the File menu. Or, open the image in a separate tab, copy it, and paste it into your main project. This puts it on a new layer.

What is the Difference Between “Place Embedded” and “Place Linked”?

Embedded” puts the whole file inside your Photoshop document. The file gets bigger, but it is safe. “Linked” just looks at the file on your hard drive. If you move or delete the original file on your computer, Photoshop will lose it. Linked keeps your Photoshop file size small.

How Can I Add an Image in Photoshop Without Losing Quality?

Always bring it in as a Smart Object. Do not rasterize it unless you have to. Avoid making a small image big. Start with a high-quality original photo.

Conclusion

We hope this guide helps you feel more ready to create. Learning how to add an image in Photoshop is the start of a fun adventure. You can now mix your own images, create a cool image overlay, or just fix up a family photo.

Remember, every expert started as a beginner. Do not be afraid to make mistakes. That is what the “Undo” button (Ctrl + Z) is for!

At Designers Choice, we want you to play with the tools. Try the move tool. Test different blending modes. See what happens when you add a drop shadow or use the gradient tool. The more you practice, the easier it gets.

Soon, adding a second image or working with a white layer mask will feel as natural as writing on a sheet of paper. Keep creating, keep learning, and trust your ideas. Your final result will be something to be proud of. Thank you for reading, and happy designing!