Categories
Uncategorized Design tools

8 Best Graphic Design Tools for Web Developers in 2026

Quick Answer: The best design tools for web developers in 2026 are Figma, Canva, Framer, Tailwind UI, and Excalidraw. Figma is best for full UI/UX design work. Canva is best for quick marketing graphics. Framer is best for building and designing websites in one tool. Tailwind UI is best for ready-made components. Excalidraw is best for quick wireframes and diagrams. Read on for the full breakdown of all 8 tools.

Not every project has a dedicated designer. Sometimes you are a developer who needs to mock up a UI before building it, create a landing page graphic, or put together a quick wireframe for a client meeting — and there is no designer available to help. That is a completely normal situation in 2026, and the good news is that the tools available to solve it have never been better.

This list covers the best design tools for web developers — chosen specifically for people who think in code, not design theory. We prioritised tools with low learning curves, developer-friendly features like code export and dev handoff, and free plans that are actually useful. You do not need design skills to get value from every tool on this list.

For a broader look at AI-powered options, our full Figma AI review is a great starting point. And when you are ready to go deeper on Figma specifically, our guide on how to use Figma for beginners walks through every core feature step by step.

Why Developers Need Design Tools

The line between development and design has blurred significantly in recent years. Here is why more developers are reaching for design tools than ever before:

Not every project has a dedicated designer. Freelancers, indie developers, and small startup teams regularly need to produce design assets without design support. Having a go-to tool ready saves time and money.

Quick mockups speed up development planning. Sketching out a UI before writing a single line of code prevents costly rebuilds later. A 20-minute wireframe in Excalidraw or Figma can save hours of development rework.

Marketing assets are part of the job. Landing pages, app store screenshots, social media graphics, and documentation images all need to look professional. Developers who can handle these themselves move faster.

Design tools improve collaboration. When you understand how Figma works, conversations with designers become far more productive. You speak the same language, and the handoff from design to development gets smoother.

How We Selected These Tools

We evaluated every tool on this list from a developer’s perspective — not a designer’s. That meant checking how quickly a non-designer could produce something useful, whether the tool exported code or design specs directly, how accessible the free plan was, and whether the learning curve was manageable alongside a full development workload. Every tool on this list passed those checks.

8 Best Design Tools for Web Developers

1. Figma — Best for Full UI/UX Design and Dev Handoff

If you are going to learn one design tool as a developer, make it Figma. It is the industry standard for UI/UX design and, crucially, it has Dev Mode — a feature built specifically for developers that shows CSS values, spacing measurements, color codes, and even auto-generated code snippets directly from any design file.

When a designer hands you a Figma file, Dev Mode means you can inspect every element and get the exact values you need without asking the designer to explain their decisions. And when you are the one building the design, you can share your Figma file directly with a client or stakeholder for review without exporting anything.

The free plan supports three design files and unlimited collaborators — plenty for most development projects. The learning curve is moderate but worth it. Our guide on how to use Figma for beginners makes the process much faster.

Best for: Full UI/UX design, client presentations, developer handoff

Free plan: Yes — 3 files, unlimited collaborators

Code export: Yes — Dev Mode shows CSS, iOS, and Android values

Learning curve: Medium

2. Canva — Best for Quick Marketing Graphics

Canva is not a UI design tool — but for the marketing and content design work that lands on developers’ plates, it is the fastest option available. Social media graphics, blog post headers, app store screenshots, presentation slides, and email banners can all be done in Canva in a fraction of the time it would take in any other tool.

The drag-and-drop interface requires no design knowledge. The template library is enormous. And the AI features — particularly Magic Design and the background remover — mean you can produce professional-looking graphics quickly even if you have never thought about design before.

The free plan is genuinely useful. Most developers will never need to upgrade.

Best for: Marketing graphics, social media content, quick visual assets

Free plan: Yes — generous free tier

Code export: No

Learning curve: Very low

3. Framer — Best for Building and Designing Websites Together

Framer sits in a unique position — it is both a design tool and a website builder. You design your site visually in Framer and it publishes directly to a live URL without writing HTML or CSS. For developers who want to prototype or launch a landing page fast, this is a genuinely powerful combination.

What makes Framer interesting for developers specifically is its component system and CMS. If you know how to think in components (which most developers do), Framer’s structure feels familiar. You can also write custom code overrides in JavaScript to extend Framer’s behaviour beyond what the visual editor supports.

The free plan lets you publish a Framer site with a Framer subdomain — useful for prototyping. Paid plans start at around $5 per month for a custom domain.

Best for: Landing pages, portfolio sites, interactive prototypes Free plan: Yes — Framer subdomain Code export: Yes — React components and CSS Learning curve: Medium

4. Tailwind UI — Best for Ready-Made Component Designs

Tailwind UI is not a design tool in the traditional sense — it is a library of beautifully designed, production-ready UI components built with Tailwind CSS. If you are already using Tailwind in your projects, this is the fastest way to get professional-looking UI without designing anything from scratch.

Every component — navbars, hero sections, pricing tables, modals, forms — comes with clean HTML and Tailwind class code you can copy and paste directly into your project. The design quality is high and consistent, and everything is responsive out of the box.

Tailwind UI is a paid product with no free plan, but the one-time purchase gives you lifetime access to the full component library including all future additions.

Best for: Production-ready UI components for Tailwind CSS projects

Free plan: No — paid one-time purchase

Code export: Yes — HTML and Tailwind CSS

Learning curve: Very low if you already know Tailwind

5. Excalidraw — Best for Quick Wireframes and Diagrams

When you need to sketch out a UI flow, architecture diagram, or page layout quickly — without spending time learning a complex tool — Excalidraw is the answer. It is free, browser-based, and has a deliberately simple hand-drawn style that makes it perfect for rough planning work.

There is almost no learning curve. You open it, draw boxes and arrows, add labels, and you have a wireframe. It is not meant to produce polished designs — it is meant to get ideas out of your head and onto a screen fast. For planning meetings, client briefings, or pre-development UI sketches, it is hard to beat.

Excalidraw also supports real-time collaboration, so multiple people can sketch on the same canvas simultaneously. Everything is free with no account required.

Best for: Quick wireframes, system diagrams, planning sketches

Free plan: Yes — completely free

Code export: No

Learning curve: Very low

6. Coolors — Best for Fast Color Palette Generation

Color decisions slow a lot of developers down. Coolors removes that friction entirely. Hit the spacebar and it generates a new five-color palette instantly. Lock colors you like and keep generating until the combination is right. Export as HEX, RGB, CSS variables, or a direct link to share with a designer or client.

Coolors also has tools for checking color contrast accessibility (WCAG compliance), extracting palettes from uploaded images, and browsing thousands of user-created palettes for inspiration. For developers who struggle with color decisions, this is the fastest solution available.

The core palette generator is completely free. A Pro plan adds extra features but is rarely necessary.

Best for: Color palette generation, accessibility checking, brand color decisions

Free plan: Yes — core features free

Code export: CSS variables, HEX, RGB

Learning curve: Very low

7. Unsplash — Best for Free Stock Photos

Every web project needs images. Unsplash is the go-to source for high-quality, free stock photography that you can use in personal and commercial projects without attribution. The library covers virtually every subject — people, landscapes, architecture, food, technology, and more.

The search is fast and the image quality is consistently high. Download in multiple resolutions directly from the site. Unsplash also has an API that developers can integrate directly into their projects to pull images programmatically.

Everything on Unsplash is free under the Unsplash License, which allows use in commercial projects without crediting the photographer (though attribution is always appreciated).

Best for: Free stock photography for web projects

Free plan: Yes — completely free

Code export: N/A

Learning curve: Very low

8. Heroicons — Best for Free UI Icons

Icons are a fundamental part of UI design and Heroicons is one of the cleanest, most developer-friendly icon sets available. Created by the team behind Tailwind CSS, Heroicons offers over 300 SVG icons in outline and solid styles — all free and open source.

Each icon is available as a raw SVG you can copy directly, or as a React or Vue component via the npm package. The visual style is clean and modern, consistent across the entire set, and designed specifically for UI use rather than illustration.

For developers building with React or Vue, the component integration is particularly smooth — import the icon you need and use it like any other component with full sizing and color control via props.

Best for: UI icons for web applications

Free plan: Yes — completely free and open source

Code export: Yes — SVG, React, Vue components

Learning curve: Very low

Quick Comparison Table

ToolBest ForFree PlanCode ExportLearning Curve
FigmaUI/UX design + dev handoff✅ Yes✅ Dev ModeMedium
CanvaMarketing graphics✅ Yes❌ NoVery Low
FramerLive websites✅ Yes✅ React/CSSMedium
Tailwind UIUI components❌ Paid✅ HTML/CSSLow
ExcalidrawWireframes✅ Yes❌ NoVery Low
CoolorsColor palettes✅ Yes✅ CSS varsVery Low
UnsplashStock photos✅ YesN/AVery Low
HeroiconsUI icons✅ Yes✅ SVG/ReactVery Low

How to Choose Based on Your Project

Not sure which tool to reach for? Here is a simple decision guide based on what you actually need right now:

Building a full web app UI? Use Figma with Dev Mode for handoff — it gives you the most control and the cleanest path from design to code.

Need a landing page fast? Use Framer — design and publish in one tool without touching HTML or CSS unless you want to.

Need quick marketing graphics? Use Canva — fastest for non-design tasks, huge template library, no learning curve.

Need a quick wireframe for a planning meeting? Use Excalidraw — simplest tool on this list, open it and start drawing in under 60 seconds.

Need icons and images for your project? Use Heroicons for icons and Unsplash for photos — both free, both high quality.

Struggling to choose colors? Use Coolors — hit spacebar until you find something that works, then export the CSS variables directly.

Final Verdict

You do not need to learn all eight tools on this list. Start with one or two based on your most immediate need and build from there.

If you only pick one, make it Figma. The Dev Mode alone makes it worth learning, and the skills you build in Figma apply directly to how you think about UI structure in code. If Figma feels like too much of a time investment right now, start with Excalidraw for wireframing and Canva for graphics — both are usable within minutes.

For more on the broader design tool landscape, check out our best AI design tools roundup. And when you are ready to go deeper on Figma, our how to use Figma for beginners guide is the fastest way to get up to speed.

Frequently Asked Questions

Q: What design tool should developers learn first? Figma is the best design tool for developers to learn first because it is the industry standard and includes Dev Mode — which shows CSS values, spacing, and code snippets directly from any design file. Learning Figma also improves communication significantly when working with designers on collaborative projects.

Q: Can developers create good designs without design skills? Yes. Tools like Canva and Framer are specifically built to help non-designers create professional looking graphics and websites. While dedicated designers will always produce more polished custom work, these tools let developers create competent designs for personal projects, prototypes, and situations where a designer is not available.

Q: What is the best free icon tool for developers? Heroicons is one of the best free icon sets for developers — created by the Tailwind CSS team, it provides clean SVG icons available as React and Vue components via npm. Other strong free options include Lucide Icons and Feather Icons, both of which follow a similar component-based integration approach.

Q: Does Figma help with developer handoff? Yes. Figma’s Dev Mode is specifically built for developer handoff. It shows exact spacing, colors, font details, and generates CSS code snippets directly from the design file. This significantly reduces the back-and-forth between designers and developers during the implementation phase of any project.

Q: What is the best tool for quick wireframes? Excalidraw is the best tool for quick wireframes due to its simple hand-drawn style interface and near-zero learning curve. It is free, works in the browser with no account required, and is ideal for quickly sketching UI flows during planning sessions before starting detailed design work.

Q: Where can developers find free stock photos? Unsplash is the best source for free stock photos that developers can use in personal and commercial projects. Other strong free options include Pexels and Pixabay. All three offer high quality images with licenses that allow commercial use, though checking the specific license on each image is always a good habit.


Categories
Uncategorized

Chat GLT Vs ChatGPT: What You Need to Know in 2026

At Designers Choice, we know that keeping up with new technology can feel hard. The world of artificial intelligence is growing fast, and new tools come out every day. One term that many people search for is “Chat GLT.” If you have typed this into a web browser or heard it on social media, you are not alone. Millions of people around the world use AI tools to help with work, school, and daily life.

This article will help you understand what Chat GLT really means, how it connects to ChatGPT, and why so many people get the two mixed up. We will keep things simple so that everyone, can follow along.

Whether you are a designer, a student, or just someone curious about AI, this guide is for you.

What Is Chat GLT?

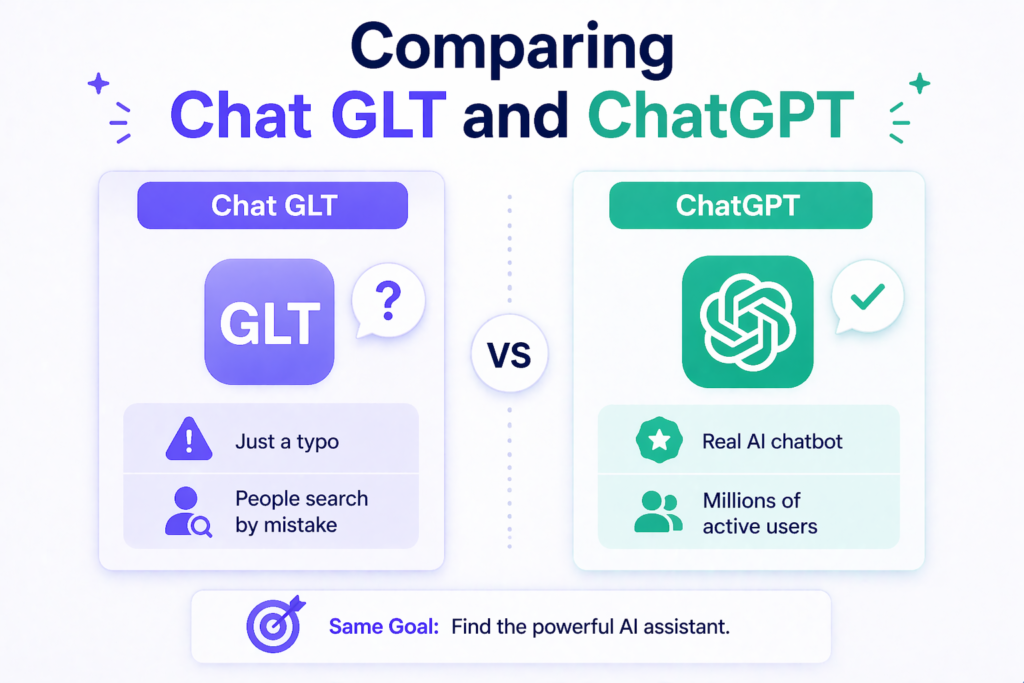
What is Chat GLT infographic showing it as a common typo for ChatGPT and not a real AI tool

Chat GLT is not a real product or AI chatbot. It is a common typo that people make when they try to search for ChatGPT. When someone types fast or hears the name spoken out loud, “GPT” can easily become “GLT” on the keyboard. The letters “P” and “L” sit close to each other, and “T” is right next to “P” as well. This small mistake leads thousands of people to type “Chat GLT” into search engines every month.

Even though Chat GLT does not exist as its own tool, the people searching for it are looking for the same thing: a powerful tool that can answer questions, write emails, help with computer code, and much more.

Common Misconceptions About Chat GLT and ChatGPT

Many people think that Chat GLT might be a different AI model made by another company.

Some wonder if it is a cheaper version, a newer app, or even a fake copy of the real thing. The truth is simple: there is no separate product called Chat GLT. If you see a website or app claiming to be “Chat GLT,” it could be a scam or a copycat trying to trick users.

Another wrong idea is that Chat GLT and ChatGPT give different answers. Since Chat GLT is just a misspelling, any website using that name is likely pointing to the same large language model technology, or trying to steal your email address and personal data.

Why the Term “Chat GLT” Is Frequently Used

The main reason people type Chat GLT is because of how our brains and fingers work. When we hear “ChatGPT” spoken quickly, it sounds like one smooth word. Our hands may type what we think we heard.

Also, autocorrect on phones sometimes changes “GPT” to “GLT” because “GLT” might be saved in someone’s text history. On top of that, some marketers use the term Chat GLT on purpose to catch people who made the typo, hoping to sell them something else.

Understanding ChatGPT: The Technology Behind the Name

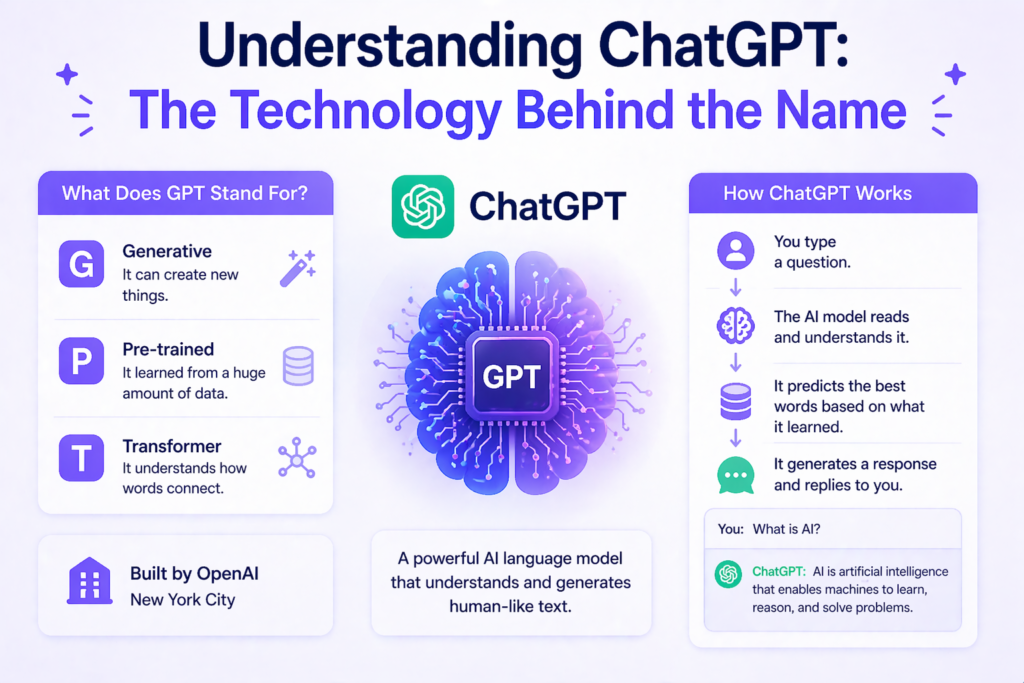
Understanding ChatGPT infographic explaining GPT meaning and how the AI model works

Now that we know Chat GLT is just a typo, let us look at the real chatbot: ChatGPT. This tool has changed how people use the internet and get information online.

What Does GPT Stand For?

GPT stands for “Generative Pre-trained Transformer.” That is a long and fancy name, so let us break it down:

  • Generative means it can create new things, like text, lists, or ideas.
  • Pre-trained means it learned from a huge amount of training data before it ever talked to a real person.
  • Transformer is a type of machine learning system that helps the AI understand how words connect to each other.

So GPT is not a person or a company. It is a type of language model built by a company called OpenAI. The creator of ChatGPT, OpenAI, is based in New York City and has become one of the biggest names in artificial intelligence.

How ChatGPT Functions At A Basic Level

When you type a question or sentence into ChatGPT, the AI model reads your input text and guesses what words should come next.

It does this based on patterns it learned during training. The training process involved reading billions of web pages, books, and articles. Then, human trainers gave feedback to help the AI give better answers. This method is called reinforcement learning from human feedback.

The result is an artificial intelligence chatbot that can converse with you about almost any topic. It can help write emails, explain hard ideas, translate languages, and even write simple computer code.

Comparing Chat GLT and ChatGPT

Comparison of Chat GLT and ChatGPT showing Chat GLT as a typo and ChatGPT as the real AI chatbot

Since we now know that Chat GLT is not a real product, the comparison is simple. But let us look at why this mix-up happens so often and what it means for users.

Are Chat GLT and ChatGPT the Same Thing?

Yes and no. Chat GLT is not a real chatbot, but almost everyone who searches for it wants to find ChatGPT.

Think of it like this: if you misspell a friend’s name in your phone, you still mean the same person. The contact is wrong, but the intention is right. In the same way, Chat GLT and ChatGPT lead to the same goal, finding the popular AI chatbot made by OpenAI.

Key Differences and Similarities Explained

The only “difference” is the spelling. Chat GLT has over 500 million weekly active users searching for help, answers, and creative ideas.

The real ChatGPT has those users. The similarities are everything else: both terms are used by people who want to talk to an AI, get homework help, write better emails, or learn something new.

Core Features of ChatGPT

Core features of ChatGPT including easy interface, voice input and multilingual support

ChatGPT is packed with features of ChatGPT that make it useful for all kinds of people, including designers, students, and business owners.

User Interface and Accessibility

The user interface of ChatGPT is clean and easy to use. You open a web browser, go to the website, and start typing. You do not need to download anything to use the basic version. This accessibility makes it open to people who are not tech experts. I

In recent years, OpenAI also added voice features, so you can now talk to the AI instead of just typing. This audio option helps people with disabilities or those who prefer speaking over writing.

Language Support and Multilingual Capabilities

ChatGPT supports dozens of languages. You can ask it questions in English, Spanish, French, Chinese, and many more. This makes it a powerful global tool for people from different countries. For designers who work with international clients, this feature is a big help.

You can ask the AI to translate your project briefs or client emails in seconds.

Accessing ChatGPT Online

Accessing ChatGPT online via web browser and mobile app with simple login and chat interface

Getting started with ChatGPT is simple. You have a few ways to access it.

Web-Based ChatGPT Platforms

The easiest way is through your web browser.

Just visit the official OpenAI website and sign up with your email address. You can use the free version right away. The free version has some limits, but it is still very useful. If you need faster answers and more features, you can pay for a premium plan.

Mobile Apps For ChatGPT

You can also download the ChatGPT app on your phone. It works on both iPhone and Android devices. The app lets you chat with the AI on the go, save your past talks, and even use voice mode.

Many ChatGPT users prefer the app because it sends notifications and feels like texting a smart friend.

Popular Uses For ChatGPT

Popular uses of ChatGPT including writing, learning, coding, ideas, analysis, and emails

People use ChatGPT for all kinds of tasks. Here are some of the most common ways it helps in daily life.

Personal Productivity Applications

ChatGPT can help you make to-do lists, plan your week, write birthday messages, and even suggest meals based on what you have in your fridge. It acts like a personal helper that never sleeps. Some people use it to draft emails to bosses or landlords, making sure they sound polite and clear. Prompt engineering, the skill of asking the AI the right way, can make these tasks even easier.

Academic, Research, and Professional Use Cases

Students use ChatGPT to understand hard subjects, get study tips, and check their grammar. Researchers use it to summarize long articles. Professionals, including designers, use it to brainstorm ideas, write project plans, and learn about new trends.

However, users should always double-check facts because ChatGPT can sometimes give incorrect information or nonsensical answers.

ChatGPT Versus Other AI Chatbots

ChatGPT vs other AI chatbots comparison chart including Gemini, Meta AI, and Claude features and use cases

ChatGPT is not the only AI chatbot out there. Let us see how it stacks up against others.

Unique Advantages of ChatGPT

One big advantage is its training. Because it learned from so much data and human feedback, it often gives more natural and helpful answers than other bots. It also has a huge community of ChatGPT users who share tips and plugins that add extra features. Another plus is that OpenAI keeps updating the model. For example, new versions released in September and October brought better accuracy and new tools.

Notable Alternatives and Competitors

Google has its own AI called Gemini. Other companies like Meta and Anthropic also make artificial intelligence models. These tools are good too, but ChatGPT remains the most popular. Traditional search engines like Google show you a list of web pages, while ChatGPT gives you a direct answer. This difference is why many people now use both: they search the web for news and use ChatGPT for quick explanations.

Advantages and Limitations of ChatGPT

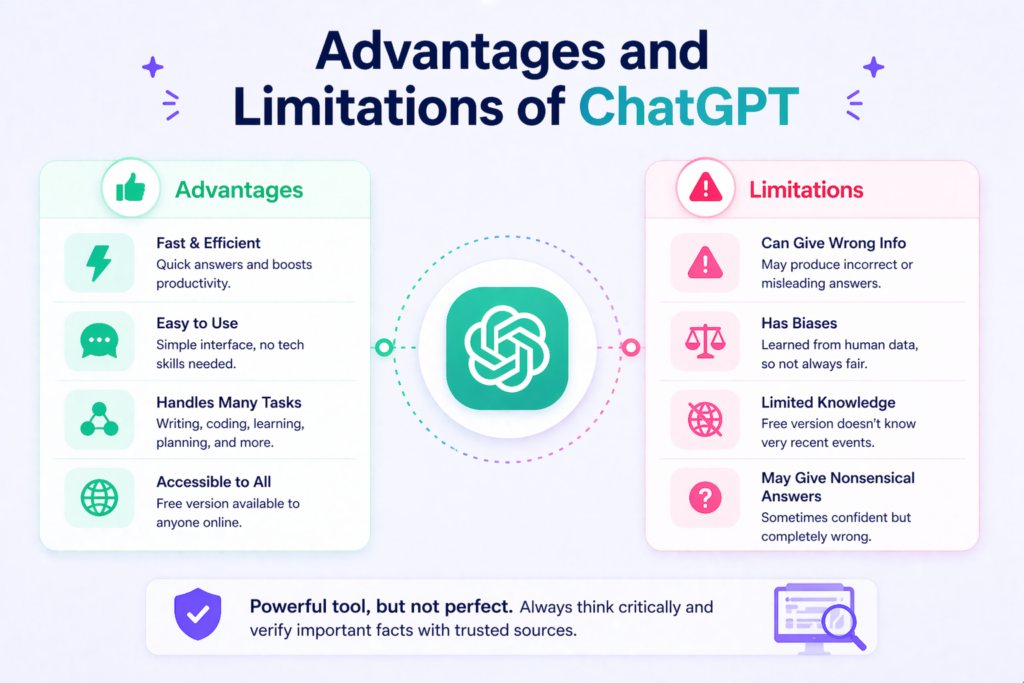
Advantages and limitations of ChatGPT showing benefits like speed and ease of use alongside challenges like misinformation, bias, and lack of real-time data access

Like any tool, ChatGPT has both good sides and bad sides.

Main Benefits For Users

The main benefits include speed, ease of use, and the ability to handle many tasks. It is a powerful tool for writers, coders, students, and designers. The free version makes it available to almost anyone with an internet connection.

It can also help people learn new skills without paying for classes.

Common Challenges and Limitations

ChatGPT is not perfect. It can spread misinformation if it guesses wrong. It has biases because it learned from human writing, and humans are not always fair. It cannot browse the live internet in the free version, so it may not know about events after a certain date.

Sometimes it gives nonsensical answers that sound smart but are wrong. Always check important facts with trusted sources.

FAQ’s:

Is “Chat GLT” A Different AI Than ChatGPT?

No. Chat GLT is just a common misspelling of ChatGPT. There is no separate AI product with that name. If you see a website claiming to be “Chat GLT,” be careful, it might not be safe.

What Does “GPT” Actually Stand For?

GPT stands for “Generative Pre-trained Transformer.” It is the name of the machine learning system that powers ChatGPT.

How Can I Access ChatGPT on My Phone?

You can download the official ChatGPT app from the App Store or Android Play Store. You can also use your phone’s web browser to visit the website.

What Are the Best Everyday Uses For ChatGPT?

People use it to write emails, plan meals, get homework help, brainstorm ideas, learn new topics, and even write computer code. It is a flexible tool for daily tasks.

Does ChatGPT Have Any Major Limitations I Should Know About?

Yes. It can give incorrect information, has biases, and does not know about very recent events unless you pay for a version with live web access. Always double-check important facts.

Conclusion

The next time you hear someone say Chat GLT or see it typed online, you will know the truth: it is simply a typo for ChatGPT.

This artificial intelligence chatbot has become one of the most important tools of our time, helping millions of people work smarter, learn faster, and create better projects.

At Designers Choice, we believe that great design starts with great tools.

While ChatGPT will not replace your creativity, it can support your process—whether you are writing client proposals, researching trends, or just trying to get through a busy week. As generative AI keeps growing, staying informed is the best way to stay ahead.

Remember to use trusted sources, practice good prompt engineering, and always think critically about the answers you get. The future of artificial general intelligence is exciting, and ChatGPT is just the beginning.

Categories
Uncategorized

GPT Zero: Can It Really Spot AI Writing? A Simple Guide

AI writing tools like ChatGPT have changed how people create content. With just a few clicks, anyone can generate essays, reports, and articles in seconds. But this has created a big problem: how do we know if a piece of text was written by a human or by artificial intelligence?

This is where AI detection tools come in. These tools help teachers, students, writers, and businesses check if content is human-written or machine-made. One of the most popular tools in this space is GPT Zero.

At Designers Choice, we know how important it is to have the right tools for your work. Whether you are a teacher checking student work, a writer protecting your reputation, or a business owner verifying content, understanding how AI detection works matters.

This guide will give you a closer look at GPT Zero, how it works, and whether it is the right AI content detector for your needs.

What is GPT Zero?

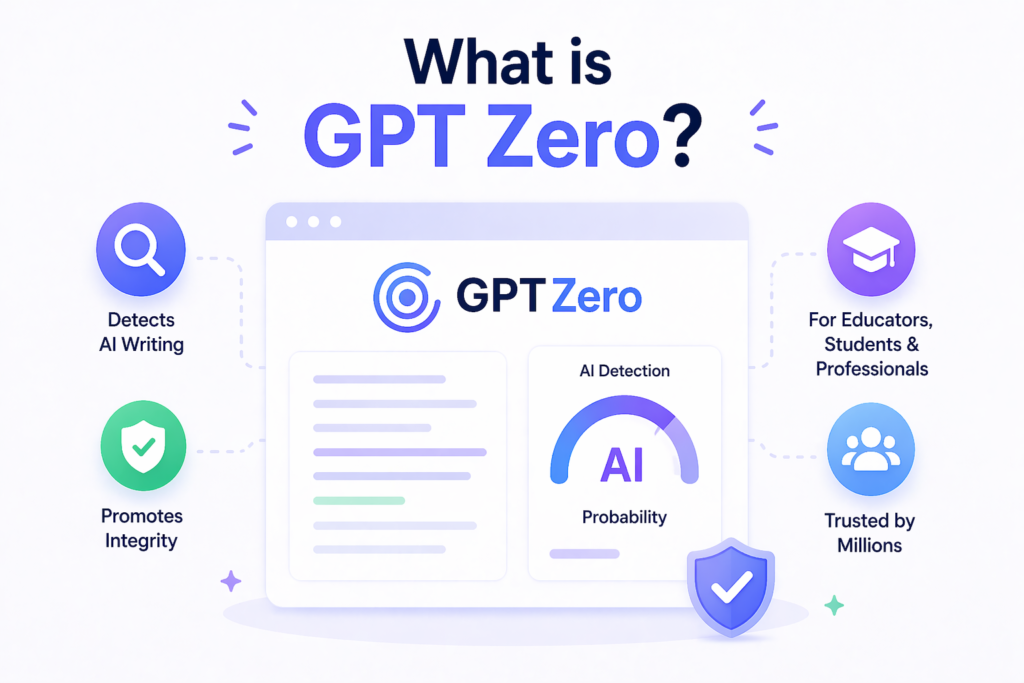
What is GPT Zero infographic showing AI writing detection and content analysis tool

GPT Zero is an AI detection tool created by Edward Tian, a student at Princeton University. He launched it in January 2023, making it one of the first tools designed to spot AI-generated text. Since then, it has become one of the most widely used AI detectors in the world.

The tool checks text to see if it was written by large language models like ChatGPT, Claude, or Google Gemini.

It looks at patterns in the writing to decide if a human or a machine created it. Millions of people use GPT Zero, including teachers, students, content creators, and professionals who care about academic integrity.

GPT Zero has grown into a full platform with a free plan for basic use and premium plans for heavy users. It offers features like batch file uploads, a Chrome extension, and even API integration for businesses that want to build AI detection into their own systems.

How Does GPT Zero Work to Detect AI-Generated Text?

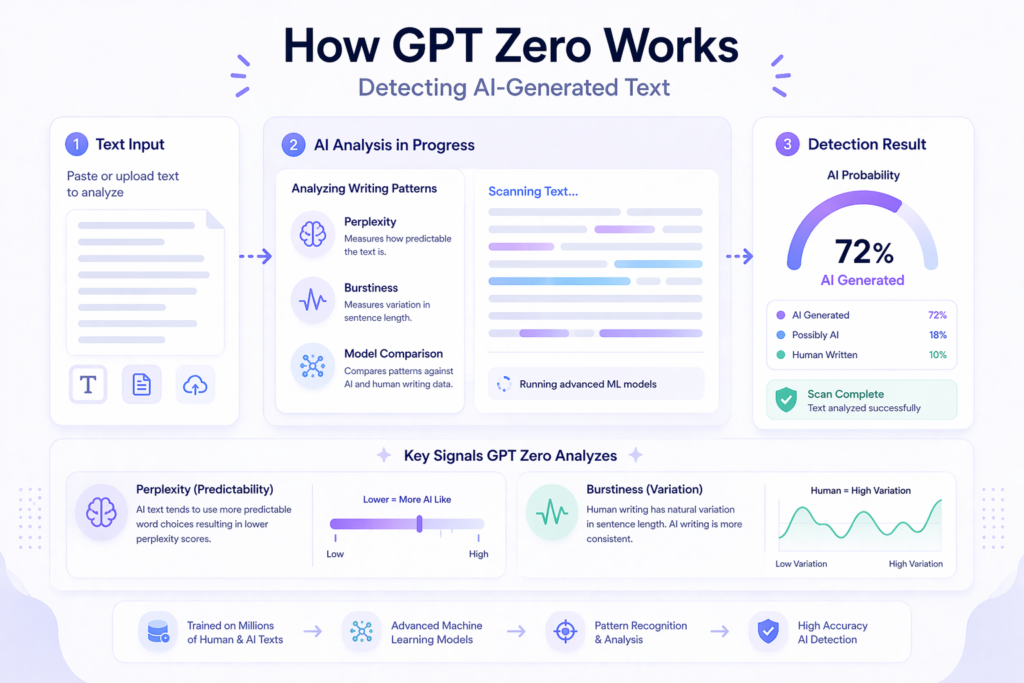
AI infographic showing how GPT Zero detects AI-generated text using perplexity, burstiness, and machine learning analysis with a probability score dashboard

GPT Zero uses machine learning and natural language processing to analyze text. It does not just look for copied words like a plagiarism checker. Instead, it studies how the text is written to find signs of AI use.

Understanding Perplexity and Burstiness

Two key ideas power GPT Zero: perplexity and burstiness.

Perplexity measures how surprised a language model would be by the word choices in a text. If the writing uses very predictable words and phrases, the perplexity score is low. AI writing usually has low perplexity because language models pick the most likely next word.

Human writing often has higher perplexity because people make more unusual word choices.

Burstiness looks at how much sentence length varies.

Human writers naturally mix short and long sentences. They might write one very long sentence followed by a short one. AI tends to be more consistent, creating sentences that are similar in length and structure. When GPT Zero sees low burstiness, it suspects AI content.

By combining these two signals, GPT Zero creates a detection model that can spot AI text with high accuracy.

The Technology Behind the Scans

GPT Zero runs text through advanced algorithms that compare it against training distribution data from known AI models.

The tool has been trained on millions of examples of both human writing and AI writing. This deep learning approach helps it recognize the small differences between human text and machine-generated content.

The technology also looks at sentence structure and writing style.

AI often follows patterns that are too perfect or too uniform. Human writing has more variation, more personality, and more natural flow. The detection tool flags these differences to give you a final verdict on whether the content is human or AI-made.

Supported Languages and Models (ChatGPT, Claude, Gemini)

GPT Zero supports multiple languages including English, Spanish, French, German, and Portuguese. It can detect content from all major AI models including ChatGPT-4, Claude, Google Gemini, and others.

The tool is constantly updated to keep up with new versions of these language models. This wide support makes GPT Zero useful for people around the world who need to check AI content in different languages.

Key Features of GPT Zero For Educators and Professionals

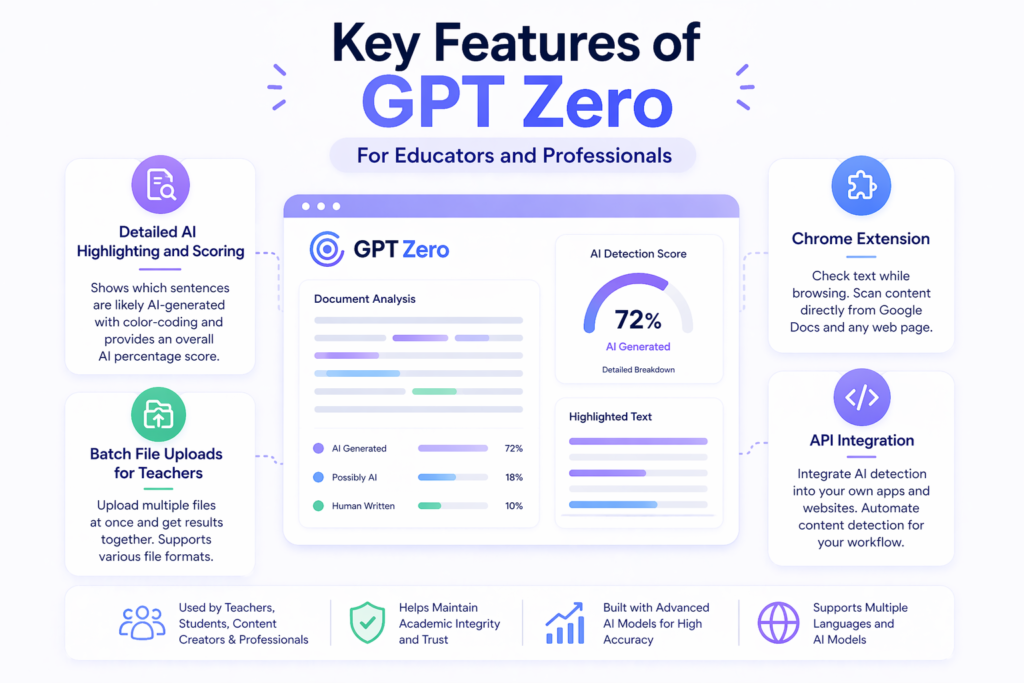
Infographic showing key features of GPT Zero including AI highlighting and scoring, batch file uploads, Chrome extension, and API integration

GPT Zero offers several features that make it stand out from other AI detection tools.

Detailed AI Highlighting and Scoring

One of the best features is the detailed highlighting.

When you scan a piece of text, GPT Zero shows you exactly which sentences it thinks are AI-generated. It uses color-coding to mark different levels of probability. This granular detail helps teachers and editors see exactly where the AI content appears. The tool also gives an overall score showing the percentage of text that appears to be AI-generated. This writing report makes it easy to understand the results at a glance.

Batch File Uploads For Teachers

For educators who need to check many student papers at once, GPT Zero offers batch uploads. Teachers can upload multiple files simultaneously and get results for all of them. This saves time when grading large classes.

The tool supports various file formats, making it flexible for different use cases.

The GPT Zero Chrome Extension and API Integration

GPT Zero offers an excellent Chrome extension that lets you check text while browsing the web. You can scan content directly from Google Docs or any web page. This makes the writing process smoother because you do not need to copy and paste text into a separate website.

For businesses and educational institutions, GPT Zero provides API integration. This allows developers to build the AI detection model directly into their own apps and websites. Customer service teams, publishers, and schools can automate content detection as part of their workflow.

GPT Zero Pricing: Is the AI Detector Free?

Many people want to know if they can use GPT Zero without paying. The answer is yes, but with some limits.

Exploring the Free Tier Limits

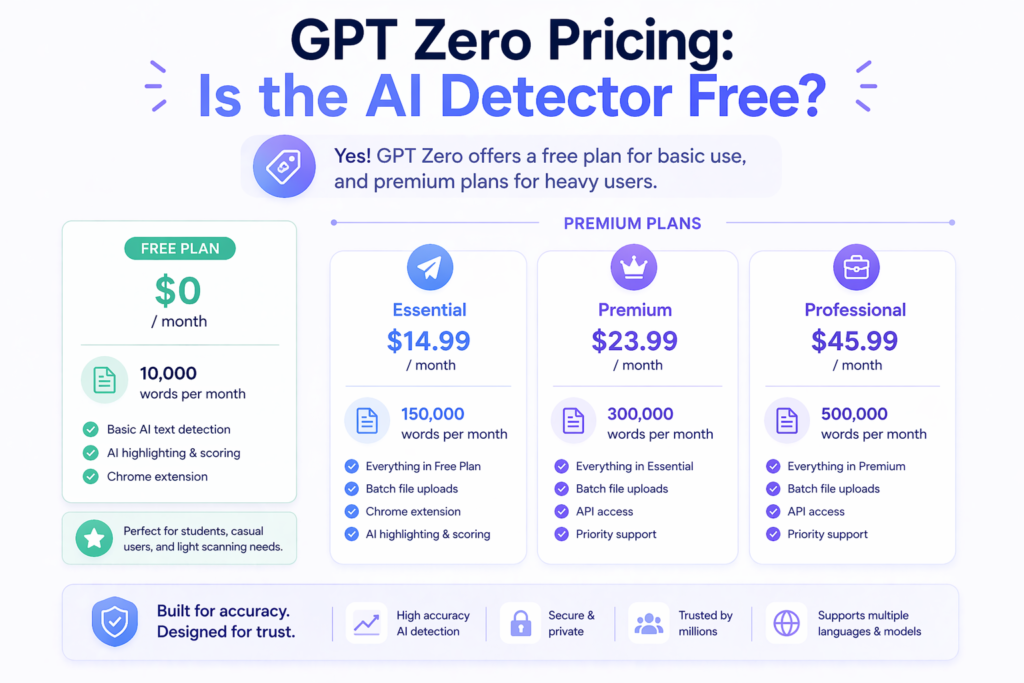
GPT Zero offers a free plan that lets you scan up to 10,000 words per month. This is enough for casual users, students checking their own work, or teachers with light needs. The free plan includes basic text detection and the Chrome extension.

However, the free version has limits. You cannot use batch uploads or access the API. If you need to scan large amounts of text regularly, you will need to upgrade.

Premium Plans For Heavy Users

For users who need more power, GPT Zero offers several paid plans:

  • Essential: $14.99 per month for 150,000 words
  • Premium: $23.99 per month for 300,000 words
  • Professional: $45.99 per month for 500,000 words

These plans unlock features like batch processing, API access, and higher word limits. For schools and businesses that need to check AI content at scale, these plans offer good value compared to other AI detection tools on the market.

GPT Zero Vs. Other Popular AI Detectors

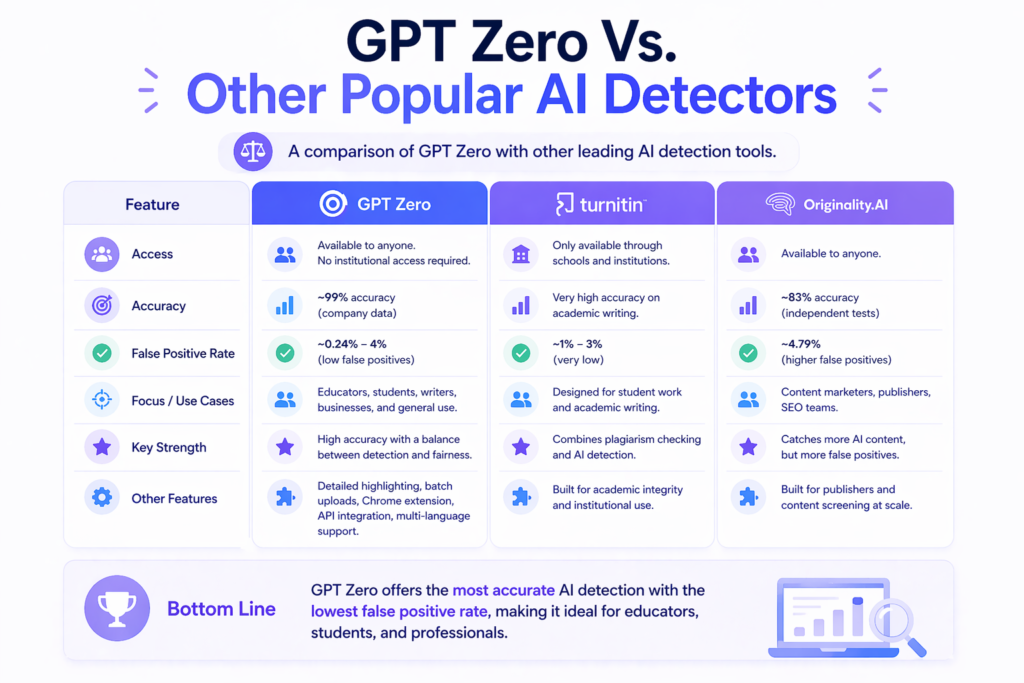
Simple comparison of GPT Zero with other AI detectors using icons for accuracy, access, and use cases

There are many AI detectors available today. How does GPT Zero compare to the competition?

GPT Zero Vs. Turnitin

Turnitin is the most famous name in academic integrity. It has been used by schools for years to check for plagiarism. In 2023, Turnitin added AI detection to its tools.

Key differences:

  • Access: Turnitin is only available through schools and institutions. You cannot buy it as an individual. GPT Zero is available to anyone.
  • False positives: Turnitin has a very low false positive rate (about 1-3%) on native English writing. GPT Zero has a slightly higher rate (about 2-4%) but still performs well.
  • Focus: Turnitin is built specifically for student work and academic writing. GPT Zero works for all types of content including news articles, blog posts, and social media content.
  • Features: Turnitin combines plagiarism checking and AI detection in one tool. GPT Zero focuses mainly on AI detection but offers writing feedback tools.

For students who want to check their work before submitting to Turnitin, GPT Zero is a good first step. However, if your school uses Turnitin, that is the tool that will actually evaluate your work.

GPT Zero Vs. Originality.AI

Originality.AI is another popular AI content detector, especially among content marketers and publishers.

Key differences:

  • Accuracy: Independent tests show GPT Zero has an accuracy rate of about 99% with a false positive rate of only 0.24%. Originality.AI has an accuracy rate of 83% with a false positive rate of about 4.79%.
  • Calibration: Originality.AI is calibrated more aggressively. It catches more AI content but also flags more human writing by mistake. GPT Zero aims for a balance between catching AI and avoiding false accusations.
  • Use cases: Originality.AI is designed for publishers and SEO teams who need to screen content before posting. GPT Zero is better for educational settings and general use.
  • Pricing: Both offer free plans, but GPT Zero’s paid plans are generally more affordable for individual users.

For most users, especially students and teachers, GPT Zero offers the most accurate AI detector experience with fewer false positives.

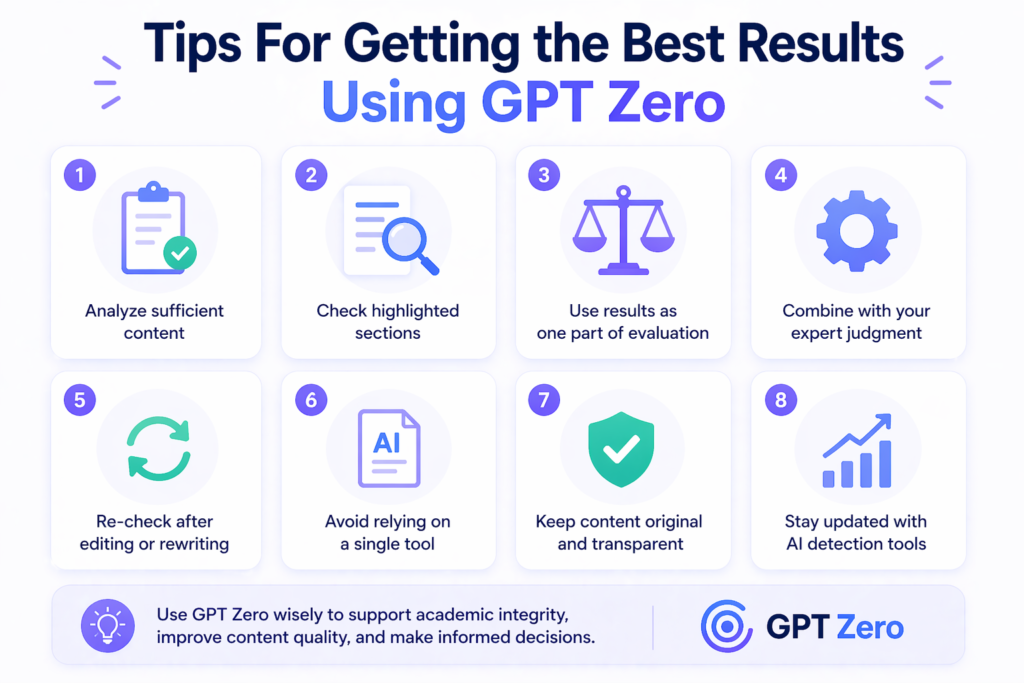
Tips For Getting the Best Results Using GPT Zero

Infographic showing tips for using GPT Zero including analyzing enough text, checking highlighted sections, and reviewing results carefully

To get the most out of this AI detection tool, follow these simple tips.

Optimal Word Counts For Accurate Detection

Research shows that GPT Zero works best with medium-length texts. Very short pieces (under 100 words) can give unreliable results. Very long pieces (over 800 words) can also be tricky. For the best accuracy rate, try to scan texts that are between 100 and 350 words.

If you have a longer document, consider breaking it into smaller sections. This gives you more granular detail about which parts might be AI-generated.

How to Handle Mixed Content (AI + Human Text)

Many documents contain both human writing and AI writing. This is called mixed content. GPT Zero can detect this, but the results can be confusing. When you scan mixed content, look at the sentence-level highlighting rather than just the overall score.

This shows you exactly which sentences are flagged as AI. If you are a teacher reviewing student work, this helps you start a conversation about the writing process rather than making accusations.

Remember that no AI detection tool is perfect. False positives do happen. A flagged sentence does not always mean the student cheated. It might just mean they have a very formal writing style.

FAQ’s:

How Accurate Is GPT Zero?

GPT Zero has an accuracy rate of about 99% according to company data, with a false positive rate of less than 1%.

However, independent studies show slightly different results. One study found GPT Zero correctly identified AI text 100% of the time but had a 16% false positive rate on human writing. Another study found 80% overall accuracy with a 0.65 sensitivity for detecting AI content.

The accuracy depends on the type of text, the length, and whether the AI content has been edited. Raw AI output is easier to detect than text that has been rewritten by humans.

Can GPT Zero Detect Text From ChatGPT-4 and Claude?

Yes. GPT Zero can detect text from ChatGPT-4, Claude, Google Gemini, and other modern language models. The tool is regularly updated to keep up with new AI models as they are released. It can even detect text from the newest models like GPT-5 and Claude Sonnet with high accuracy.

Is GPT Zero Suitable For Students, Writers, and Educators?

Yes. GPT Zero is designed for all these groups. Students can use it to check their work before submitting assignments. Writers can verify that their content will pass AI detection checks from clients. Educators can use it to maintain academic integrity in their classrooms.

The free plan is especially helpful for students who need a reliable AI detector without spending money.

Will GPT Zero Flag Human Writing As AI (False Positives)?

Sometimes. Like all AI detection tools, GPT Zero can produce false positives. This happens when human writing has characteristics that look like AI writing. For example, very formal scientific writing or highly edited prose might be flagged.

Non-native English speakers may also see higher false positive rates because their writing patterns differ from the training distribution data.

If GPT Zero says your writing is AI, but you wrote it yourself, try adding more personal style, varying your sentence length, and using more unique word choices.

Does GPT Zero Save Or Store the Data I Upload?

GPT Zero has privacy policies in place to protect user data.

However, if you are concerned about privacy, you should read their current data policy on their website. For sensitive documents, consider using the tool’s features that minimize data retention or contact their customer service for specific questions about data handling.

Is There A Word Limit For Scanning Text in GPT Zero?

Yes. The free plan allows up to 10,000 words per month. Paid plans offer higher limits ranging from 150,000 to 500,000 words per month. For single scans, there may be limits on how much text you can paste at once, but you can usually break longer documents into sections.

Conclusion

GPT Zero has become one of the most trusted names in AI detection since its launch in 2023.

Created by Edward Tian at Princeton University, this tool uses advanced algorithms to analyze perplexity and burstiness in text. It offers high accuracy rates and low false positive rates compared to many competitors.

For educators, GPT Zero provides batch uploads, detailed writing reports, and an excellent Chrome extension that integrates with Google Docs. For students and writers, the free plan offers enough power to check work before submission.

For businesses, the API integration allows built-in AI detection across platforms.

While no detection tool is perfect, GPT Zero stands out as one of the best AI detection tools available today. It balances accuracy with fairness, helping maintain academic integrity without creating too many false alarms.

Whether you are checking a single piece of text or managing content at scale, GPT Zero offers the features and reliability you need.

As generative AI continues to evolve, tools like GPT Zero will remain important for protecting human-written content. We are huge fans of the writing reports and granular detail this tool provides.

If you need to verify that your content is truly human, give GPT Zero a try and see the results for yourself.

Categories
Uncategorized

How to Change Artboard Color in Illustrator: A Complete Guide

Have you ever stared at a bright, plain screen while working on your computer? Sometimes, that bright white screen makes it very hard to see what you are doing. At Designers Choice, we know that making art should be fun and easy. It should not be hard on your eyes.

When you do graphic design, you might need a different workspace to see things clearly. Knowing exactly how to change the artboard color in Illustrator is a very handy trick to learn. It is an essential skill that helps you see your design elements much better.

In this easy guide, we will show you the simple steps to change the color of the artboard. We will look at two simple methods that anyone can do. Whether you are making fun art for social media or getting ready to print a big image file, these neat tricks will make your illustrator workflow much better. Let us look at how you can pick a new background color today!

We will make sure you learn this quickly so you can get back to drawing.

Why Learn How to Change Artboard Color in Illustrator?

Why Learn How to Change Artboard Color in Illustrator?

You might wonder why you even need to learn how to change the artboard color in Illustrator in the first place. Most new projects start with a giant, plain white canvas. It looks just like a fresh piece of copy paper. But leaving it plain white is not always the best choice for your art.

Here are a few great reasons why you might want to change the background color of an artboard.

Enhancing Visibility For White Or Light-Colored Artwork

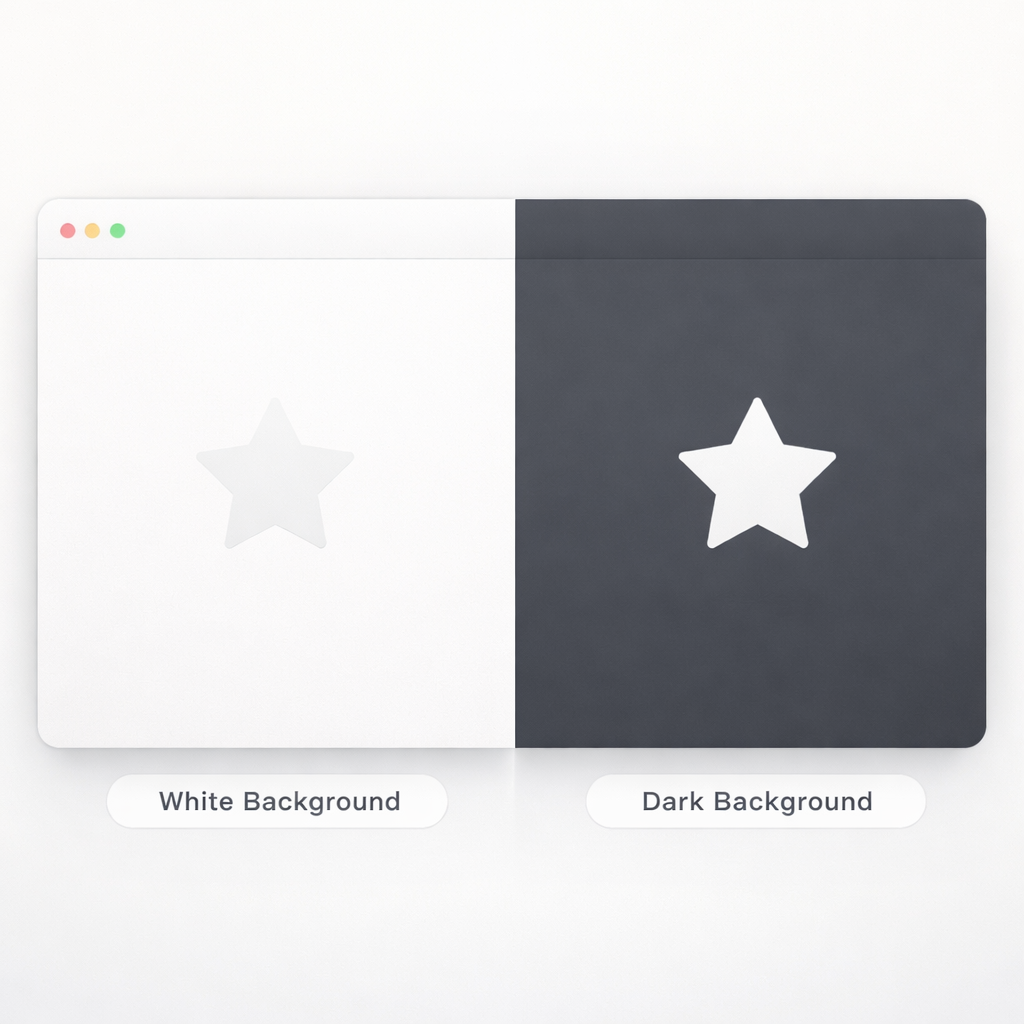
If you are drawing a fluffy white cloud or a light yellow star, it will blend right into a white background.

You will not be able to see the edges of your art at all. It can make you feel lost. If you change background color to something dark, like blue or black, your light-colored art will pop right out. This makes it so much easier to work on your graphic design.

You can pick different backgrounds to see your work clearly and easily. You will not have to guess where your lines are anymore.

Simulating Final Print Materials (Like Colored Paper)

Sometimes you want to print your art on real blue paper or pink paper at your house or at a print shop. If you only look at a white screen while you draw, it is hard to guess what the final print will actually look like.

You can use the simulate colored paper option inside the program to see exactly how your ink will look on that colored paper. This helps you plan your art much better before you spend money on printing.

Reducing Eye Strain During Long Design Sessions

Staring at a super bright screen for hours and hours can make your eyes feel very tired and sore. It can even give you a headache.

If you change the artboard background color to a soft gray or a warm, gentle tone, it is much kinder to your eyes. This is a very helpful trick for anyone who spends a lot of time sitting at a desk and working on design elements.

You can even adjust your user interface brightness to help your eyes even more while you work.

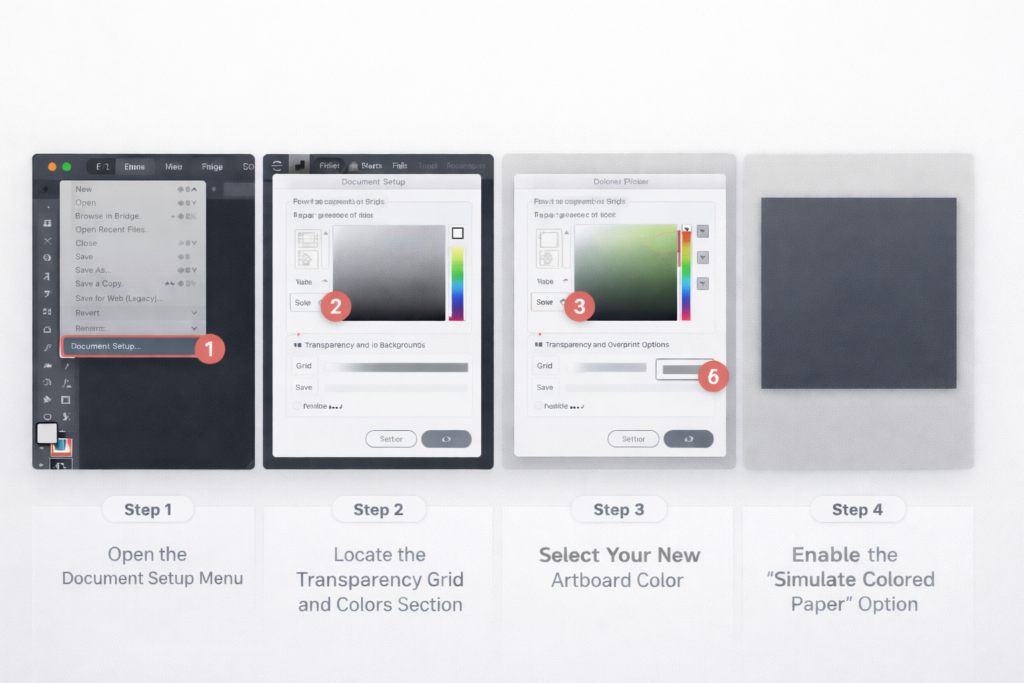
Document Setup Method: How to Change Artboard Color in Illustrator

Document Setup Method: How to Change Artboard Color in Illustrator

The first way to do this is called the document setup method. This way only changes how the workspace looks on your computer screen. It is great when you just want a better view while you are drawing. Let us break it down into very simple steps.

Step 1: Open the Document Setup Menu

First, you need to turn on your computer and open adobe illustrator.

Start your new document or open a file you already made earlier. Now, look at the very top of your screen. You will see a list of words. Click on the word “File” in the menu bar. A drop-down list will appear on your screen. Scroll down that list and click on the words “Document Setup.”

This will open the document setup window right in the middle of your screen. You can also access document setup by clicking a special button inside the properties panel. You can usually find this panel on the right side of your screen.

Step 2: Locate the Transparency Grid and Colors Section

Inside the document setup window, you need to look for a specific section. It is called the “Transparency and Overprint Options” section.

Here, you will see a little box that looks like a checkerboard. This little box is related to the transparency grid. You will also see two small color boxes right next to it. These two boxes are very important. They control the color of the grid and the color of your artboard.

Step 3: Select Your New Artboard Color

Now, click on the top color box. This action opens up the color selector tool. Now, you have the power to pick any color you want for your canvas color. You can click on a nice dark gray, a soft gentle blue, or any other color that helps you see your drawing better.

Once you pick the exact color you want, click the button that says “OK.”

Step 4: Enable the “Simulate Colored Paper” Option

There is one more very important thing to do. You must check the little box right next to the simulate colored paper option. If you forget to check this box, nothing will happen at all. Once you check it, click “OK” to close the menu completely.

If you still see a white screen after doing this, do not worry. You just need to turn on the grid. Go back to the menu bar at the top, click on the word “View,” and select show transparency grid. Now, you will finally see your brand new background color!

The Background Shape Method: An Alternative Way to Change Artboard Color

The Background Shape Method: An Alternative Way to Change Artboard Color

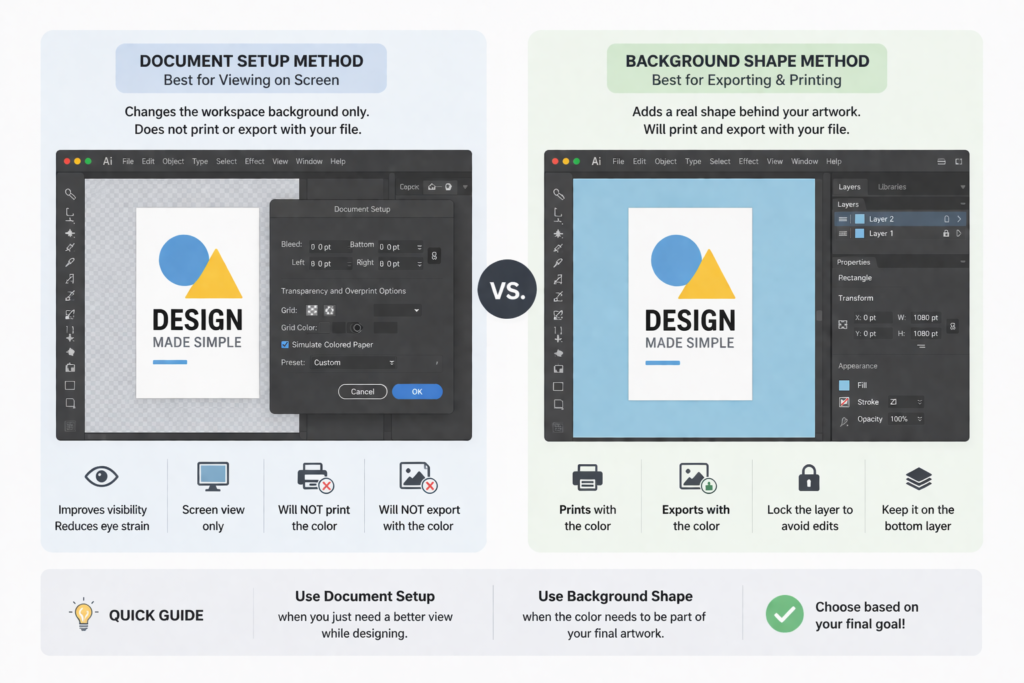
The first method is cool, but it only changes what you see on your monitor. It does not actually print that color on your printer. If you want the color to print out, or if you want to save it as a raster image with the color showing, you need to use a different method.

This way is called the rectangle method. Here is exactly how to make a background rectangle for your art.

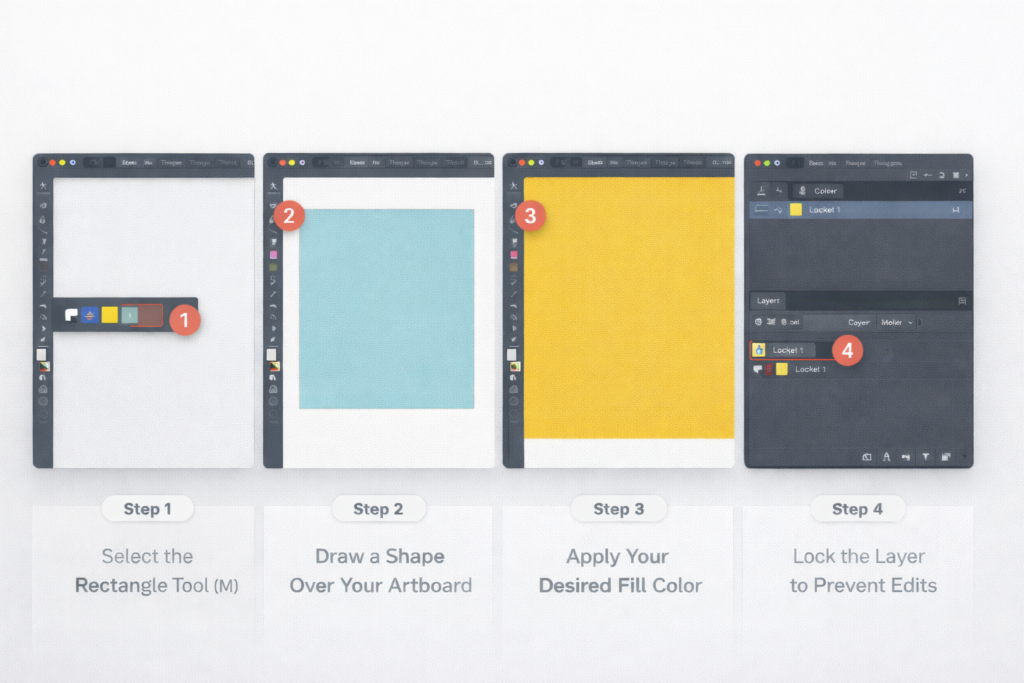
Step 1: Select the Rectangle Tool (M)

Go to your tool panel on the left side of your screen. Look for the rectangle tool and click on it with your mouse. It looks like a simple square. You can also just press the letter “M” on your computer keyboard to pick it super quickly.

Step 2: Draw A Shape Over Your Artboard

Now, click and drag your mouse across the entire artboard. You want to make a big shape that is the exact size of your artboard. If your artboard is a perfect square, draw a perfect square. Make sure it covers every single edge perfectly so no white parts are left showing.

Step 3: Apply Your Desired Fill Color

With your big shape still selected, look at your color tools. Pick a new fill color for your shape. This color will be your new image background. You can change it to bright blue, deep red, or anything you like. Now, your shape acts as the solid color of the background.

Step 4: Lock the Layer to Prevent Accidental Edits

You do not want to accidentally move this background shape while you are busy drawing other fun things.

So, you need to open your layers panel. It is usually sitting on the right side of your screen. Look for your new shape in the list. Click the empty little box next to the eye icon to lock it. A small picture of a padlock will appear. Now, the shape is safely locked in place.

For better organizing, make a new layer right above it to draw your other design elements. Always make sure to keep your background shape sitting at the bottom of the layer list.

Document Setup Vs. Background Shape: Which Should You Use?

Document Setup vs Background Shape

Now you know two great ways to change the color of your artboard. But which one should you pick for your project? It really depends on what you want to do with your file later on.

When to Use Document Setup (Viewing Purposes Only)

The document setup method is strictly for your eyes while you work on your computer. It only changes the user interface view.

If you use this method, the color will not show up when you print your artwork on a printer. It will also not show up if you save your file as a picture with a transparent background.

You should only use this method if you just want to reduce eye strain or if you just need to see white shapes better while you work.

When to Use A Background Shape (Exporting and Printing)

The rectangle method is exactly what you need if you want the color to be part of your final art.

If you are making a fun post for social media and want a pink background, you must draw a solid pink shape. This method makes sure the background colors are saved when you export your final image file. It makes the color real and permanent, unlike the other way.

FAQ’s:

Will the Color I Set in Document Setup Show Up When I Export Or Print My File?

No, it will not. The color you pick in the document setup menu is only there to help you see better on your computer screen. When you print the file or save it to show your friends, it will act like it has a transparent background or a plain white background.

If you want the color to actually print out on paper, you must use the rectangle tool to make a solid shape behind your art.

How Do I Change the Artboard Color Back to White?

If you used the document setup method, just go right back to the document setup window. Click the color selector and pick the white color again. Make sure the simulate colored paper option is still checked, and click “OK.” If you drew a big shape instead, just unlock the shape in the layers panel. Then, you can change its fill color to white. Or, you can just press delete on your keyboard to remove the shape completely.

Can I Have Multiple Artboards With Different Colors in the Same Illustrator Document?

If you use the document setup method, the color you pick will change the look of the entire artboard workspace all at once. It will make all your boards look the same color. If you want different colors on different boards, you must use the rectangle tool.

Draw a shape on the first board and give it one color. Then, draw a shape on the next board and give it a different color. You can use the artboard tool and the artboard options to easily fix the size of your artboard for each different one you make.

Why Isn’t the Color Changing Even After I Picked A New One in Document Setup?

This is a very common problem for beginners. Usually, it happens because you forgot to check the tiny box for the simulated colored paper option. Go back into the menu and make sure that box has a check mark in it. Also, you must make sure your transparency grid is turned on.

Go to “View” in the menu bar and click the words Show Transparency Grid. Then you will see your new background color.

Does Changing the Illustrator UI Interface Color Affect My Artboard?

No, it does not do that. You can change your user interface brightness to make the menus dark gray or light gray.

This only changes the toolbars and menus sitting around your workspace. It just changes the user interface. It does not change the actual canvas color where you draw your art. The color of your artboard stays the same, no matter how dark or light your menus are.

Conclusion

Knowing how to change artboard color in Illustrator is a great trick that makes your work so much easier.

We hope these simple steps help you enjoy your graphic design work even more today. Whether you use the document setup method for a better view or the background rectangle for printing, you now have the tools you need to succeed.

At Designers Choice, we love sharing tips that help you create better art without getting a headache. You can easily save your eyes from staring at a super bright white screen all day long. You can easily test how your art looks on different colored paper before you print it.

There is no need for a fancy automated background remover tool when you know how to control your layers and backgrounds right from the very start. Try out these simple methods today on your brand new projects, and see how much better your workspace feels!