
TL;DR
- You can create an Instagram Reel in Canva using a vertical 1080 × 1920 pixel canvas with a 9:16 aspect ratio.
- Canva lets you build Reels from scratch or customize ready-made video templates with text, images, animations, music, and transitions.
- The easiest workflow is to choose the right Reel format, add your footage, arrange the timeline, customize the design, add captions, and export the finished video.
- Keep important text, logos, and visual elements away from the edges because Instagram’s interface can cover parts of your Reel.
- Canva is useful for beginners, creators, marketers, and businesses that want to produce branded Reels without learning complex video-editing software.
- For frequent content production, features available through Canva Pro can make it easier to work with premium assets, brand controls, templates, and other design resources.
Creating an Instagram Reel doesn’t require advanced video-editing skills. If you already use Canva for social media graphics, presentations, or marketing materials, you can use the same drag-and-drop approach to create short-form videos.
The biggest advantage is speed. Instead of learning a complicated editing application, you can start with a template, replace the existing content, add your own footage, adjust the timing, and export the finished Reel.
This guide explains how to make Instagram Reels in Canva from start to finish, including the correct dimensions, templates, editing process, text placement, animations, audio, captions, export settings, and common mistakes to avoid.
What Size Should an Instagram Reel Be in Canva?
Before learning how to make Instagram Reels, start with the correct canvas.
The recommended Instagram Reel size is 1080 × 1920 pixels, with a 9:16 aspect ratio. This creates the vertical, full-screen format designed for mobile viewing.
If you’re creating a Reel from scratch in Canva, choose a vertical video format or create a custom design using these dimensions.
| Setting | Recommended option |
| Width | 1080 pixels |
| Height | 1920 pixels |
| Aspect ratio | 9:16 |
| Orientation | Vertical |
| Format | MP4 |
| Resolution | 1080p |
Using the correct dimensions from the beginning is easier than creating a horizontal video and trying to convert it later.
For more information about the technical specifications, see our complete guide to Instagram Reel Size & Dimensions.
How to Make Instagram Reels in Canva
The basic process is straightforward:
- Open Canva
- Choose an Instagram Reel design
- Select a template or start from scratch
- Upload your video clips
- Arrange the clips on the timeline
- Add text and graphics
- Add transitions and animations
- Add music or voiceover
- Create captions
- Review the Reel
- Export the final video
Let’s look at each step in detail.
1. Open Canva and Start an Instagram Reel
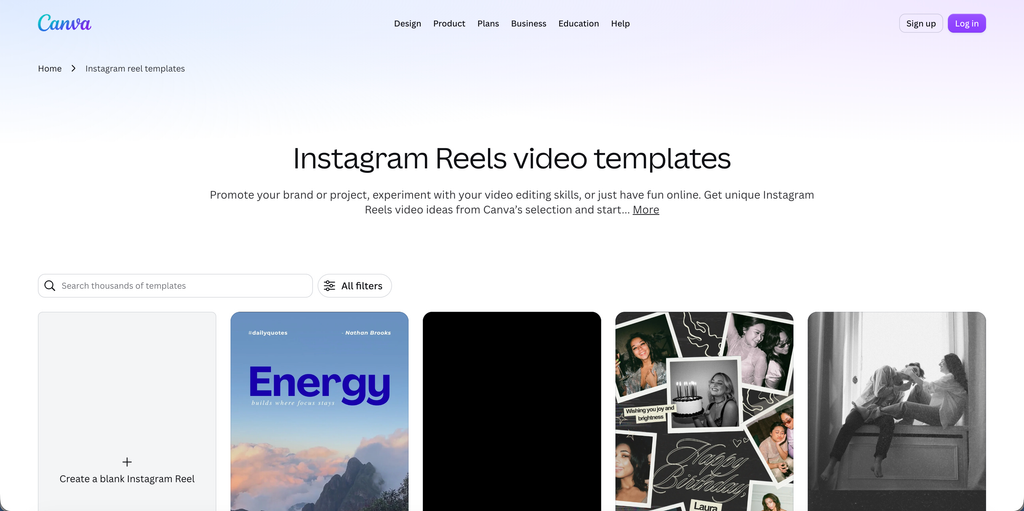
Open Canva and search for Instagram Reel or choose a vertical video design.
Canva will display templates designed for short-form vertical content.
If you already know what you want to create, you can also start with a blank 1080 × 1920 design.
Starting with a blank canvas gives you complete control over the layout. Templates are faster when you need a polished design without building every element yourself.
When Should You Use a Template?
Templates are particularly useful for:
- Product promotions
- Educational Reels
- List-style videos
- Quotes
- Tutorials
- Announcements
- Personal-brand content
- Instagram marketing campaigns
Choose a template based on its structure rather than simply its appearance.
A template with attractive animations may not be useful if it doesn’t give you enough room for your actual content.
2. Choose an Instagram Reel Template
Once you’ve opened the Reel editor, browse Canva’s available templates.
Look for a layout that matches your content style.
For example, an educational Reel may benefit from a simple template with large text and clean transitions. A fashion or lifestyle Reel may work better with image-heavy layouts and subtle animation.
When choosing a template, consider:
- Text placement
- Number of scenes
- Animation style
- Typography
- Color palette
- Image-to-video balance
- Amount of customization required
Don’t feel obligated to use a template exactly as provided. Treat it as a starting structure.
You can replace almost every visual element with your own content.
3. Upload Your Video Clips
After selecting your template, upload the footage you want to use.
Your source material could include:
- Smartphone videos
- Screen recordings
- Product demonstrations
- Talking-head footage
- Stock videos
- Photographs
- Illustrations
- Screenshots
Drag your media into the appropriate pages or scenes.
If the source video isn’t already vertical, Canva can help you crop and reposition it to fit the Reel canvas.
However, be careful when cropping landscape footage. Important subjects near the edges can disappear when the video is converted to a vertical format.
4. Remove or Replace Backgrounds
Background treatment can significantly change the appearance of a Reel.
If you’re using product photographs, portraits, or other images where the subject needs to stand out, removing the original background can help create a cleaner composition.
For example, a product image can be placed over a branded background instead of leaving the original room or environment visible.
A background remover canva workflow can be useful when preparing these assets.
After removing the background, place the subject over your Reel background and adjust its size and position.
Don’t overuse background removal. If the original image already works well, keeping the natural background may produce a more authentic result.
5. Arrange Your Reel Scenes
Canva treats different sections of your Reel as pages or scenes.
Each scene can contain:
- Video
- Images
- Text
- Shapes
- Icons
- Illustrations
- Stickers
- Animations
Think about the Reel as a sequence rather than a collection of individual designs.
A simple educational structure might look like:
Scene 1: Hook
Scene 2: Problem
Scene 3: Explanation
Scene 4: Example
Scene 5: Takeaway
Scene 6: Call to action
The exact number of scenes depends on the topic and pacing.
The goal is to make every scene contribute something.
6. Edit the Video Timeline
Once your clips are in Canva, adjust their timing.
Trim clips that contain unnecessary pauses, awkward beginnings, or repetitive footage.
For short-form content, pacing matters.
If a clip takes too long to communicate a simple idea, shorten it.
You can also split longer footage into multiple sections and place supporting graphics or text between them.
Keep Transitions Purposeful
Canva provides different transition effects between scenes.
Use them when they improve the flow.
A simple cut can often work better than an elaborate transition, particularly when the content itself is the focus.
If every scene has a different animation, transition, and effect, the Reel can quickly become visually distracting.
7. Add Text to Your Instagram Reel
Text is one of the most important elements of many Reels.
Use it to communicate:
- The opening hook
- Key points
- Instructions
- Statistics
- Product benefits
- Calls to action
Keep your primary message short.
Instead of putting an entire paragraph on screen, break the information into smaller pieces.
For example:
Weak:
“Here are five important things that every beginner should know before creating their first Instagram Reel.”
Better:
5 things to know before your first Reel
The second version is easier to understand quickly on a phone.
8. Choose Readable Fonts
Your typography should be easy to read at a glance.
Avoid overly decorative fonts for important information.
Instead, prioritize:
- Strong contrast
- Appropriate font size
- Clear letterforms
- Consistent hierarchy
- Adequate spacing
Use one font for the headline and another complementary style for supporting information if needed.
You can also explore our guide to Best Fonts for Instagram Reels when you want more typography ideas for your designs.
9. Keep Text Inside the Safe Area
A common Canva Reel mistake is placing text too close to the edges.
Instagram overlays controls and other interface elements on top of the video.
This means a beautifully designed CTA can become difficult to read if it sits directly underneath an interface element.
Keep important content toward the central area of the design.
This is especially important for:
- Headlines
- Logos
- Product names
- Prices
- Subtitles
- CTAs
Don’t treat the entire 1080 × 1920 canvas as equally safe for important information.
10. Add Animations
Canva allows you to animate individual elements as well as entire pages.
Animations can make a static design feel more dynamic.
Useful animation applications include:
- Revealing a headline
- Introducing a product
- Emphasizing a keyword
- Creating movement between scenes
- Bringing attention to a CTA
However, animation should support the message.
If every element moves simultaneously, viewers may have difficulty knowing where to look.
Choose one primary visual focus for each scene.
11. Add Music or Audio
Audio can add energy and context to an Instagram Reel.
Depending on your content, you might use:
- Background music
- Voiceover
- Original audio
- Sound effects
- Spoken narration
If you’re creating an educational Reel, don’t let background music overpower the voice.
For voice-led content, clear speech should generally remain the priority.
When using music, also make sure you understand the applicable licensing and usage rights for the content and account you’re publishing from.
12. Add Captions to Your Reel
Captions are useful when viewers watch without sound and when spoken information is important to understanding the video.
You can create captions manually or use transcription tools as part of your workflow.
For example, a free transcribe audio to text tool can help turn recorded speech into editable text that you can then use as a starting point for captions.
Don’t simply paste the entire transcript onto the screen.
Edit the transcript into short, readable phrases.
For example:
Instead of:
“Today I’m going to show you three simple ways that you can improve the design of your Instagram Reels.”
Use:
3 simple ways to improve your Reel design
Then reveal the supporting information progressively.
13. Add Your Branding
If you’re creating Reels for a business or personal brand, consistency matters.
Consider using a repeatable system for:
- Fonts
- Colors
- Logo placement
- Headline styles
- Caption styles
- Backgrounds
- Graphic elements
You don’t need to put your logo on every part of the screen.
A consistent visual identity can make your content recognizable without overwhelming the design.
Canva’s paid features can be particularly useful for teams and brands that need additional templates, premium assets, and brand-management capabilities. Canva Pro is one option to consider if those features are relevant to your workflow.
14. Preview Your Instagram Reel
Before exporting, watch the entire Reel from beginning to end.
Don’t only inspect individual scenes.
Look at the overall experience.
Ask:
- Does the first scene grab attention?
- Is the message immediately clear?
- Is the text readable?
- Are the transitions too fast?
- Are any scenes unnecessarily long?
- Is the audio balanced?
- Are captions synchronized?
- Is anything hidden near the edges?
- Does the final CTA make sense?
This review is where many small problems become obvious.
15. Export Your Instagram Reel From Canva
Once you’re happy with the design, select the option to download or export the project.
For a video Reel, MP4 is a practical format.
Use the highest appropriate quality available in your Canva export settings and maintain the vertical 1080 × 1920 format.
Before uploading to Instagram, watch the exported file rather than assuming the editor preview represents the final file perfectly.
Best Canva Features for Instagram Reels
Canva has several features that can make Reel creation easier.
| Canva feature | Useful for |
| Templates | Starting designs quickly |
| Video editor | Trimming and arranging clips |
| Text tools | Headlines and captions |
| Animations | Adding movement |
| Transitions | Connecting scenes |
| Stock media | Finding visual assets |
| Background removal | Isolating subjects |
| Brand tools | Maintaining consistency |
| Audio | Music and voice content |
| Resize/export tools | Preparing content for publishing |
You don’t need to use every feature in a single Reel.
A simple combination of good footage, readable text, clean composition, and appropriate pacing can produce a stronger result than a design filled with effects.
Canva Free vs. Canva Pro for Instagram Reels
You can create Instagram Reels in Canva without necessarily paying for a subscription.
The free version can be enough for creators who mainly need basic design tools, templates, editing capabilities, and free media.
Canva Pro becomes more useful when you need additional premium content and workflow features.
| Need | Canva Free | Canva Pro |
| Create Reel designs | Yes | Yes |
| Basic video editing | Yes | Yes |
| Free templates | Yes | Yes |
| Free assets | Yes | Yes |
| Premium assets | Limited | More access |
| Brand-management features | Limited | More advanced |
| Premium templates | Limited | More access |
| Background-removal capabilities | Limited | More access |
Feature availability can change, so check Canva’s current plan details before choosing a subscription based on a specific feature.
For occasional Reel creation, the free version may be enough. For businesses producing content regularly, the additional workflow features can make the paid plan more worthwhile.
Instagram Reel Ideas You Can Create in Canva
Once you know how to make Instagram Reels, you can use Canva for many different content formats.
Educational Reels
Turn a tutorial or design tip into a short sequence.
For example:
3 Canva mistakes beginners should avoid
Each mistake can become its own scene.
List Reels
List formats work well for quick information.
Examples:
- 5 design tips
- 7 useful Canva features
- 10 font combinations
- 5 social media design mistakes
Before-and-After Reels
Show the original design first and the improved version afterward.
This format works particularly well for design education.
Product Reels
Show a product, feature, template, or service through a sequence of short clips.
Use text to highlight the most important benefit.
Tutorial Reels
Record your screen while completing a task and add short instructions over the footage.
Keep each step focused on one action.
Behind-the-Scenes Reels
Show how you create a design, edit a video, prepare content, or work through a creative project.
The content doesn’t have to be heavily edited to be useful.
Common Mistakes When Making Instagram Reels in Canva
1. Starting With the Wrong Canvas
Creating a horizontal design and converting it later can create cropping problems.
Start with the vertical Reel format.
2. Using Too Much Text
A Reel isn’t a blog post.
Give viewers only the information they need at that moment.
3. Overusing Animations
Movement should guide attention, not compete for it.
4. Ignoring the First Few Seconds
The opening scene needs to establish why someone should continue watching.
Don’t waste the opening on unnecessary logos or long introductions.
5. Making Every Scene Look Identical
Consistency is useful, but every scene should still have a clear purpose.
Use variations in composition to maintain visual interest while keeping the overall branding consistent.
6. Ignoring Mobile Readability
Always preview the final design at a small size.
Text that looks fine on a large desktop screen may be too small on a phone.
7. Forgetting the Cover
Your Reel’s cover can influence how the content looks on your profile.
Create a clear cover with a readable title and central composition.
For more guidance, see Instagram Reel Cover Size: Complete Guide + Best Practices.
Best Practices for Creating Instagram Reels in Canva
Start With One Clear Idea
Don’t try to teach five unrelated concepts in a 20-second Reel.
Choose one main takeaway.
Hook the Viewer Quickly
The opening should tell viewers what they’ll get from watching.
Instead of:
“Hi everyone, welcome back to another video…”
Try:
“Your Canva Reels look cluttered? Fix these three things.”
Keep Visual Hierarchy Simple
Every scene should have a clear focal point.
A viewer should know what to look at first.
Use Consistent Design Elements
Repeat typography, colors, and graphic treatments throughout the Reel.
Cut Unnecessary Pauses
If your video contains spoken content, remove long pauses and unnecessary repetitions.
Make the CTA Specific
Instead of a vague “Follow for more,” tell the viewer what to do or why.
For example:
Save this before creating your next Reel.
That’s more directly connected to the content.
How to Improve Your Instagram Reels Over Time
Creating a Reel is only the first step.
Once you have published several videos, look at how they perform.
Pay attention to:
- Views
- Watch time
- Retention
- Shares
- Saves
- Comments
- Profile visits
- Follows
Compare your best-performing Reels with weaker ones.
Look for patterns.
Maybe tutorials generate more saves. Perhaps list-style content earns more shares. Maybe videos with a direct opening question keep viewers longer.
Use those observations to improve your next batch of content.
Don’t change everything at once. Test one major variable at a time, such as the opening hook, format, topic, pacing, or visual style.
Frequently Asked Questions
Can I make Instagram Reels in Canva?
Yes. Canva includes templates and video-editing tools that can be used to create vertical Instagram Reels. You can upload your footage, add text and graphics, adjust timing, add audio and animations, and export the finished video.
What size should I use to make an Instagram Reel in Canva?
Use a 1080 × 1920 pixel canvas with a 9:16 aspect ratio for a standard full-screen vertical Reel.
Is Canva good for making Instagram Reels?
Canva is a practical choice for creators who want a relatively simple workflow with templates, drag-and-drop editing, text tools, graphics, animations, and stock media.
It is particularly useful for branded and design-heavy Reels.
Can I make an Instagram Reel from scratch in Canva?
Yes. You can start with a blank vertical video canvas instead of using a template. This gives you complete control over the composition, typography, footage, animations, and branding.
Can I use Canva templates for Instagram Reels?
Yes. Canva provides Reel-oriented templates that can be customized with your own video clips, photographs, text, colors, and other design elements.
Can I add captions to an Instagram Reel in Canva?
Yes. You can add text-based captions to your Reel. You can also use transcription as part of your workflow and then edit the resulting text into short, readable caption segments.
Do I need Canva Pro to make Instagram Reels?
No. You can create Reels using Canva’s free features, although some templates, assets, and advanced features may require a paid plan.
How do I make a professional-looking Instagram Reel in Canva?
Start with the correct 1080 × 1920 canvas, use a clear visual hierarchy, keep text readable, limit unnecessary animations, maintain consistent branding, and edit the video so every scene contributes to the main message.
How do I add music to a Canva Instagram Reel?
You can add available audio to your Canva project and adjust its position and volume alongside your video. Make sure you have the appropriate rights to use any audio you publish.
Can I make Instagram Reels on Canva for free?
Yes. Canva’s free plan can be used to create Reel designs, although access to certain templates, media assets, and features may be restricted.
Final Thoughts
Learning how to make Instagram Reels in Canva is mostly about building a simple, repeatable workflow.
Start with the correct 1080 × 1920 canvas, choose a suitable template or create your own layout, add your footage, keep the text readable, use animations selectively, and make sure the final design works on a small mobile screen.
You don’t need to use every Canva feature to make a good Instagram Reel. Strong content, clear visual hierarchy, good pacing, and consistent branding matter more than filling the screen with effects.
Once you have a workflow that works, create a few Reel formats you can reuse. That makes it much easier to publish consistently without designing every video from zero.
