
Have you ever made a Canva design that’s tall and narrow but wished it was wider? That’s where landscape mode comes in!
Imagine turning your design sideways to create more space for photos, text, or graphics. Whether you’re creating a website banner, a slide for a class project, or a social media post, switching to landscape orientation helps your work look its best.
In this guide, I’ll show you how to use Canva’s resize button to flip your original design into a new orientation-no fancy skills needed.
You’ll learn to set custom size dimensions, use Canva Pro features (or the free version), and tweak your layout after resizing. Even if you’re new to design, these steps will help you master landscape format quickly. Let’s dive in and turn your ideas into wide, eye-catching creations!
Understanding Landscape Orientation In Canva
What is Landscape Orientation?
Landscape orientation means your design is wider than it is tall. Think of it like a TV screen or a picture of mountains. The width is greater than the height. In simple terms, when we talk about landscape orientation, we mean the page is set up so it’s wider than it is tall.
For example, if a design is 1000 pixels by 800 pixels, it’s in landscape format because 1000 (width) is bigger than 800 (height).
Benefits of Using Landscape Mode
Using landscape mode has many good points:
- It gives you more space from left to right
- It works better for designs that will be seen on computer screens
- It’s great for website headers, banners, or wide photos
- Many social media covers use landscape formats
When you pick the right orientation for your project, it makes your design look better and work better for what you need.
How To Landscape In Canva?
Let’s go through the steps to make your design landscape in Canva:
Step 1: Open Your Design
First, log into your Canva account. You can either open an existing design that you want to change, or start a new one. If you’re starting fresh and know you want a landscape format, you can pick a template that’s already in landscape mode or set custom dimensions from the start.
Step 2: Go To The Resize Tool
Once your design is open, look at the top menu. You’ll see a button called “Resize” in the upper left corner. Click on this button to open the resize options.
Note: The full resize feature is only for Canva Pro users. If you don’t have Canva Pro, don’t worry – I’ll show you a free way to do this later.
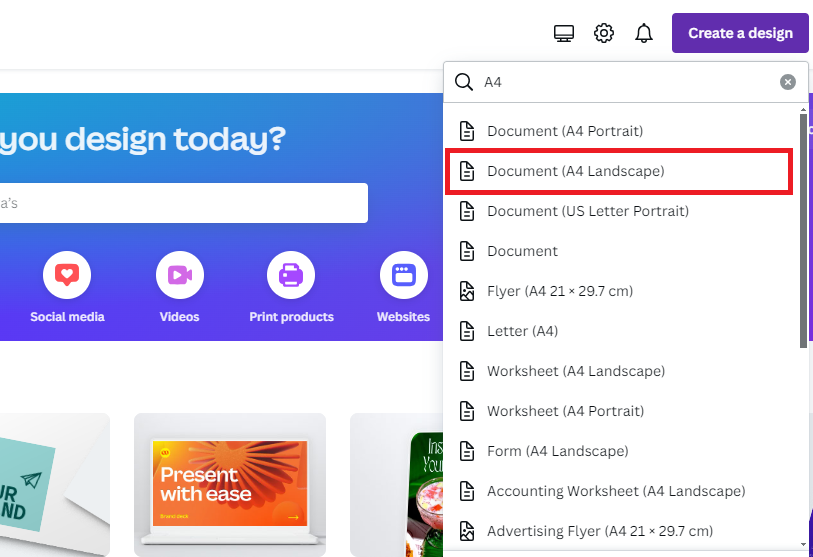
Step 3: Choose Your Landscape Format and New Dimensions
After clicking “Resize,” you’ll see options to change your design’s size. You can:
- Pick from preset sizes (like A4 Landscape or 1920 x 1080 pixels)
- Enter custom dimensions in the “Custom size” fields
For landscape format, make sure the width (first number) is bigger than the height (second number). For example, if your design is currently 800 x 1000 pixels, you could make it 1000 x 800 pixels to switch to landscape.
If you want to keep the same ratio but just flip the orientation, simply swap the width and height numbers.
Step 4: Select Resize Options
After setting your new dimensions, Canva will show you a preview of how your design will look. You’ll have two options:
- “Copy & Resize” – This makes a new design with the new dimensions while keeping your original design unchanged. Your original design will stay open in its original tab, and the new resized design will open in a new tab.
- “Resize This Design” – This changes your current design to the new dimensions. This option doesn’t make a copy, so your original design will be replaced.
Choose the option that works best for you.
Step 5: Adjust and Finalize Your Design
After resizing, you’ll need to check how your design elements look in the new layout. You might need to move text, images, or other elements to make them fit better in the landscape format.
While adjusting, you may need to learn how to replace an image in Canva or even how to flip an image in Canva to get the perfect fit.
Sometimes, you might even want to know how to cut out an image in Canva to create a more dynamic layout. Resize and reposition things until your design looks good in its new orientation.
How To Make A Document Landscape In Canva?
Making a document landscape in Canva follows the same steps as changing any design to landscape:
- Open your document in Canva
- Click the “Resize” button at the top
- Enter new dimensions where the width is larger than the height
- Click “Continue“
- Adjust your layout as needed
For documents like flyers, brochures, or reports, remember that landscape format gives you more horizontal space but less vertical space.
This means you might want to organize your text in more columns or learn how to indent in Canva to make good use of the space..
Converting Existing Designs To Landscape
Using The Resize Or Magic Switch Feature
The easiest way to change an existing design to landscape is with Canva’s “Magic Switch” feature (also called “Resize”). This feature lets you change the orientation with just a few clicks:
- Open your design in Canva
- Click “Resize & Magic Switch” at the top of the screen
- Select “Custom size” from the menu
- Click on either the width or height field
- Choose “Landscape” from the quick options that appear
- Click “Continue” and then select “Copy & resize” or “Resize this design“
This method is fast and easy, but it requires Canva Pro.
If you’re wondering Is Canva Pro is worth it, features like this can be a major time-saver. You can learn more about how much Canva Pro costs or even find out how to get Canva Pro for free to test these features.
Manual Dimension Adjustment Process
If you’re using the free version of Canva, you can still make landscape designs by following these steps:
- Create a new design with landscape dimensions
- From Canva’s home page, click “Create a design“
- Click “Custom size” and enter dimensions where the width is larger than the height
- Click “Create new design“
- Copy elements from your original design
- Open your original design in a new tab
- Select all elements (click on each one while holding Shift)
- Copy them (Ctrl+C or Cmd+C)
- Go to your new landscape design
- Paste the elements (Ctrl+V or Cmd+V)
- Adjust the elements to fit the new layout
This method takes more time than using the Magic Switch feature, but it works with the free version of Canva.
Landscape Design For Special Projects
Creating Landscape Posters
Landscape posters are great for showing wide scenes or displaying lots of information side by side.
To create a landscape poster in Canva:
- Start a new design with landscape dimensions (for a standard poster, try 24″ × 18″).
- Choose a template or start from scratch.
- Add your images, text, and other elements. For more advanced designs, you might want to learn how to slice in Canva for cool effects.
- Use the horizontal space to create a flowing layout from left to right.
Remember that people read from left to right, so put the most important information on the left side of your poster.
Designing Landscape Headers For Websites
Website headers need to be landscape because websites are usually wider than they are tall.
Here’s how to make a website header in Canva:
- Create a new design with dimensions around 1920 × 300 pixels (a common header size).
- Add your logo, navigation elements, and any featured text or images.
- Make sure the text is easy to read. A great way to do this is to learn how to highlight text in Canva.
- Check how your header looks at different screen sizes.
A good website header should be clean, show your brand clearly, and work well on both big and small screens.
Adjusting Elements After Orientation Change
Repositioning Design Elements
When you change from portrait (tall) to landscape (wide), your design elements might not be in the right place anymore.
Here’s how to fix that:
- Check the alignment of all elements – Are they centered, left-aligned, or right-aligned as they should be?
- Resize elements if needed – Some images or text boxes might need to be larger or smaller in the new layout. You may want to how to fade an image on Canva to blend it into the background.
- Move elements to follow a logical flow – In landscape format, layouts often work better when elements flow from left to right.
- Check spacing between elements – Make sure there’s enough space between all parts of your design.
Take your time with this step – proper layout is key to making your design look good.
Optimizing Visual Flow For Landscape Format
Visual flow means the way people’s eyes move through your design. In landscape format, people usually look from left to right.
Here’s how to make this work for your design:
- Put the most important information on the left side.
- Use elements like lines, arrows, or colors to guide the eye across the design. You can also play with text effects by learning how to curve text in Canva or how to outline text in Canva.
- Create a balance between the left and right sides of your design.
- Use the extra horizontal space for elements that work well side by side, like before-and-after images.
A good landscape design uses the width to tell a visual story from beginning to end.
Pro Tips For Landscape Designs In Canva
Working With Free Vs. Pro Features
Canva’s free version has some limits, but you can still create great landscape designs. One common question is, “Can you upload fonts to Canva?” The answer is yes, but it’s a Pro feature.
With Canva Pro:
- Use the Magic Switch/Resize feature to quickly change orientation
- Resize multiple designs at once (up to 50 designs)
- Access more templates and elements that work well in landscape mode
With Free Canva:
- Create new designs with custom landscape dimensions
- Copy and paste elements between designs
- Use the available free templates and adjust them for landscape format
If you work with landscape designs often, Canva Pro’s resize feature can save you a lot of time. Consider the free trial to see if it helps you.
Saving and Exporting Landscape Designs
After creating your landscape design, you’ll want to save and export it properly:
- Save your design by clicking “File” then “Save” (Canva also saves automatically)
- To export, click “Share” then “Download“
- Choose the right file format:
- PNG or JPG for images. Before using images, always check if Canva images are copyright-free.
- PDF for documents. If you’re creating an interactive document, you’ll want to know how to add a clickable link in Canva PDF.
- MP4 for animations. You could even learn how to put a timer in Canva for animated posts.
- Click “Download“
For website headers or social media images, PNG is usually best.
For print materials like posters, PDF is better because it keeps the image quality when printed.
FAQ’s:
How To Change Portrait to Landscape In Canva?
To change a portrait (tall) design to landscape (wide) in Canva:
- Click the “Resize” button
- Enter new dimensions where the width is larger than the height (or swap your current dimensions)
- Click “Continue” then choose “Copy & resize” or “Resize this design“
- Adjust your elements to fit the new layout
How To Make A Document Horizontal In Canva?
Making a document horizontal (landscape) in Canva is the same as changing to landscape orientation:
- Click “Resize“
- Enter dimensions where the width is greater than the height
- Click “Continue“
- Choose whether to create a new copy or resize the current design
- Adjust your layout as needed
How Does Resizing Affect The Layout and Elements In My Design?
When you resize a design:
- Elements stay in the same relative positions
- Some elements might look too big or small in the new format
- Text might wrap differently
- You’ll need to check and adjust the positions of all elements
- Background images might be cropped or stretched
Always review your design after resizing to make sure everything looks right.
Can I Use The Resize Feature Without Canva Pro?
The built-in resize feature requires Canva Pro, Canva Teams, Canva for Education, or Canva for Nonprofits.
Without these, you can:
- Create a new design with landscape dimensions
- Copy and paste elements from your original design
- Adjust the layout
This takes more time but works with the free version of Canva.
Is There A Way To Save Custom Landscape Dimensions For Future Designs In Canva?
Yes! When you create a design with custom dimensions:
- Make your design
- Click “File” then “Save as template“
- Give your template a name
- Click “Save“
Now you can find this template with your saved dimensions whenever you start a new design.
Conclusion
Changing your designs to landscape in Canva opens up new possibilities for your projects.
Whether you’re making website banners, presentation slides, or social media graphics, landscape format can give your designs the space they need.
Remember that you can change to landscape format in Canva by using the Resize tool if you have Canva Pro, or by creating a new design with landscape dimensions if you’re using the free version.
After changing the orientation, take time to adjust your elements to make the best use of the landscape format.
With this guide, you now know how to landscape in Canva and how to make your landscape designs look great. Keep practicing, and soon changing orientations will be a simple part of your design process!
