
Indenting text in Canva is not as simple as pressing the Tab key. Unlike Microsoft Word or Google Docs, Canva does not have automatic indentation – so you need to know the right workarounds to get clean, professional-looking text in your designs.
In 2026, Canva gives you two main ways to work with indentation – manual methods for standard designs like presentations and social media graphics and built-in indent buttons for Canva Docs. Both approaches are easy once you know where to look.
In this guide, we will walk you through every method step by step – from first-line indents and hanging indents to block indentation and how to use rulers for precise alignment. No design experience needed.
Understanding Types of Indentation
Before diving into specific Canva techniques, let’s establish the different types of indentation you might need in your designs.
First-Line Indents
A first-line indent occurs when only the first line of a paragraph is indented while all subsequent lines remain aligned with the left margin. This indentation style is commonly used in books, articles, and formal documents to indicate the beginning of new paragraphs.
The standard first-line indent typically measures about 0.5 inches or 5 spaces from the left margin.
This style enhances readability by creating visual separation between paragraphs without requiring extra line spacing, making it particularly effective for body text in multi-paragraph documents.
Hanging Indents
A hanging indent (also called a negative indent) is the reverse of a first-line indent.
With this formatting style, the first line of text aligns with the left margin, while all subsequent lines are indented. Hanging indents are commonly used for bibliographies, references pages, and citation lists.
This indentation style makes it easier for readers to scan through lists of information by clearly highlighting the beginning of each entry.
Academic papers using APA or MLA formatting typically require hanging indents in their references sections, making this an essential skill for creating educational materials in Canva.
Block Indents
Block indentation occurs when an entire paragraph or section of text is uniformly indented from the left margin. This style creates visual separation between the indented text and surrounding content, often used for quotes, excerpts, or to establish a hierarchy of information.
In professional documents and presentations, block indents help organize information and direct the reader’s attention to specific content. They’re particularly effective when you want to emphasize certain sections without changing other text elements like font size or style.
How to Indent in Canva?
Creating indents in Canva requires different approaches depending on whether you’re working with standard Canva designs or Canva Docs.
Before you even start with text, you might need to set up your page orientation by learning how to landscape in Canva.
Unlike Microsoft Word or Google Docs, Canva doesn’t offer a tab key function for automatic indentation.
For standard Canva designs (presentations, social media graphics, etc.), you’ll be manipulating various elements manually.
For instance, when creating presentations, you might also need to learn how to put a timer in Canva to keep your talk on track. While we’re focusing on text, it’s also useful to know how to replace an image in Canva or even how to flip an image in Canva to complete your design.
For standard Canva designs, you’ll need to use manual methods:
- Add a text box to your canvas using the Text tab in the toolbar
- Enter your text content
- For first-line indents, place your cursor at the beginning of the paragraph and add spaces manually
- For block indents, either add spaces before each line or adjust the position of the entire text box
- For hanging indents, you’ll need to use multiple text boxes (more on this later)
Canva Docs offers more formatting options through dedicated indent buttons in the toolbar. These make basic indentation more straightforward but still have limitations compared to traditional word processors.
The key is understanding that Canva treats text primarily as a design element. This is why you can do cool things like how to curve text in Canva or even how to flip text in Canva, but also why basic formatting works differently. You can even further customize your designs by exploring if you can upload fonts to Canva for a unique look.
How To Do A Hanging Indent In Canva?
Creating properly formatted hanging indents requires specific techniques depending on which Canva format you’re using.
Indenting in Canva Designs (Not Docs)
When working with text in Canva presentations or other design projects, you’ll need to employ manual techniques for indentation.
First-Line Indent
To create a first-line indent in a Canva design:
- Add a text box to your canvas using the Text tab
- Type or paste your text into the box
- Ensure your text is left-aligned by clicking the alignment button in the toolbar
- Position your cursor at the beginning of the first line of your paragraph
- Press the space bar approximately five times (the equivalent of a standard tab indent)
- Repeat this process for each paragraph requiring a first-line indent
While not as precise as dedicated word processors, this method creates an effective visual indent for your paragraphs.
Block Indents
For block indentation in standard Canva designs:
- Add your text box to the canvas
- Select the entire text block
- Use the space bar to add spaces at the beginning of each line, or
- Adjust the position of the text box by moving it to the right on your canvas
The second method gives you greater flexibility, similar to how you can freely position other elements after learning how to cut out an image in Canva. This control is key to a polished design.
Hanging Indent
Creating hanging indents in Canva designs requires separating your text into multiple elements:
- Add a text box and enter your complete text
- Cut the text below the first line using Ctrl+X (Windows) or Command+X (Mac)
- Create a new text box and paste this text
- Format both text boxes identically (same font, size, spacing, etc.)
- Position the second text box directly below the first line
- Move the second text box to the right to create the hanging indent effect
- Use rulers or guides for precise alignment
While this requires more steps than in traditional word processors, it gives you complete control over the appearance and spacing of your hanging indent.
How To Indent Text In Canva Docs?
Canva Docs provides more text formatting options than standard Canva designs, making some indentation tasks easier. These features, along with modern ai graphic design tools, help users create cleaner and more professional-looking documents without advanced design skills.
Indent An Entire Paragraph
To create a block indent in Canva Docs:
- Select the paragraph you want to indent
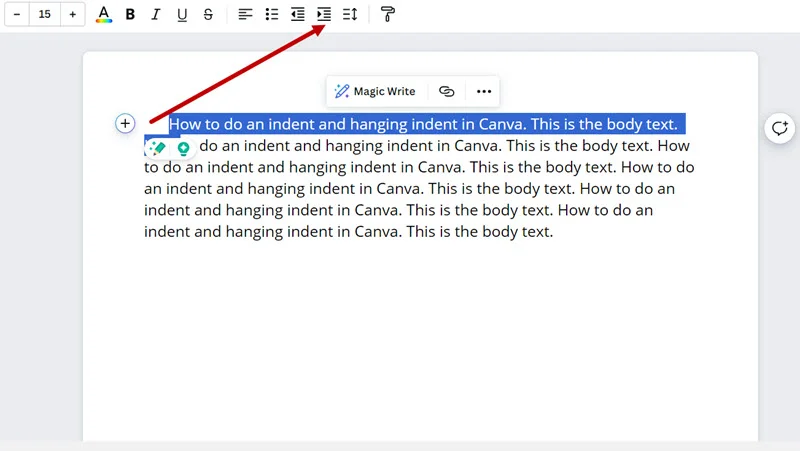
- Locate the “Increase Indent” button in the toolbar (it appears as an arrow pointing right)
- Click this button to move the entire paragraph to the right
- To reduce the indent, use the “Decrease Indent” button
This creates a uniform block indent for the selected text with consistent spacing.
Indent The First Line
For first-line indentation in Canva Docs:
- Place your cursor at the beginning of the paragraph
- Click the “Increase Indent” button in the toolbar
- Canva Docs will indent the first line by approximately 2em spaces
- For additional indentation, you may need to add manual spaces
Note that Canva Docs limits how much you can indent using the toolbar buttons.
While great for basic documents, you might also want to know how to add a clickable link in Canva PDF when you export your document.
For even more interactivity, you could add a QR code, but it’s important to know if Canva QR codes expire before adding them to print designs.
Advanced Indentation Techniques
Creating Hanging Indents Manually
For more precise control over hanging indents in Canva designs:
- Create a text box containing your entire text
- Duplicate this text box (Ctrl+D or Command+D)
- In the first text box, delete everything except the first line
- In the second text box, delete only the first line
- Align both text boxes so the first line appears directly above the rest
- Move the second text box to the right to create the hanging indent effect
- Group both text boxes (select both and click “Group” in the toolbar) to keep them together
This technique gives you precise control over the spacing and alignment of your hanging indent.
Using Rulers and Guides
For consistent indentation across multiple text elements:
- Enable rulers by going to File > Show rulers
- Add guides to your canvas by clicking on the ruler and dragging down or across
- Use these guides to align your indented text consistently
- For hanging indents, place a vertical guide where you want your indented text to begin
- Align all subsequent lines to this guide for visual consistency
Using rulers and guides ensures uniform indentation throughout your design. This is especially important for multi-page documents like presentations or when you want to learn how to create a lookbook in Canva, where consistency is key to a professional appearance.
Indent Limitations and Workarounds
Limitations often come up when using Canva for designs, especially with indentation.
Tab Key Limitations
Canva’s most significant limitation for text formatting is the absence of a tab key. Another common question is, “Does Canva have spell check?”.
While it does, its functionality differs from traditional word processors, reinforcing the need for manual proofreading.
Workarounds include:
- Using a consistent number of spaces (typically 5) for first-line indents
- Creating separate text boxes for complex indentation needs
- Utilizing Canva Docs’ indent buttons for basic indentation functions
These workarounds are especially useful when working with free graphic design tools like Canva’s basic version.
Solutions For Complex Formatting
When creating documents requiring complex indentation:
- Consider drafting your text with proper formatting in Google Docs or Microsoft Word first.
- For especially complex sections, you might create images of properly formatted text. Similarly, for visual effects you can’t achieve directly, knowing how to fade an image on Canva or how to slice in Canva can provide creative workarounds.
- For bibliographies or references, create one properly formatted entry, then duplicate and modify it. Mastering other text effects, like learning how to outline text in Canva or how to add a shadow in Canva, can also make your reference pages more visually distinct.
- These workflows are especially helpful when working with beginner-friendly graphic design tools, where manual adjustments are often needed to achieve precise formatting.
Tips For Professional Documents
For creating professional-looking documents with proper indentation:
- Maintain consistent indentation spacing throughout your document.
- When using multiple text boxes, match font, size, spacing, and alignment exactly.
- Group related text elements to prevent accidental misalignment. This is especially important in complex layouts where you might also be figuring out how to wrap text in Canva around images.
- Consider using Canva Docs for text-heavy projects. If you’re frequently creating professional documents, you might wonder, “Is Canva Pro worth it?”. The Pro version unlocks features that can streamline your workflow. Knowing how much Canva Pro costs and how to get Canva Pro for free can help you decide.
- Use alignment tools and guides to ensure precise positioning of text elements.
FAQ’s:
How Can I Create A First-Line Indent In Canva?
In standard Canva designs, add spaces at the beginning of the first line of your paragraph- approximately 5 spaces creates a standard first-line indent. In Canva Docs, select the first line and use the “Increase Indent” button in the toolbar to indent just that line.
Remember that Canva Docs limits how much you can indent the first line before it begins indenting the entire paragraph.
Can I Apply Different Indents To Different Paragraphs?
Yes! In Canva designs, you can customize indentation for each paragraph individually by adding different numbers of spaces or creating separate text boxes with different positioning.
In Canva Docs, select specific paragraphs and apply different levels of indentation using the toolbar options. This gives you flexibility to create varied formatting styles within a single document.
Is There A Way To Do A Hanging Indent In Canva?
Yes, though it requires a manual approach. The most effective method in standard Canva designs is to separate your text into two text boxes-one for the first line and another for subsequent lines. Position the first text box at the left margin and place the second text box with the remaining text indented to the right. In Canva Docs, you’ll need to use similar manual techniques as there’s no built-in hanging indent feature.
Can I Indent An Entire Paragraph In Canva?
Absolutely. In Canva designs, indent an entire paragraph by either adding spaces at the beginning of each line or positioning the entire text box with an offset from the margin.
In Canva Docs, simply select the paragraph and click the “Increase Indent” button in the toolbar. This creates a uniform block indent that can be useful for highlighting quotes or important sections of text.
Conclusion
While Canva doesn’t provide the same text formatting capabilities as traditional word processors, the techniques outlined in this guide give you the tools to create professional-looking indentation in all your projects.
Understanding the different indentation types and mastering the manual methods in Canva lets you create polished, readable documents.
Remember that Canva’s strength lies in its flexibility as a design tool.
A common concern for professionals is whether Canva images are copyright-free, and understanding the licensing is important.
With practice, you’ll create perfectly indented text that enhances your designs. Once you’ve mastered these skills, you can even learn how to sell Canva templates on Etsy. Many designers ask, “Can I sell Canva designs on Etsy?”, and the answer is yes—turning your design skills into a business.
Whether you need to format academic references with hanging indents, create professional documents with first-line paragraph indents, or emphasize quotes with block indentation, these methods will help you achieve consistent, professional results in all your Canva projects.
